Guide to Error 4001 in BackupBuddy
While using BackupBuddy, you may sometimes experience errors. These errors can frequently lead to headaches, so understanding what this error means will help you in your troubleshooting process. Each error has its specified number, so make sure to remember this number as it often indicates what exactly went wrong during the backup process.

Error #4001
On the Overview tab, you may see this error: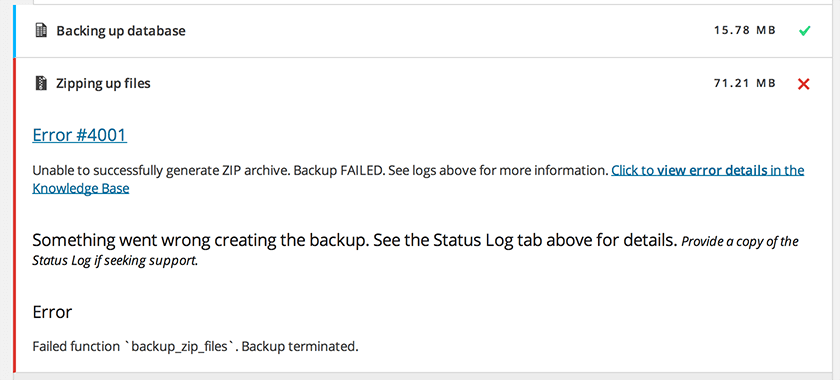 Error #4001 Unable to successfully generate ZIP archive. Backup FAILED. See logs above for more information. Click to view error details in the Knowledge Base
The Status Log tab may show this:
Error #4001: Unable to successfully generate ZIP archive. Backup FAILED. See logs above for more information.
The Status Log entries just prior to the final indication of the 4001 error will provide further detail of the site/server/hosting problem that has caused BackupBuddy to halt the backup because it’s either unsafe or impossible to continue with the rest of the process. For example, it might be unsafe because the web server cannot access a file or files requested to be added to the backup, or it might be impossible because the server is out of available disk space. The main thing to look for is the Zip process exit code: ##. Most Zip errors can be fixed within the ZIP settings. (Wp-Admin -> BackupBuddy -> Settings -> Advanced Settings / Troubleshooting -> Zip):
Error #4001 Unable to successfully generate ZIP archive. Backup FAILED. See logs above for more information. Click to view error details in the Knowledge Base
The Status Log tab may show this:
Error #4001: Unable to successfully generate ZIP archive. Backup FAILED. See logs above for more information.
The Status Log entries just prior to the final indication of the 4001 error will provide further detail of the site/server/hosting problem that has caused BackupBuddy to halt the backup because it’s either unsafe or impossible to continue with the rest of the process. For example, it might be unsafe because the web server cannot access a file or files requested to be added to the backup, or it might be impossible because the server is out of available disk space. The main thing to look for is the Zip process exit code: ##. Most Zip errors can be fixed within the ZIP settings. (Wp-Admin -> BackupBuddy -> Settings -> Advanced Settings / Troubleshooting -> Zip):
 NOTE: The 4001 error in BackupBuddy v5+ and the 3382 error in BackupBuddy pre-v5 are synonymous
Here are the most common types of exit codes generated during the 4001 error:
Exit codes 10, -10, -1, and 14: indicate a lack of disk space available on the server. You might consider freeing up some space on the site (try deleting old backups stored locally) and/or have your hosting provider increase the disk quota. Consider storing backups offsite using a remote destination such as Stash or on your local machine.
Exit code 4: “Zip process exit code: 4” is returned by your server, and it means that your problem is most likely due to the server’s ZIP utility being unable to allocate memory for one or more buffers during the start of the backup. You might need to refer to your hosting provider for assistance.
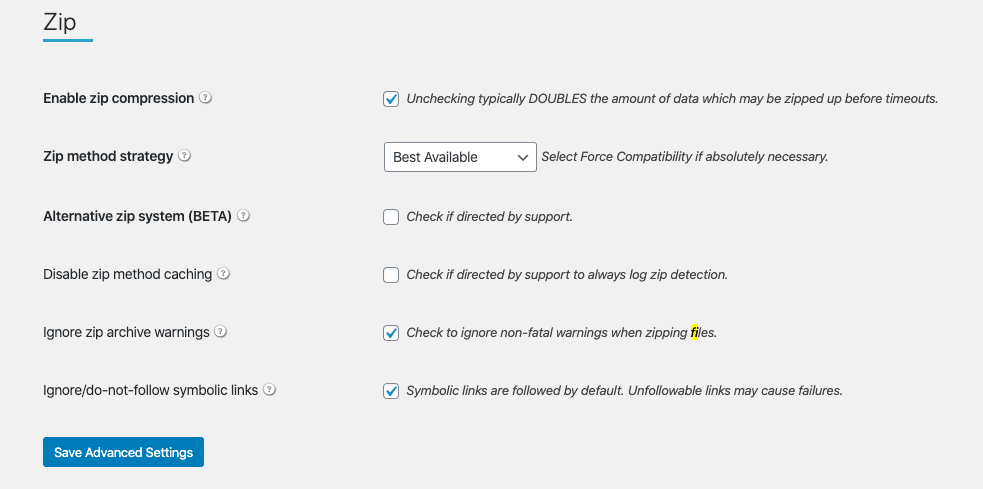
In the meantime, go to BackupBuddy -> Settings -> Zip -> Zip method strategy and change to “Force Compatibility” and see if that makes a difference, as it will more than likely use PclZip (PHP’s ZIP utility). Make sure to change it back to “Best Available” if that still doesn’t help alleviate the problem.
If adjusting the Zip method strategy didn’t help, you could try using the Alternative ZIP System with its default settings. To enable the Alternative ZIP System, navigate to BackupBuddy -> Settings -> Advanced Settings / Troubleshooting -> Zip and enable the Alternative Zip System.
If none of those settings worked, then you’ll need to refer to your hosting provider about the “zip process exit code of 4”.
Exit code 5: (Internal Logic Error) – The “Zip process exit code” of the integer 5 is returned directly by your server, and it means there is an internal logic error. The exit code 5 should never happen as it indicates a programming error of some sort on the server. In other words, it means something is broken on the server. It’s possible that it is being caused by a standard-issue such as lack of disk space, but it’s normally represented by a different exit code. You might try deleting some old backups and/or increase the disk quota.
Another possibility, which again would normally show up as a different exit code, is that the hosting provider has a fixed cap on maximum file size (of any file, not just this type of file). Perhaps your hosting provider limits the creation size of files to 64 MB as the error might appear right before it hits that mark.
The standard thing to do would be to try again and see whether you get the same behavior or different behavior that might indicate the above as being some transient server failure condition. But if it does persist, then you will need to refer to your hosting support as the issue is arising in the operation of the host provided command-line ZIP utility.
Exit code 9 and 127: indicate several different possible errors, but they all revolve around your hosting provider prematurely killing off the process. Here are different potential solutions:
NOTE: The 4001 error in BackupBuddy v5+ and the 3382 error in BackupBuddy pre-v5 are synonymous
Here are the most common types of exit codes generated during the 4001 error:
Exit codes 10, -10, -1, and 14: indicate a lack of disk space available on the server. You might consider freeing up some space on the site (try deleting old backups stored locally) and/or have your hosting provider increase the disk quota. Consider storing backups offsite using a remote destination such as Stash or on your local machine.
Exit code 4: “Zip process exit code: 4” is returned by your server, and it means that your problem is most likely due to the server’s ZIP utility being unable to allocate memory for one or more buffers during the start of the backup. You might need to refer to your hosting provider for assistance.
In the meantime, go to BackupBuddy -> Settings -> Zip -> Zip method strategy and change to “Force Compatibility” and see if that makes a difference, as it will more than likely use PclZip (PHP’s ZIP utility). Make sure to change it back to “Best Available” if that still doesn’t help alleviate the problem.
If adjusting the Zip method strategy didn’t help, you could try using the Alternative ZIP System with its default settings. To enable the Alternative ZIP System, navigate to BackupBuddy -> Settings -> Advanced Settings / Troubleshooting -> Zip and enable the Alternative Zip System.
If none of those settings worked, then you’ll need to refer to your hosting provider about the “zip process exit code of 4”.
Exit code 5: (Internal Logic Error) – The “Zip process exit code” of the integer 5 is returned directly by your server, and it means there is an internal logic error. The exit code 5 should never happen as it indicates a programming error of some sort on the server. In other words, it means something is broken on the server. It’s possible that it is being caused by a standard-issue such as lack of disk space, but it’s normally represented by a different exit code. You might try deleting some old backups and/or increase the disk quota.
Another possibility, which again would normally show up as a different exit code, is that the hosting provider has a fixed cap on maximum file size (of any file, not just this type of file). Perhaps your hosting provider limits the creation size of files to 64 MB as the error might appear right before it hits that mark.
The standard thing to do would be to try again and see whether you get the same behavior or different behavior that might indicate the above as being some transient server failure condition. But if it does persist, then you will need to refer to your hosting support as the issue is arising in the operation of the host provided command-line ZIP utility.
Exit code 9 and 127: indicate several different possible errors, but they all revolve around your hosting provider prematurely killing off the process. Here are different potential solutions:
- At the settings page, uncheck zip compression and see if this makes a difference. Zip compression can be disabled under BackupBuddy -> Settings -> Advanced Settings / Troubleshooting -> Zip -> Enable zip compression.
- At the settings page, change the Zip method strategy to “Force compatibility”, and see if that alleviates the problem. It’s best to try this with ZIP compression still disabled. If it works, try again with ZIP compression checked. The setting can be found under BackupBuddy -> Settings -> Advanced Settings / Troubleshooting -> Zip -> Zip method strategy
- Try temporarily adding additional exclusions in BackupBuddy’s Settings page to gauge what the limit might be. Start by going to BackupBuddy -> Server Tools -> Site Size Maps -> Display Directory Size Listing Then you can exclude them here: BackupBuddy -> Settings -> General Settings -> File & Directory Defaults -> Other things you might be able to exclude are any directories in the root of your install like a /stats/, /logs/, /errors/, /cache/, or anything else that is not part of a standard WordPress install.
- Also, it might help if you manually do the housekeeping that BackupBuddy does at intervals. Just go here: BackupBuddy -> Settings -> Other -> Housekeeping -> Cleanup old/temp data & perform housekeeping. Click that button and it will remove any temp files.
- Your host might be able to increase or remove whatever timeout constraint is kicking in.
- It could be related to the PHP max execution time, so increasing that may help as well.
- Finally, try enabling the “Alternative zip system” with it set to “Multi-Burst/Single-Step”. The setting is found under BackupBuddy -> Settings -> Advanced Settings/Troubleshooting -> Zip. Select Alternative Zip System Set Zip Build Strategy to “Multi-Burst/Single-Step” if not already. Leave the rest of its options at their defaults, save settings then try again.
Conclusion
As you can see, multiple factors can contribute to errors during the backup process. In this case, the 4001 error indicates the zip archive could not be created. Most of the time, this revolves around the server not being to handle the ZIP operation properly. Tweaking the Zip settings will frequently help address any problems that the backup may have during the zip process. Remember, the errors are there to help you with your troubleshooting.Get Release Notes for SolidWP products delivered right to your inbox.
Sign up
Join us for the next Solid Academy Webinar!
Free weekly webinars that will help you master WordPress and increase your business's bottom line.
What is a WordPress Phishing Attack?
Learn how to identify and prevent phishing attacks on WordPress websites.
Kiki SheldonWebsite Protection: 5 Ways to Keep Your Website Safe
Robust website protection is the shield that stands between your business and relentless cyber attacks. Prioritizing website protection enables businesses to fortify defenses to safeguard their online presence and preserve the trust of their customers in the face of ever-evolving cybersecurity threats.
Kiki Sheldon23 Ideas To Grow Your WordPress Business in 2023
WordPress is the most popular website-building platform worldwide, trusted by numerous brands. WordPress enables you to build a user-friendly and highly reliable site, together with tools and plugins to enhance your marketing and work like a lead magnet. All these features make WordPress the platform chosen by more than 43% of businesses globally.
SolidWP Editorial TeamSign up now — Get SolidWP updates and valuable content straight to your inbox
Sign up
Get started with confidence — risk free, guaranteed
