How to Migrate a WordPress Website with BackupBuddy
Migrating a WordPress website can be time-consuming, frustrating, costly and downright difficult. Depending on how you go about moving your site, the process could take over 24 hours! Since the creation of BackupBuddy, WordPress migration woes such as these has been a thing of the past. BackupBuddy handles all the critical and time-consuming processes for you when moving your WordPress site.

Why Migrate WordPress? Different Scenarios
Here are the most common reasons you may want to migrate (or move) a WordPress website:- You may want to move your WordPress website to a new domain or URL
- You may want to move your WordPress website to a new hosting company or a new server
- You may want to move a WordPress website from a WordPress staging environment to a live website
Preparing Your WordPress Site for Migration
Before creating the backup you want to use to migrate your website, it is important to migrate only what is necessary for your site to function. Here is a list of items to exclude from your backups when preparing to migrate your site. To exclude files and folders head over to the BackupBuddy settings page, scroll down the General tab till you see the setting File & Directory Defaults. Click the little red minus button when hovering the file or folder you wish to exclude within the file listing.What to Watch Out For
- Check the BackupBuddy site size maps tool. The site size maps are an amazing tool within BackupBuddy. This will show you a list of all your site’s directories in descending order from largest to smallest. It will also highlight already excluded directories in red. This allows you to see the directories/folders that are taking up the most space on your site. Then you can go take a look at those directories through FTP/SSH and see what is taking up all the space. To go to this nifty tool, start by going to the BackupBuddy Server Tools page. Once there, click on the Site size maps tab. Now that you are on the tab, click the Display directory size listing button. This will show you all your sites directories in order from largest to smallest. Also, if you are using different backup profiles, you can select which one you want to use in the dropdown. This will allow you to see what is taking up the most space within your current backup profile. This is the number one way to see what is taking up space on your site and what could be excluded.
- System files. This means files such as php.ini, nginx.conf, debug.log, error.log, etc. Any files that pertain to the server environment the site is currently on should be excluded. These may exist within the root/main directory of your WordPress site. Though, remember BackupBuddy only backs up from your root/main WordPress directory and down the file-tree, so only worry about system files that exist within those directories.
- Sites within subdirectories of your main site. Some sites have other sites within subdirectories of your main site. Remember how I said BackupBuddy backs up everything from your main WordPress root directory and down the file-tree? Well, that includes subsites if you have them in your main/root directory. So say you have your “test site” directory/folder in the same folder/directory as your wp-admin, wp-content, and wp-includes folder. Well, that will more than likely need to be excluded as you do not want to be backing up a whole other site! So make sure if you have extra sites within subdirectories of your main site, you go ahead and exclude those as explained previously in this article.
- Backups made by other plugins. While we do have some backup directories made by other plugins added to the exclusions list, you will need to add directories added by other backups plugins to your default exclusions list on the BackupBuddy settings page.
- Caching files. Caching files made by any plugin for any reason should always be excluded from a backup. You never want to restore old cached files as those could contain URLs to the site’s previous location or could be just plain out of date. BackupBuddy excludes wp-content/cache by default. If you have a plugin that uses cached files, please have them excluded on the BackupBuddy settings page.
- Files that are not necessary for the site to fully function. Some examples of this would be images or files that are not currently being linked to on your site. Since these files are not linked to by a file or a database reference, then it is okay to exclude them from the backup.
Not All Websites Are Created Equal
Exclusions will be different for each site because each site is different. There are an infinite amount of ways a site can be customized or configured. And who knows if those customizations or configurations will react the same after your site has been moved to a different server environment. While we try to exclude known files that cause issues, we cannot catch them all. So it is up to you to use your best judgment on what should be excluded on your site. Because the lighter and more free of bloat your backup is, the easier it will be to move it around and import it.Time to Migrate Your WordPress Site
When migrating your site, you will need two things: 1. A backup created by Backupbuddy and 2. importbuddy.php (our migration script included with BackupBuddy) After you have followed the advice above on what should be excluded from your backup for the migration of your site, now go create a backup! If you have not done this yet, start by heading over to the BackupBuddy Backup page and click the button Complete Backup.
 To grab the migration script ImportBuddy, head over to the Restore / Migrate page. Once on the page, click the Download Importbuddy.php link. This will prompt you to set a password for this specific importbuddy.php file. Leave the field blank if you want to use the ImportBuddy password you set up during the quick setup wizard or the password you have currently saved in the BackupBuddy settings.
 Now that you have both your BackupBuddy backup and importbuddy.php downloaded to your local computer, it’s time to upload both to the location where you want your site to be restored. Make sure the location of where you are uploading the files does not have any other WordPress files within that same directory/folder. The only files that should be there are files related to your hosting. Your directory/folder should look similar to the image above.
ImportBuddy to the Rescue
 Now that ImportBuddy and your BackupBuddy backup is in the location where you want your newly migrated site to exist, it’s time to start the migration.
Start by navigating to the ImportBuddy script through the URL bar in your browser. If you placed importbuddy.php and your backup in the public_html directory, you would enter example.com/importbuddy.php. If you placed both the backup and importbuddy.php in a directory named “test” that was under your public_html directory, you would then enter example.com/test/importbuddy.php.
Once you navigate to the ImportBuddy script, you will be greeted with the password screen.
Now that ImportBuddy and your BackupBuddy backup is in the location where you want your newly migrated site to exist, it’s time to start the migration.
Start by navigating to the ImportBuddy script through the URL bar in your browser. If you placed importbuddy.php and your backup in the public_html directory, you would enter example.com/importbuddy.php. If you placed both the backup and importbuddy.php in a directory named “test” that was under your public_html directory, you would then enter example.com/test/importbuddy.php.
Once you navigate to the ImportBuddy script, you will be greeted with the password screen.
 After you enter your password, you will now be on Step 1 of the import process. You will notice two buttons in the top left-hand corner of the importbuddy frame, Upload a Backup and Restore from Stash / Stash Live.
You can always just upload importbuddy.php and then use the upload button to upload the backup through importbuddy (although it is usually much faster when uploading through FTP/Cpanel). If you use Stash or Stash Live, you can directly download the backup from your stash account that you wish to restore using the Restore from Stash / Stash Live button. To continue with the migration, now click the Restore Backup button.
After you enter your password, you will now be on Step 1 of the import process. You will notice two buttons in the top left-hand corner of the importbuddy frame, Upload a Backup and Restore from Stash / Stash Live.
You can always just upload importbuddy.php and then use the upload button to upload the backup through importbuddy (although it is usually much faster when uploading through FTP/Cpanel). If you use Stash or Stash Live, you can directly download the backup from your stash account that you wish to restore using the Restore from Stash / Stash Live button. To continue with the migration, now click the Restore Backup button.
 After you have clicked the Restore Backup button, ImportBuddy will find the best available zip method and use it to unzip your backup .zip file. After your backup has been unzipped, you will now be on Step 3 of the ImportBuddy process. This is where you enter your database information that will be tied to your newly migrated site.
If you have not already created a new database at your site’s new location, then go ahead and do it now. If you are using a pre-existing database them make sure you use a unique database table prefix. After you have your database info entered in click the Next Step button. If your database info is incorrect then ImportBuddy will not let you proceed. ImportBuddy will now import your database tables into your database.
After you have clicked the Restore Backup button, ImportBuddy will find the best available zip method and use it to unzip your backup .zip file. After your backup has been unzipped, you will now be on Step 3 of the ImportBuddy process. This is where you enter your database information that will be tied to your newly migrated site.
If you have not already created a new database at your site’s new location, then go ahead and do it now. If you are using a pre-existing database them make sure you use a unique database table prefix. After you have your database info entered in click the Next Step button. If your database info is incorrect then ImportBuddy will not let you proceed. ImportBuddy will now import your database tables into your database.
 Now that your database tables are imported, they need to be migrated now. Step 4 asks for the new URL of your site. ImportBuddy will take the URL and replace all the old URLs from the site’s previous location. Importbuddy will also change the paths/location from your sites previous location to your site’s new location. Enter in the URL of your new site and then click the Next Step button.
 After the migration of your URLs and paths, Step 5 will be complete and your site will be fully migrated!
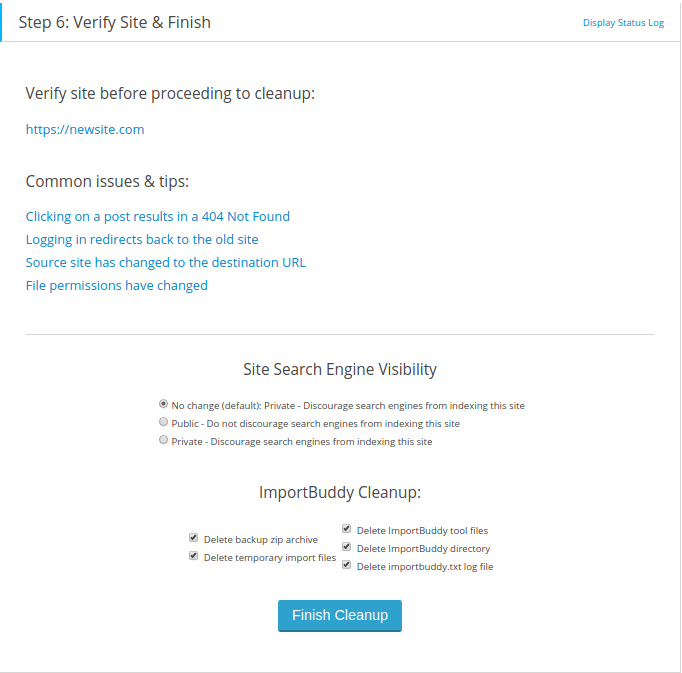
Now you will see Step 6 where you can view your site to make sure the migration went as expected. Then there are other options such as setting your search engine visibility if you are making a staging/dev site of your live site. Also, you have the option to change what is removed upon cleanup.
After you click the Finish Cleanup button, this will remove each of the items that are selected. This will make sure all temporary files, importbuddy, and your backup .zip file are removed completely. If you run into any issues during the migration process our top-notch support team will be there to help every step of the way. Happy Migrating Everyone!
After the migration of your URLs and paths, Step 5 will be complete and your site will be fully migrated!
Now you will see Step 6 where you can view your site to make sure the migration went as expected. Then there are other options such as setting your search engine visibility if you are making a staging/dev site of your live site. Also, you have the option to change what is removed upon cleanup.
After you click the Finish Cleanup button, this will remove each of the items that are selected. This will make sure all temporary files, importbuddy, and your backup .zip file are removed completely. If you run into any issues during the migration process our top-notch support team will be there to help every step of the way. Happy Migrating Everyone!
Get BackupBuddy Today
Get BackupBuddy, the 3-in-1 WordPress backup plugin that also works as a WordPress migration plugin. BackupBuddy makes it easy to migrate WordPress to a new host or domain in just a few clicks.Get BackupBuddy now
Get Release Notes for SolidWP products delivered right to your inbox.
Sign up
Join us for the next Solid Academy Webinar!
Free weekly webinars that will help you master WordPress and increase your business's bottom line.
What is a WordPress Phishing Attack?
Learn how to identify and prevent phishing attacks on WordPress websites.
Kiki SheldonWebsite Protection: 5 Ways to Keep Your Website Safe
Robust website protection is the shield that stands between your business and relentless cyber attacks. Prioritizing website protection enables businesses to fortify defenses to safeguard their online presence and preserve the trust of their customers in the face of ever-evolving cybersecurity threats.
Kiki Sheldon23 Ideas To Grow Your WordPress Business in 2023
WordPress is the most popular website-building platform worldwide, trusted by numerous brands. WordPress enables you to build a user-friendly and highly reliable site, together with tools and plugins to enhance your marketing and work like a lead magnet. All these features make WordPress the platform chosen by more than 43% of businesses globally.
SolidWP Editorial TeamSign up now — Get SolidWP updates and valuable content straight to your inbox
Sign up
Get started with confidence — risk free, guaranteed
