Install WordPress: The Essential Guide
Wondering how to properly install WordPress? You just landed on the right article. In this guide, we'll dive into how the WordPress install process works, plus all of the different ways that WordPress can be installed on a server or even on your computer for development purposes. In this guide When it comes to installing WordPress, there are several different ways to install the popular website publishing software and content management system (CMS).

Wondering how to properly install WordPress? You just landed on the right article. In this guide, we’ll dive into how the WordPress install process works, plus all of the different ways that WordPress can be installed on a server or even on your computer for development purposes.
When it comes to installing WordPress, there are several different ways to install the popular website publishing software and content management system (CMS).
But before we jump in, it’s important to remember that WordPress isn’t a standard desktop software application such as Microsoft Excel. It won’t work to its full potential when it’s only running on your personal computer.
Rather, you’ll need to install WordPress on a web server for it to power your live website to the world. That being said, there is a simple way to install the platform directly onto your computer if you’re looking to do your website design and testing in a local environment. More on that in a bit.
We’ll also show you the other methods of WordPress installation that will allow you to start building your new website immediately.
Why Install WordPress?
The best reason to install WordPress is because the installation process is so quick and easy. In fact, WordPress boasts a famous 5 minute installation.
Beyond how fast WordPress is to install, WordPress is also an incredibly popular content management system (CMS) for websites because it’s simple to use (even for beginners) and meets the grueling demands of nearly any kind of website, large or small, including:
- eCommerce sites
- Blogs
- News magazines
- Restaurants
- Forums
- Small businesses
- Corporate sites
- Government sites
- Stand-alone social media sites
- Membership sites
- Almost any other site you can think of
If you’re brand new to creating websites with WordPress, the installation process might have you feeling a bit intimidated. But don’t worry, we’ll unpack everything you need to know in this guide.
Get SolidWP tips direct in your inbox
Sign up
Get started with confidence — risk free, guaranteed
Do I Need To Install WordPress?
Yes. If you want to have a WordPress website, you’ll need to get a web hosting account and install WordPress there.
Conversely, if you’d like to create, test and develop a WordPress site on your local workstation that only you can see, WordPress will need to be installed locally on your computer.
Another option to use WordPress for building your site does not involve downloading the software. We covered this in more detail in our article about WordPress.com vs. WordPress.org. Check that article out if you haven’t already. All of the answers about WordPress.com are there.
For the purposes of this guide, we’re going to focus only on using WordPress core software.
Before You Begin: 5 Things To Do Prior To A WordPress Installation
Before you begin the process of installation, you’ll first need to take care of a few easy tasks. Following these five steps will speed up the process and get everything ready to go.
- 1. Buy a domain name
- 2. Purchase a web hosting plan (gain access to a web server)
- 3. Get a code/text editor
- 4. Get an FTP/sFTP client application to edit files on your web server)
- 5. Download WordPress
Let’s unpack each of these steps to do before you install WordPress.
1. Buy a Domain Name
To get your website up and running, you’ll need a domain name. You can purchase a domain name either from a domain registrar or from your hosting company when you purchase a web hosting plan (see the next step).
Not sure which domain name to buy? You’ll need to give this purchase some thought as it will be the “address” of your website. Check out tips for how to find a good domain name.
2. Purchase a Web Hosting Plan (Gain Access To a Web Server)
To have a WordPress website, you need a domain name and a web server or web host. The next thing to do before your WordPress install is to get access to a web server. This usually means you need to buy a web hosting plan from a reputable WordPress hosting company.
You’ll find a wide range of web hosting companies to choose from, but there are a few things to keep in mind. Cost shouldn’t be your only consideration. A web hosting company needs to have a solid reputation, specialize in WordPress websites, provide knowledgeable support, and have important server security measures in place.
What is a Web Server?
A web server comprises both the hardware and software that is used to “serve,” or host, various websites. Web servers process, store and deliver the website pages you create to the people who are searching the Internet for your content.
Apache is one of the most-used options for the software that powers web servers. While it certainly is possible to create your WordPress site on your own server using the Apache software, it’s much more common for WordPress users to purchase hosting accounts that already run on web servers, such Liquidweb, Nexcess or iThemes WordPress hosting (remember, the best websites don’t run on $4/month hosting accounts).
When you’re choosing a hosting provider, make sure they meet the specific requirements of WordPress before you run an installation.
The WordPress requirements include:
- Support for HTTPS
- MySQL v. 5.6 or higher OR MariaDB v. 10.0 or higher
- PHP v. 7.2 or higher (otherwise, you may see a WordPress PHP Update Required error message.
After you’ve verified this information and chosen your hosting provider, it’s time to move on to step two.
3. Get a Code/Text Editor
Make sure you have access to a text or code editor program, such as Coda, TextWrangler (now BBEdit) or even Notepad. A text editor will allow you to open, view and edit your WordPress files in plain text without any added formatting. This is what you’ll use to edit the code of your WordPress files.
Don’t worry if you’re a little intimidated about editing code. We’ll walk through exactly what you need to do, or you can use another of the WordPress install methods we’ll cover in this article.
4. Get an FTP/sFTP Client Application to Edit Files on Your Server
FTP stands for file transfer protocol. sFTP stands for secure file transfer protocol. Both represent the method used to download, upload and manage WordPress files on a web server.
To install WordPress manually, you’ll need to get an application that can log in and access your web server’s files, also known as an FTP/sFTP client. Some programs are free, such as FileZilla.
Once you have downloaded your FTP/sFTP application, you’ll need to connect to your web server using the login credentials provided by your web host when you purchased your plan.
5. Download WordPress
Lastly, you’ll need to download WordPress. The WordPress download will include all of the WordPress core files required for a WordPress website to operate.
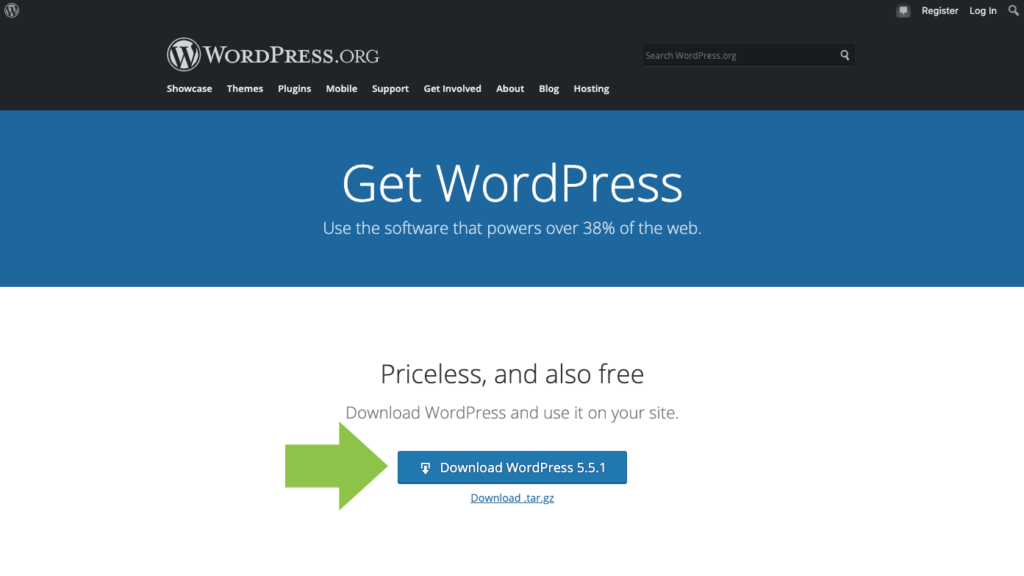
Now you’re ready to begin the WordPress installation process.
5 Ways to Install WordPress
To begin breaking down how the WordPress install process works, first understand that there are five different ways to perform a WordPress installation.
- Purchase a web hosting plan with an automatic WordPress installation.
- Use the file manager in your web hosting control panel (usually cPanel) to install WordPress.
- Use a one-click WordPress installation application like Softaculous, available from your web host.
- Perform a manual WordPress installation.
- Install WordPress locally, directly onto your computer.
Each of these options has pros and cons you’ll need to consider.
For example, the simplest option of installing WordPress is to find a web host that gives you an automatic installation of WordPress such as a one-click WordPress install. But one-click WordPress installations have a few security issues you’ll want to avoid.
The manual method of installing WordPress is a bit more difficult and may seem more intimidating to the average user, but this method of installing WordPress is more secure.
The final decision of how to install WordPress is ultimately up to you.
How to Install WordPress: 5 Different Methods Explained
In the next section, we’ll go through each of these in detail so that you’re able to decide the best way of installing WordPress for your project.
Then, after WordPress has been successfully installed, you can get to work building your website, true to your online vision.
1. Automatic WordPress Installation with Your Web Host
There’s a good number of WordPress hosting providers that will offer you an automatic WordPress installation. Automatic WordPress installation is obviously the easiest method of installing WordPress that you can choose because all you need is a domain name and the rest is covered for you. This is also an especially good option for new users who don’t have a web development background.
If you don’t know whether your host offers automatic installations, just check on their website. Every company that offers it will have it listed somewhere on their site.
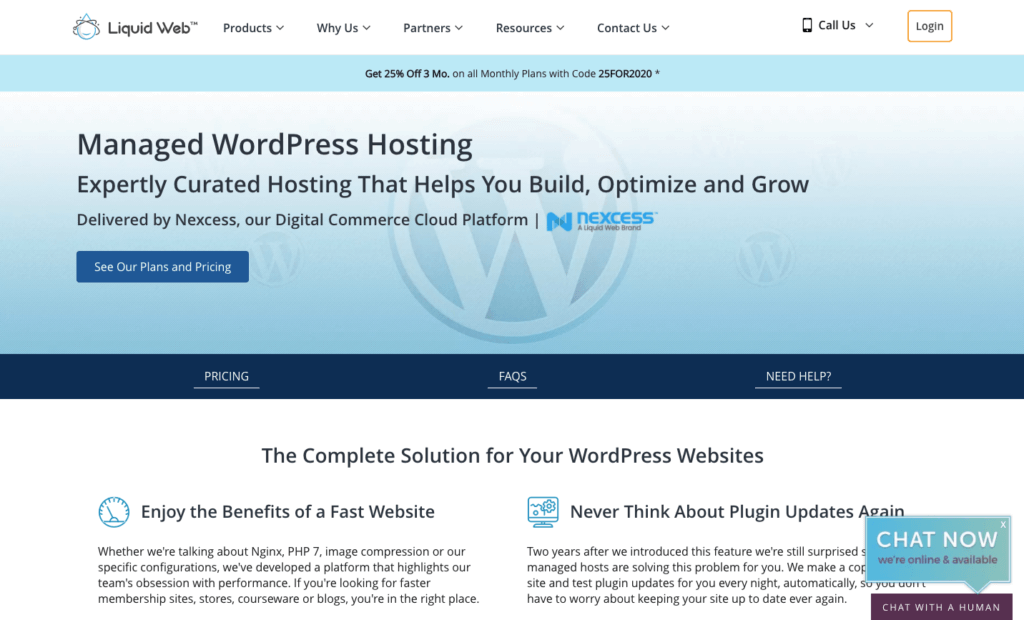
For example, Liquid Web offers an excellent Managed WordPress solution. This type of hosting offers the complete solution for WordPress websites, including “done for you” WordPress installation.
2. Install WordPress via Web Hosting Control Panel File Manager (cPanel WordPress Install)
For those more experienced or looking for a hands-on way to get WordPress up and running, consider doing the installation through your web hosting control panel (usually called cPanel). This option is the perfect way for more experienced developers to tailor how their installation process proceeds.
What is cPanel?
If you’re not sure what is meant by cPanel, cPanel is the dashboard you will likely use to log in to your hosting control panel. Your hosting provider usually sends you your login credentials immediately after you purchase your hosting plan.
Once you log in to cPanel, you’ll see a File Manager icon. This is where you will upload the WordPress core files. From here, the process is exactly the same as the install WordPress manually instructions, so jump ahead to #4.
3. “One-Click” WordPress Installation (WordPress Auto-Installers)
Most web hosts offer “auto-installer” applications to help you quickly install the website CMS of your choice onto your server. WordPress has several “one-click” WordPress installation options.
After you’ve logged into the dashboard, or cPanel, with your host-assigned credentials, you’ll see a section called “auto-installers.” This may also be called “Softaculous Apps Installer.”
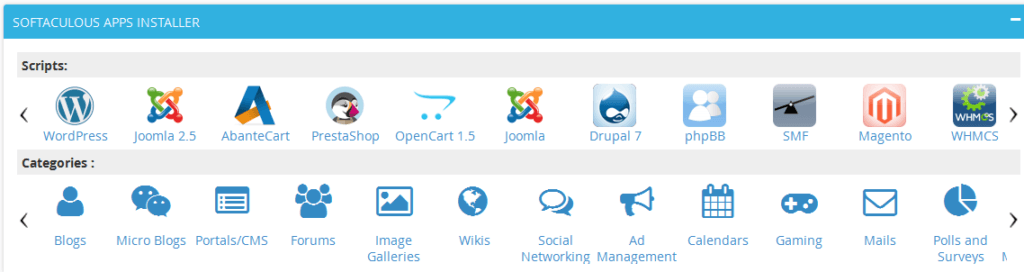
Go under that section and click on the WordPress icon. At this point, you’ll be redirected to a new page. Here, you click on “Install Now.” Once that’s clicked, you’ll be asked to provide the domain where the WordPress install will be applied.
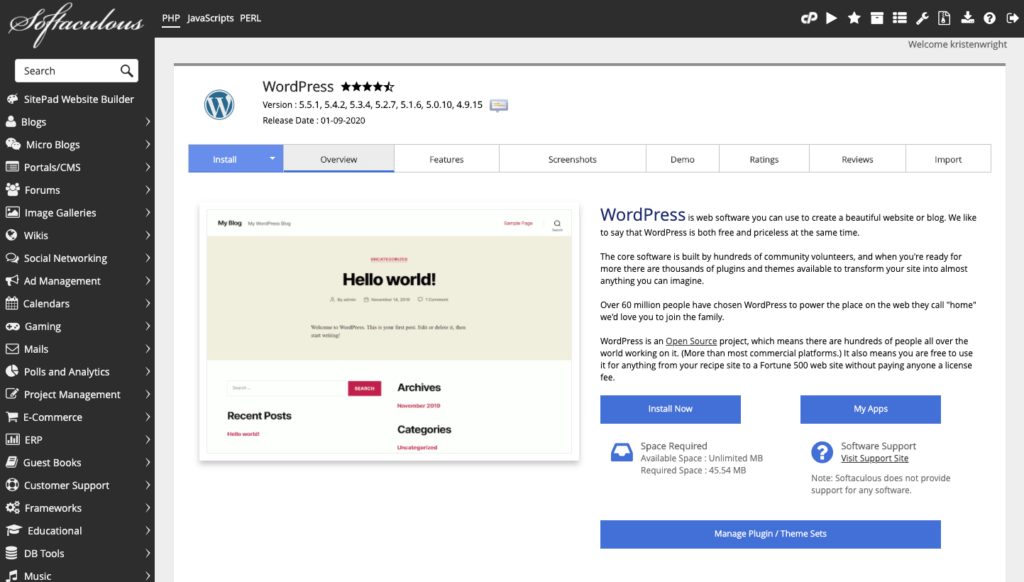
Note that this page should look very similar no matter what auto-installer or host cPanel you’re using.
Under “Protocol,” you’ll notice that the default is set to http. Unless you already have an SSL certificate installed on your site, it’s highly recommended that you keep it at http. If you do have an SSL certificate installed, go ahead and change it to https.
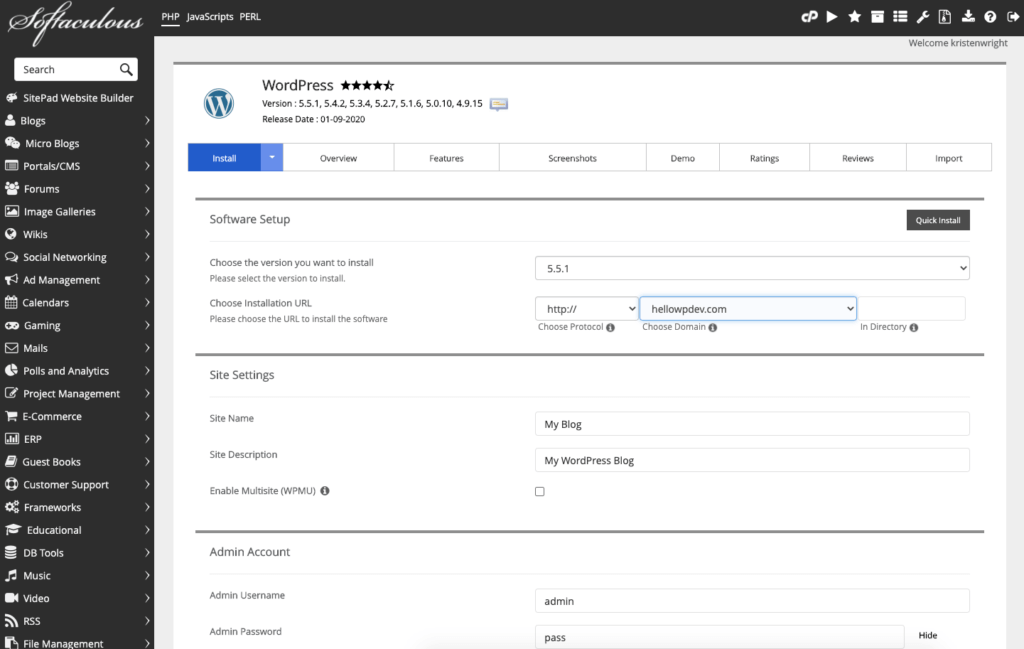
After this, you’re asked if you wish to enter a Directory. In the majority of cases, leave this blank. Doing so will ensure that WordPress gets installed on your main domain.
In other words, by leaving it blank, your WordPress installation will go to http://newsite.com. If you choose to enter a directory, WordPress will only be installed on a portion of your site, such as http://newsite.com/articles.
You can see how that may be useful in certain applications. But the odds are that you want WordPress installed on your entire domain.
When you go under “Site Settings”, you’ll be able to enter your website’s name and description. Of course you can always go back later if you ever want to change them or make updates.
Beyond that, you’ll need to complete the information on your admin page.
Simply enter an admin username, password, email and anything else that required by the auto-installer you’re using. Make sure you record the username and password. You’ll need them to login to the WordPress dashboard after the installation completes.
After that’s done, all you need to do is click the magic “Install” button.
Once it completes, you’ll be able to access your WordPress admin dashboard by navigating to http://newsite/com/wp-admin. Make sure to use the login information that you just set up a moment ago (see, you needed it quicker than you thought!).
You can edit your admin details here if you need to.
4. Install WordPress Manually
With the amount of web host providers that automatically give WordPress installs to you, coupled with the easy auto-installers you have available within your host cPanel, you may wonder why you should do a manual install of WordPress.
- Learning to manually install WordPress is an important skill in creating the foundation for a secure and efficient WordPress installation.
- While a manual install may take a bit longer, it helps to correct the security and “bloat” issues associated with using the quick-install applications provided by most hosting providers.
1. The first thing you’ll want to do is get an FTP program. Again, FileZilla is one of the best (and free!) options out there.
2. Download WordPress. Save the WordPress zip file to your computer.
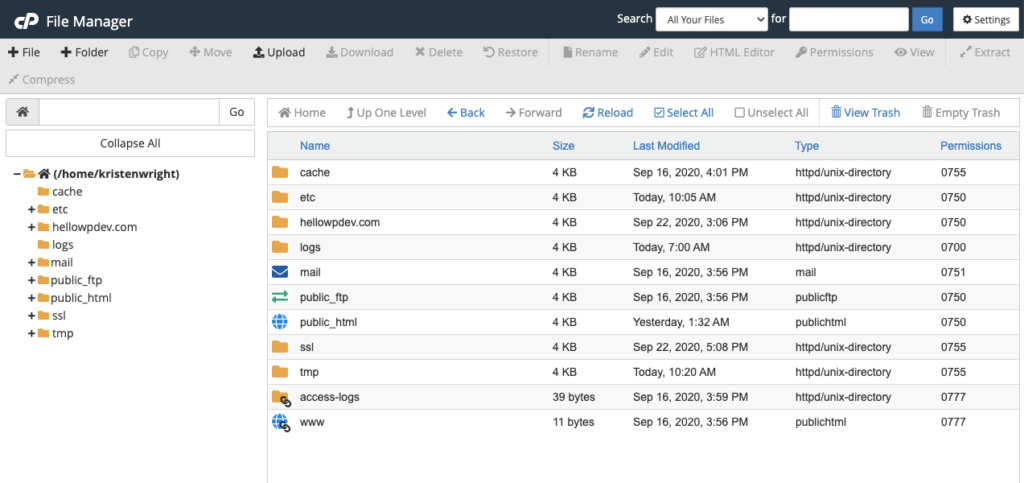
3. Find your downloaded copy of the WordPress software and use FileZilla to upload it into your public directory, which will look as such: public_html.
3. After the WordPress download completes, it’s time to set up a WordPress database for your new website.
- Name
- Username
- Password
- Database Host
- Table Prefix
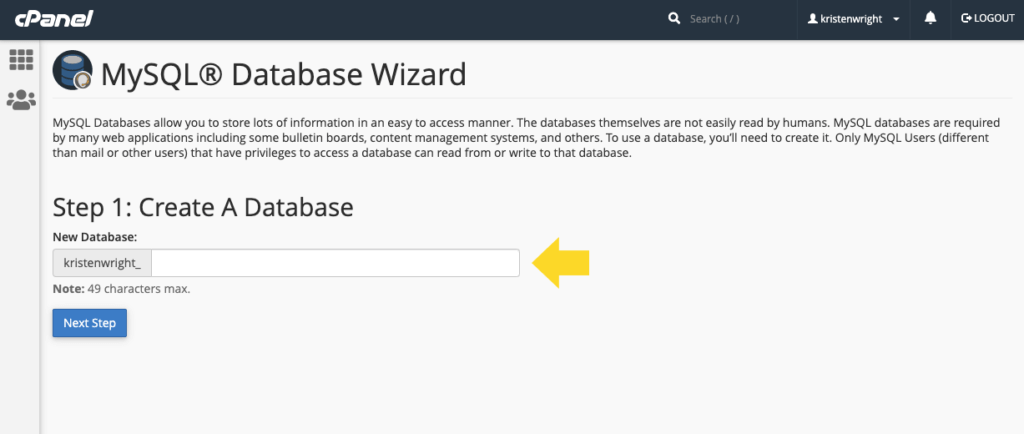
To create a new database, go into your host’s cPanel and look for the button that says “MySQL Database Wizard.” Depending on the host you use, the MySQL button can be found in a number of different locations. Poke around a little bit and you’ll find it.
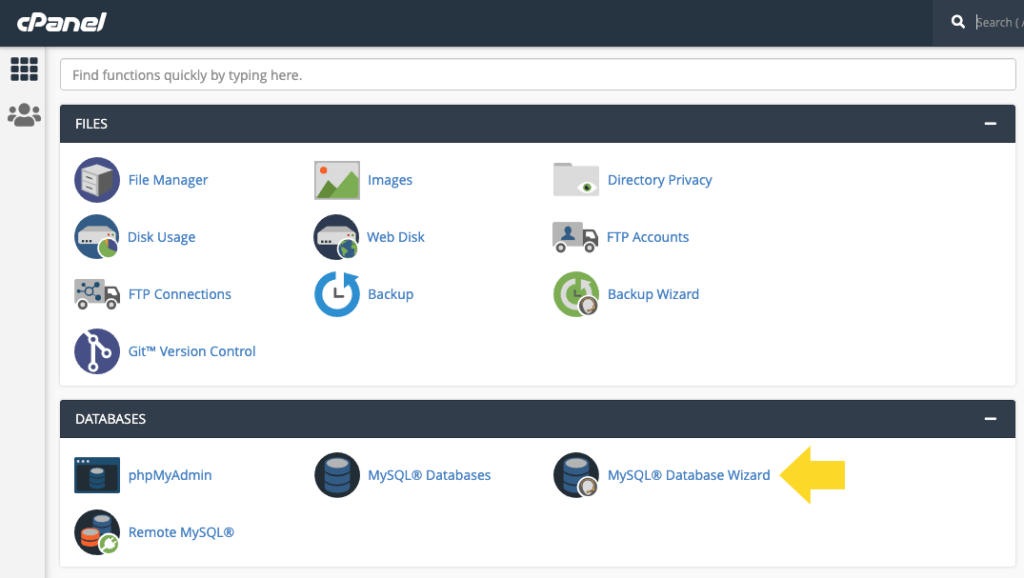
4. After you click on it, you’ll be prompted to enter the name of your database. Once that’s done, click on “Create Database.”
5. With your database now created, it will ask you to create a user for the MySQL account. Simply complete the information, including a new password, and create the new user.
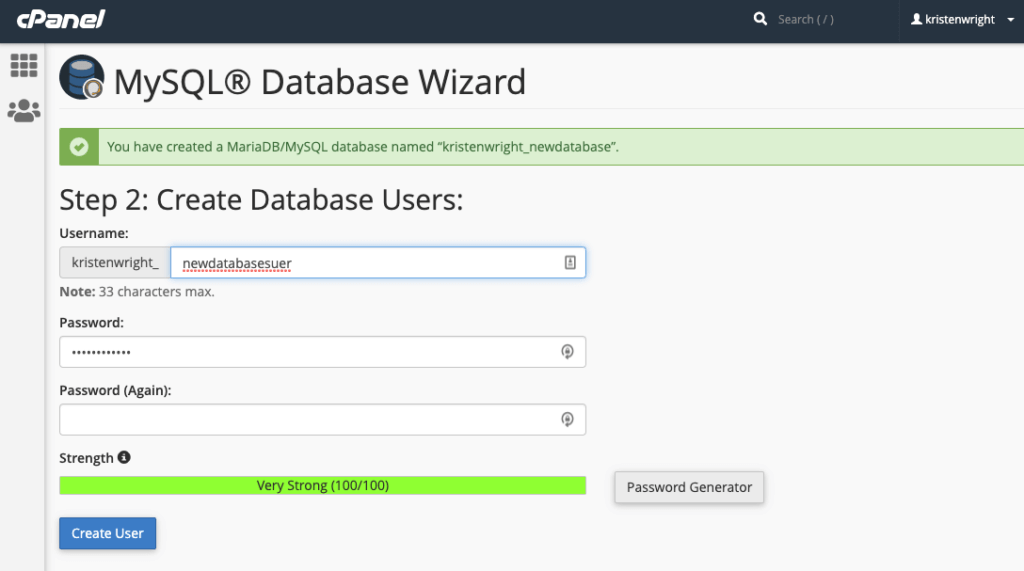
If the new user account is for someone other than yourself, make sure that you give the new user access to the database by giving them their login information.
On the next page, it’ll ask you about the privileges you wish to give to the new user. For an admin account, it’s always best to check all of these boxes.
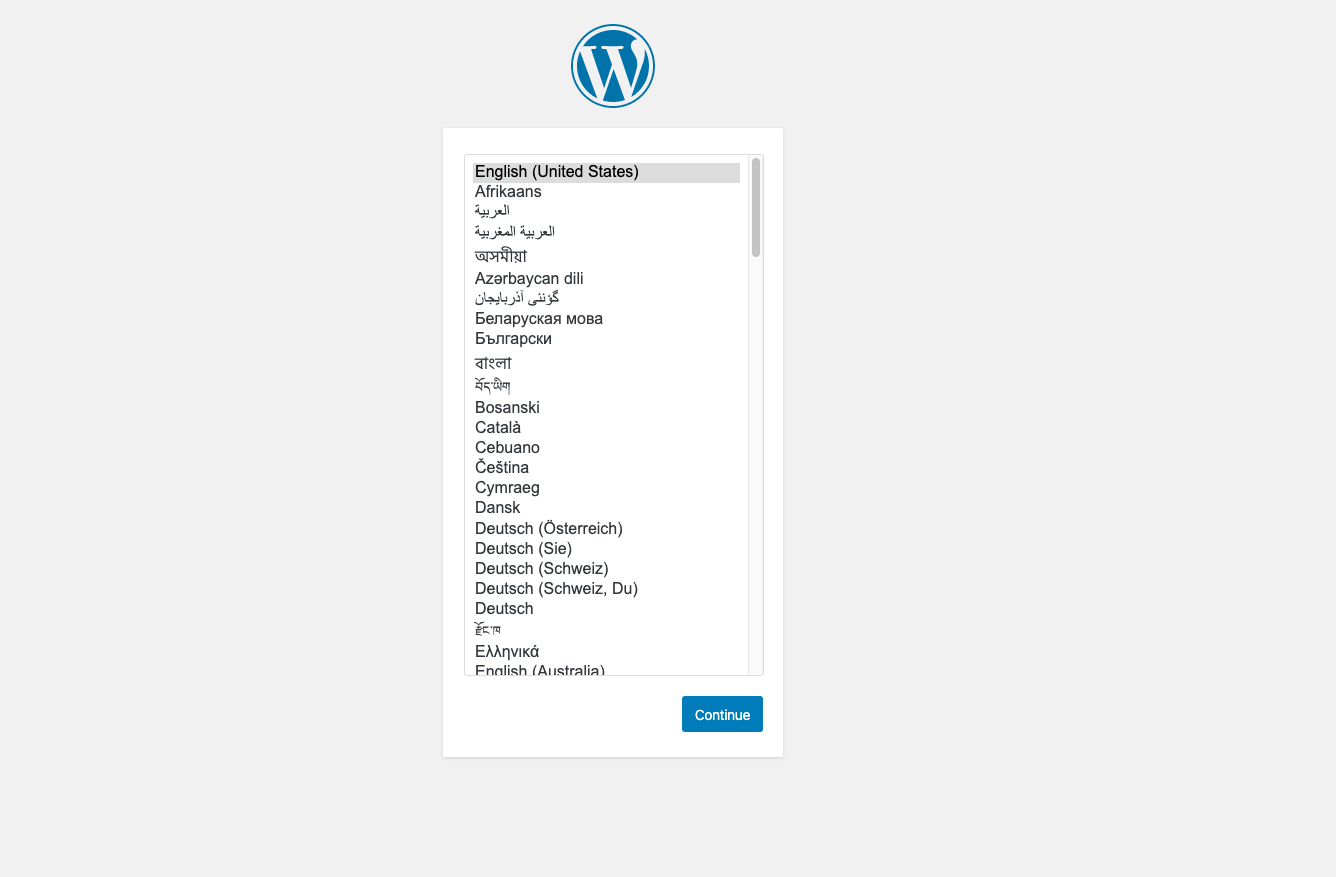
6. With your FTP transfer successful, you should now be able to navigate to your domain for installation completion. Type in your
If the transfer has in fact succeeded, the first thing you’ll see is WordPress prompting you to choose what language your website will be displayed in. Choose the desired language and continue.
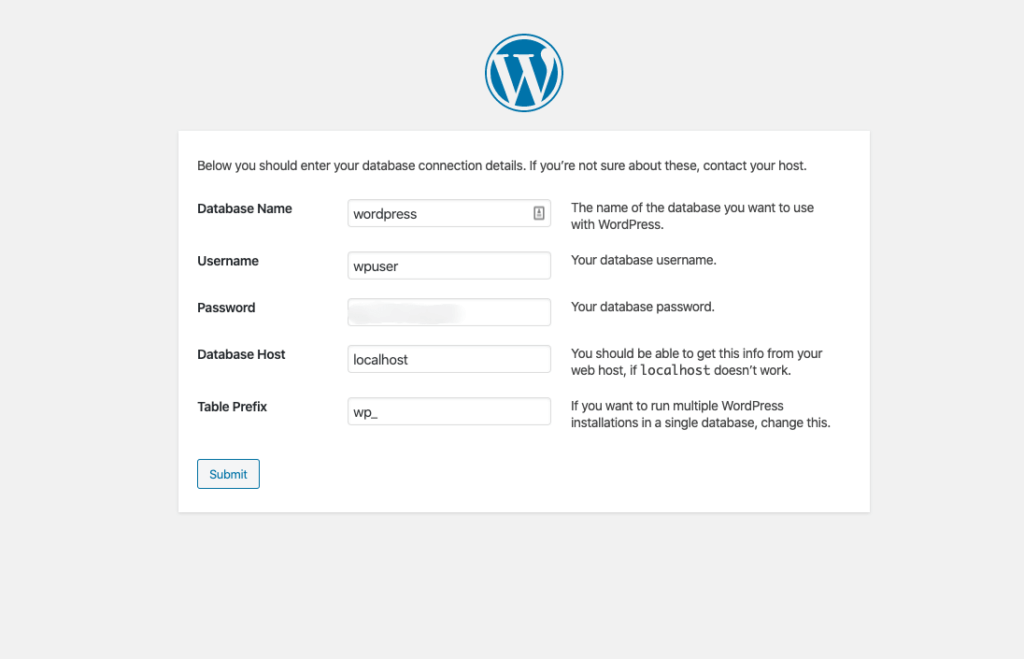
7. After this, you will be notified that WordPress needs database information in order to properly install WordPress. You’re now asked to input your database information, including the:
- Name
- Username
- Password
- Database Host
- Table Prefix
After you’re done with that, go ahead and click on the submit button.
Then, click “Run the Install,” and you’ll be prompted to enter your admin information for WordPress. This will be the site title, username, password and email that you entered previously.
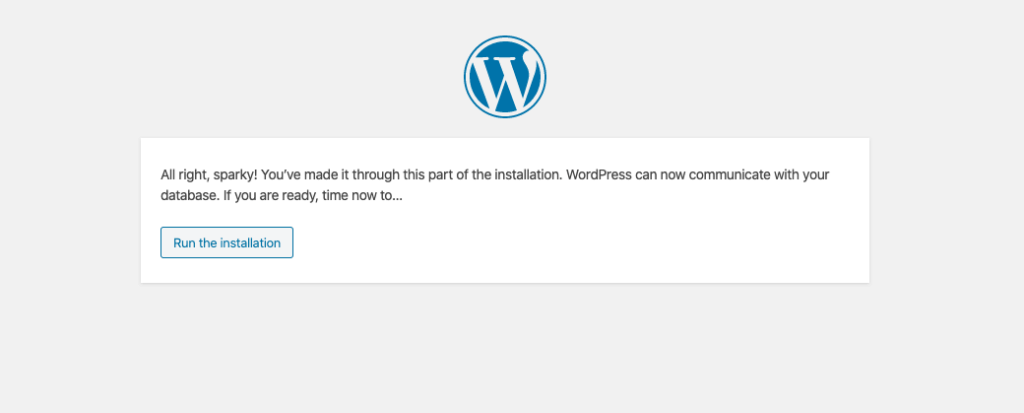
8. You will receive a welcoming page along with the information needed about the site. This includes the site title, admin username and password, email, and search engine visibility.
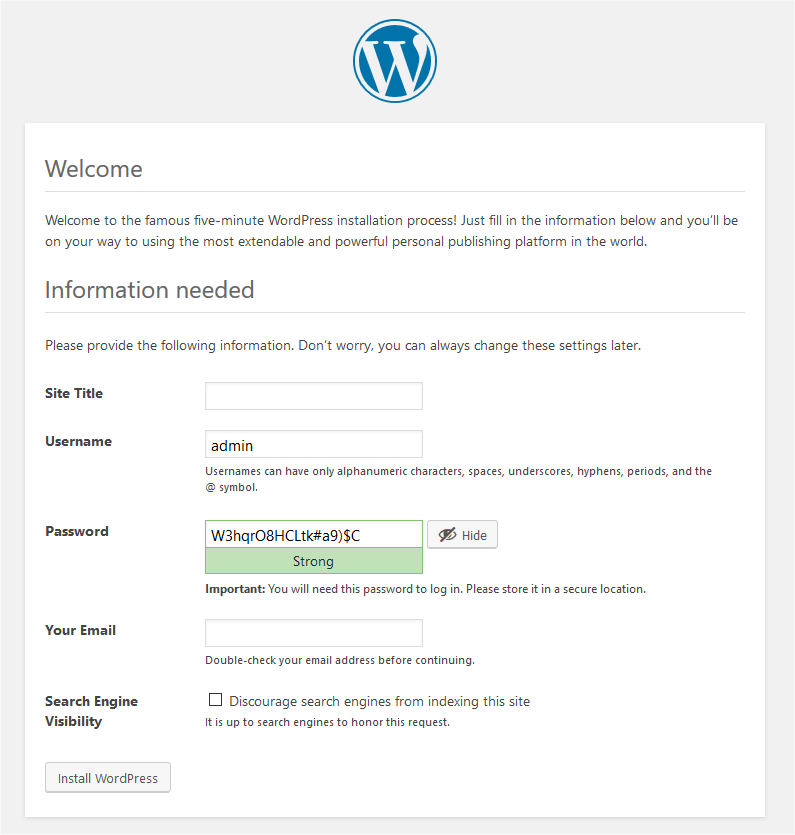
- For the site title, we will enter “My WordPress Site”, but any title will work.
- The username will be your desired username, and we will use the WordPress generated password for password.
- Enter your email address for your email.
- Lastly, if you wish to attract users, then leave search engine visibility unchecked so your site will be indexed. (You may want to turn this setting off as you build your site. Just don’t forget to turn it back on.)
9. Now, click Install WordPress. Your manual installation of WordPress is now complete. Congratulations!
5. Install WordPress Locally
Your fifth installation option is to put WordPress directly on your local workstation with a localhost server app.
If you’re not familiar with the term localhost in computer networking, it’s a lot like saying “this computer.” Localhost is the default name that is utilized to establish a direct connection with your computer using the loopback address network.
The default IP address of the loopback address is 127.0.0.1, which is used by developers to test different programs on their local workstations without the information being sent out to other Internet users.
Installing WordPress locally is a useful way to do a WordPress installation if you’re looking to test applications that aren’t yet ready for the rest of the world to see. Installing WordPress locally gives you an “offline” version of your website that doesn’t require the internet to work.
Local WordPress installations aren’t that common, but you might be interested in doing so for reasons that make sense to you. Who are we to stop you? Rather, we’ll show you exactly how to do it.
Just keep in mind that, although you’ll be able to build a website that fully functions in every way, the only eyeballs that will be able to see it will be the ones that look at your computer monitor.
How to Install WordPress Locally on Windows
By following these steps, you’ll end up with a working local application of WordPress on your Windows-powered machine.
- Visit Apache Friends, then download and install XAMPP on your local workstation.
- Run the file after the download (it’s a big file so it could take a while to download) and launch the installer for XAMPP.
- Click through any prompts that come up.
- Choose the components that you’re installing. When installing XAMPP and WordPress, you don’t need all of them. Beyond the required components, just choose MySQL and phpMyAdmin.
- Leave the install folder set at default.
- On the following screen, uncheck the box that asks you to install Bitnami for XAMPP. You don’t need it for this application.
- Click next and you’re ready to install.
- Once the install is complete, go ahead and launch the control panel.
- Apache and MySQL are needed for a proper install of XAMPP and WordPress. You’ll be able to launch both of these from the control panel of XAMPP.
- After launching them, you’ll notice that the status turn green.
- Test to see if your local server works by going into a browser and navigating to http://localhost/. If it was done correctly, you’ll have a functioning XAMPP server on your PC. Now you need to get a WordPress site running on XAMPP.
- Navigate to C://xampp (or something similar) to access the folder where you installed your application of XAMPP. In the folder, locate the htdocs subfolder.
- Within that subfolder, make a new folder for your test website. The name you give the folder will be the sub-name you use to access your website (http://localhost/myfoldername).
- Extract the downloaded zip file for WordPress into that subfolder.
- Log into you control panel for XAMPP and launch phpMyAdmin.
- At the top, click on databases to create your WordPress database.
- Enter a name and click on create.
- Access your site (http://localhost/myfoldername) where you should now see the WordPress installer.
- When the database details are requested, use the name of database you made in phpMyAdmin for the Database Name. For Username, use the word root. Leave the password blank.
- Complete the remainder of the WordPress install.
You’re done and should now see your install running on your local host.
How to Install WordPress Locally on Mac
Mac users can also do local WordPress installations. A few of the steps differ from a Windows install.
- Download MAMP.
- When the download completes, start the installation wizard. Note that you don’t need to install the Pro version. Use the free version simply by clicking on the grey folder.
- After installation, go to the MAMP controller to start your server.
- Launch phpMyAdmin by clicking Open WebStart.
- Unzip your downloaded file for WordPress and put the folder within the document root folder in MAMP.
- Re-name this folder to the name of your test WordPress site.
- Create your WordPress database by using phpMyAdmin in the control panel for MAMP.
- Add a name for your database, then add the database credentials to your wp-config.php file.
- Run the installation of your WordPress application by heading to the link http://localhost/myfoldername.
The remaining steps are identical to a Windows WordPress install.
How to Locally Install on Linux
To install locally on Linux, you’ll want to use XAMPP and follow the same steps detailed for how to install WordPress on Windows install above. Although there can be very minor differences to the process, you should be able to navigate your way through them without much trouble.
How to Install on Ubuntu
To install WordPress locally on Ubuntu, you’ll need to be working on a computer running Ubuntu Server 16.04 LTS while also running an Apache2 server.
To perform the WordPress install, use following command:
sudo apt update
sudo apt install wordpress php libapache2-mod-php mysql-server php-mysql
If you’ve yet to install MySQL, you’ll be asked for a password for the root MySQL user. Feel free to leave the field empty.
Next, you need to create the Apache site for your installation. You can create /etc/apache2/sites-available/wordpress.conf by using these lines to configure Apache for WordPress.
Enable the site using:
sudo a2ensite wordpress
Enable URL rewriting with:
sudo a2enmod rewrite
Reload Apache2 with:
sudo service apache2 reload
Next, we need to create the MySQL database by using this code to configure the database.
To configure your WordPress application to use the database, open /etc/wordpress/config-localhost.php and write the lines on the bottom of this page: https://ubuntu.com/tutorials/install-and-configure-wordpress#4-configure-database
Then, enable your MySQL using:
sudo service mysql start
And you’re almost done.
To configure WordPress, head to your browser and put in http://localhost/yoursitename. You’ll be asked for a site title, username, password and email.
You’ll now be able to login to your WordPress dashboard at http://localhost/yoursitename/wp-login.php and start creating your local site.
Install WordPress and Now You’re Ready To Get To Work
No matter which method you choose to install WordPress, now is when the real work begins: getting your new site designed, published, and out to the world.
But before you go any further, make sure to get your project started right by downloading and installing the best WordPress backup plugin and WordPress security plugin to secure and protect your website.
Get SolidWP tips direct in your inbox
Sign up
Get started with confidence — risk free, guaranteed
Web security has never been more important than it is today. Your site needs robust tools that will keep data secure and your site fully backed up at all times in case you ever need it restored.
Enjoy your new WordPress install! Here’s to your future online success.
Join us for the next Solid Academy Webinar!
Free weekly webinars that will help you master WordPress and increase your business's bottom line.
What is a WordPress Phishing Attack?
Learn how to identify and prevent phishing attacks on WordPress websites.
Kiki SheldonWebsite Protection: 5 Ways to Keep Your Website Safe
Robust website protection is the shield that stands between your business and relentless cyber attacks. Prioritizing website protection enables businesses to fortify defenses to safeguard their online presence and preserve the trust of their customers in the face of ever-evolving cybersecurity threats.
Kiki Sheldon23 Ideas To Grow Your WordPress Business in 2023
WordPress is the most popular website-building platform worldwide, trusted by numerous brands. WordPress enables you to build a user-friendly and highly reliable site, together with tools and plugins to enhance your marketing and work like a lead magnet. All these features make WordPress the platform chosen by more than 43% of businesses globally.
SolidWP Editorial TeamSign up now — Get SolidWP updates and valuable content straight to your inbox
Sign up
Get started with confidence — risk free, guaranteed
