Enhance Site Security: Expert .htaccess Guide
The .htaccess file is a powerful website file that controls high-level configuration of your website. On servers that run Apache (a web server software), the .htaccess file allows you to make changes to your website's configuration without having to edit server configuration files.

In this guide to the .htacess file, we answer what the .htaccess file is, how to use the .htaccess file and how to locate it on your server, and more.
What Is the .htaccess File?
The .htaccess file is a powerful website file that controls the high-level configuration of your website. On servers that run Apache (a web server software), the .htaccess file allows you to make changes to your website’s configuration without having to edit server configuration files.
Why Is .htaccess Access Important?
The importance of .htaccess lies in its ability to provide server-level configurations without requiring direct access to the main server configuration files. This makes it a powerful tool for website management and optimization.
- Flexibility: It allows you to make server configuration changes without accessing core server files, which is especially useful in shared hosting environments.
- Site-specific control: You can apply rules to specific directories, giving you granular control over different parts of your website.
- SEO optimization: Through URL rewrites and redirects, .htaccess helps maintain SEO value when restructuring your site.
- Security enhancements: It enables you to implement various security measures like password protection and preventing hotlinking.
- Performance tweaks: You can use .htaccess to enable caching, compress files, and implement other performance-enhancing techniques.
- Custom error handling: It allows you to create and display custom error pages, improving user experience.
- No server restarts: Unlike changes to main server configuration files, .htaccess modifications take effect immediately without requiring a server restart.
In short, .htaccess provides a high level of control and functionality without requiring advanced server administration skills.
Locating the .htaccess File
The location of your .htaccess file determines which directory and subdirectories its rules will affect. However, locating the .htaccess file can sometimes be tricky, especially for beginners, because it’s often hidden by default for security reasons.
In this section, we’ll explore where the .htaccess file is typically located and how you can access it, even if it’s not immediately visible in your file manager or FTP client.
Where is the .htaccess file located?
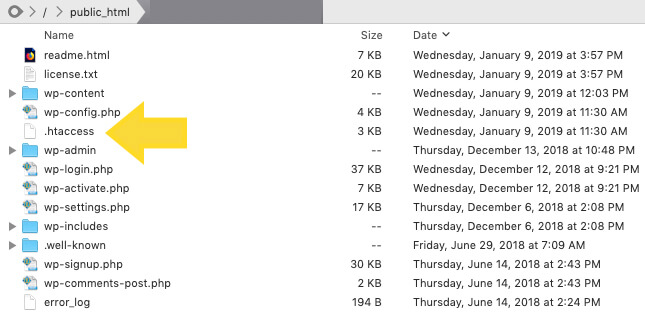
The .htaccess file is typically located in the root directory of your website, which is often referred to as the “public_html” folder.
This root directory might also be named “www” or “httpdocs”, depending on your hosting provider. It’s important to note that Apache, the software that powers many web servers, is configured to hide all files named .htaccess by default. This is a security measure to protect the important configuration information contained in these files.
While the main .htaccess file resides in the root directory, it’s possible to have additional .htaccess files in subdirectories. These subdirectory .htaccess files will apply rules specifically to those directories and their subdirectories. However, the files in a higher-level directory will take precedence over those in lower-level directories.
Remember, the file should be named exactly “.htaccess” with no file extension. Some systems might automatically add a .txt extension, which you’ll need to remove for the file to function properly.
If you’re having trouble seeing your .htaccess file, don’t worry. It’s likely there but hidden, and in the next section, we’ll cover how to access these hidden files.
How to access hidden files
Apache (the software that powers your web server) is configured so that all files named .htaccess are hidden. Why? The files have important configuration information and can be used to compromise your server.Although the file is hidden, the .htaccess file location is most commonly found in your website’s public_html folder.
You can access your .htaccess file in a few different ways:
- From your hosting account’s file management (such as via cPanel)
- From an sFTP or FTP client
Tip: If you don’t see your .htaccess file in your public_html folder, you may have to check “Show Hidden Files.”
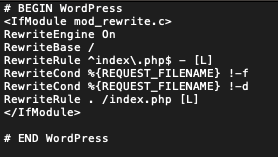
Once you open the .htaccess file, it should look something like this:
Prerequisites of .htaccess
Before diving into .htaccess file manipulation, it’s crucial to ensure you have the right setup and permissions. This section covers what you need to get started, how to set up your server, and how to enable .htaccess in Apache.
What you need before you start
Working with .htaccess files requires some basic tools and knowledge. While it’s not overly complicated, having the right resources at your disposal will make the process much smoother.
Here’s what you’ll need to get started:
- Access to your web server
- A text editor
- Basic understanding of HTML and server configurations
- Backup of your website
Having these elements in place will ensure you’re well-prepared to make changes to your .htaccess file safely and effectively.
Setting up your server
Proper server configuration is essential for .htaccess to function correctly. While many hosting providers handle most of this setup for you, it’s important to understand what’s required. Here’s what you need to check on your server:
- Ensure you’re using an Apache web server
- Check if mod_rewrite is enabled
- Verify PHP version
- Confirm you have the necessary permissions
How to enable .htaccess in Apache
If .htaccess isn’t already enabled on your server, you’ll need to activate it. This process involves modifying your Apache configuration to allow .htaccess files to override server settings. Here’s how to do it:
- Locate your Apache configuration file
- Find the <Directory> section for your website
- Ensure the AllowOverride directive is set to All
- If you made changes, save the file and restart Apache
- Create a test .htaccess file in your website’s root directory to confirm it’s working
It’s always good to check with your hosting provider if you’re unsure about any of these prerequisites or if you encounter any issues while trying to use .htaccess files.
Creating and Editing the .htaccess File
While your website might already have an .htaccess file, there may be instances when you need to create a new one from scratch.
How to Create a .htaccess File
Creating a new .htaccess file is a straightforward process, but it requires attention to detail. Here’s how to do it:
- Open a plain text editor on your local computer.
- Create a new, blank file.
- Save the file with the exact name “.htaccess” (including the dot, without any file extension).
- If your system hides file extensions, make sure to enclose the filename in quotes when saving to ensure it’s not saved as “.htaccess.txt”.
- Add your desired Apache directives to the file.
- Save the file.
- Upload the file to your website’s root directory (or the specific directory where you want the rules to apply) using FTP or your hosting control panel’s file manager.
- Set the correct file permissions (typically 644).
- Test your website to ensure the new .htaccess file hasn’t caused any errors.
Remember, even an empty .htaccess file can affect your server’s behavior, so always create and upload these files with caution.
How to Edit Your .htaccess File
Once you have an .htaccess file in place, you may need to edit it to add, modify, or remove rules. Here’s how to safely edit your .htaccess file:
- Download the existing .htaccess file from your server using FTP or your host’s file manager.
- Open the file in a plain text editor. Avoid using word processors as they may add unwanted formatting.
- Make your desired changes. Be careful not to modify or delete existing rules unless you’re sure about what you’re doing.
- Save the file, ensuring you maintain the “.htaccess” filename without any extension.
- Upload the edited file back to your server, replacing the old version.
- Test your website immediately after uploading to ensure your changes haven’t caused any errors.
Important: Always create a backup of your original .htaccess file before making any changes. This allows you to quickly revert if something goes wrong.
If you encounter any server errors after editing your .htaccess file, immediately revert to your backup copy. Even a small syntax error can cause your entire website to become inaccessible.
Remember, the .htaccess file is powerful but sensitive. Each line of code can significantly impact your website’s functionality, so edit with caution and test thoroughly after each change.
Note: Do not delete the existing .htaccess file unless it is empty or you are absolutely sure it is okay to delete it.
Common Uses of the .htaccess File
There are several use cases for the .htaccess file. The most common examples include:
- Add redirections for certain URLs
- Load custom error pages, like 404 pages
- Force your site to use HTTPS instead of HTTP
- Password-protect certain directories on your server
- Prevent hotlinking
Using .htaccess files is a powerful tool for managing your server, but it can be tricky. Make sure you are familiar with making changes to your server before you start editing .htaccess files.
Note: Before trying any of the things described in this guide, we strongly recommend you make a backup of the .htaccess file and your entire WordPress website (such as with a WordPress backup plugin like BackupBuddy). If you are not comfortable making changes to your .htaccess file, you may need to contact a website developer.
1. URL Redirects
If you decide to change domain names or change the organization of your site, you can set up URL redirects to make sure your website visitors aren’t confused. An easy way to do this is with .htaccess files.
To edit your .htaccess file, you will need to re-create the file yourself and upload it to the server using SFTP.
- Log into your server via SFTP.
- Locate and download your .htaccess file. It will usually be located in your content folder. If you don’t have a .htaccess file, you can create a file called .htaccess on your computer to hold your configurations.
- Open the file via your favorite text editor
- Add this line to your file to enable basic rewriting:
RewriteEngine on
- Copy and paste your new configurations into the .htaccess file and save the file.
- Upload this back to the directory you originally took your .htaccess file from.
- Test your work by going to your website and viewing the pages you wanted to redirect.
You can also use the .htaccess file to redirect individual pages on your website using 301 and 302 redirects.
2. Custom Error Pages with .htaccess
A 404 page is a page with an error message that displays in the place of pages that don’t actually exist on a website. A 404 page usually reads “Page Not Found” but you can also find examples of funny 404 pages that have been customized to give website visitors a better experience.

Before you customize your error pages, you’ll need to create them. You can do this by hand coding your page, using a site builder, or another method. Once you’ve built your error page, save the file so it can be uploaded to your server.
To set up custom error pages, you will edit your website’s .htaccess file:
- Before editing your .htaccess file, upload your customized error pages to your server. You can do this via SFTP. Put these files in the content directory for your website.
- Log into your server via SFTP using the FTP program of your choice.
- Download the .htaccess file that corresponds to the domain where you want to use custom error pages.
- Open this file in a text editor and add this information: ErrorDocument 400 /errors/400.html
- Replace /errors/400.html with the file path to an error page you have uploaded. This example has “400,” for a 400 error.
- Add as many lines as needed, changing the error number and the file path as needed. (ErrorDocument 500, ErrorDocument 404, ETC…)
- When you’re done adding to your .htaccess file, save and exit the file. Then upload it back to the directory you got it from.
- Finally, test your website to make sure your error pages are functioning.
3. Forcing HTTPS with .htaccess
If you want to make sure every website visitor is using a secure (SSL) connection, you can use .htaccess rules to redirect insecure traffic. This will redirect http://mysite.com to https://mysite.com.
Of course, this will only work if you have an SSL installed for your domain. To that end, all iThemes Hosting accounts do come with a free Let’s Encrypt SSL.
To redirect every website visitor to a secure connection, add this rule to the .htaccess file for the website you’d like the redirect:
RewriteEngine On
RewriteCond %{HTTPS} !=on
RewriteRule ^/?(.*) https://mysite.com/$1 [R=301,L]
You will need to replace mysite.com with the actual domain of your site.
4. Password Protecting Directories with .htaccess
During the development, testing, and creation of your website, you may want to password protect your site until it’s ready for public viewing. You may also have specific pages or web directories you’d like to lock down to specific users.
The .htaccess file is a powerful tool to help you accomplish this within the iThemes Hosting framework. Next, we’ll walk through creating a password to protect your website, directories, and other components of your site:
- 1. First, you will need access to the Document Root for the site. This is where you will house the .htaccess file and also the .htpasswd file in order to password protect your site. The file path will look something like this:
/eed292b5.ithemeshosting.com/web/content/
It will be found in the SFTP information section with the title of “Path” on your iThemes Hosting page in Sync. Make sure you are using the FTP Information path and not the UNIX Path. - 2. The .htpasswd file should be placed one directory up from the site root and kept separate from the .htaccess file.
Note: Placing the .htpasswd file above the content/ folder is safer since it is not directly accessible via a web browser. - 3. You will need to generate the syntax for the .htaccess and the .htpasswd files. You can use any site you’d like but for the purpose of this article, I am using http://tools.dynamicdrive.com.
- 4. Once you follow the steps to create the files, you will need to place the syntax on your server. If you already have a .htaccess file on your site, you can append the file and add the additional syntax.
- 5. Upload the .htpasswd file to the location you determined in step 2.
- 6. Check the permissions of the files to make sure the users you want to have permissions will be able to access them.

5. Preventing Hotlinking
Hotlinking occurs when a website displays images or other content hosted on another site without permission. While it might seem convenient to link directly to images on other servers, this practice can lead to several issues:
- Increased bandwidth usage for the original host
- Potential copyright infringement
- Loss of control over content distribution
For website owners whose content is being hotlinked, this can result in higher server costs and decreased performance. Fortunately, .htaccess provides a simple solution to prevent hotlinking.
By implementing hotlink protection through your .htaccess file, you can:
- Ensure your server resources are used only for your own site
- Protect your content from unauthorized use
- Potentially reduce bandwidth costs
Here’s how to enable hotlink protection using .htaccess:
- 1. First, you will need to sign into your site via SFTP
- 2. You will now need to download the .htaccess file from your /web/content folder
- 3. Once you’ve got the .htaccess file on your computer you will want to add the following lines to that file:
RewriteEngine on
RewriteCond %{HTTP_REFERER} !^$
RewriteCond %{HTTP_REFERER} !^http://(www\.)mydomain.com/.*$[NC]
RewriteRule \.
- 4. Make sure that you alter mydomain.com to match your domain. Also, please be sure that you do not modify any other code within the .htaccess file.
- 5. Once you’ve added the above lines, you will then want to upload the .htaccess file back to your /web/content directory
- 6. Once uploaded, disconnect from SFTP and check your site to make sure that there are no errors.
Advanced .htaccess Configurations
While .htaccess is powerful for basic server configurations, it also offers advanced features for more complex requirements. This section explores three advanced .htaccess configurations: Mod_Rewrite Rules, MIME Types, and Server-Side Includes (SSI).
Mod_Rewrite Rules
Mod_Rewrite is a powerful Apache module that allows for flexible URL manipulation. It’s commonly used for creating clean, SEO-friendly URLs, implementing complex redirects, and modifying how your site’s URLs appear to users and search engines.
URL Rewrites: Rewrites are similar to redirects but are converted by the web server while handling the traffic. Here’s an example of forcing non-WWW site addresses:
Options +FollowSymLinks
RewriteEngine on
RewriteCond %{HTTP_HOST} .
RewriteCond %{HTTP_HOST} !^example\.com
RewriteRule (.*) http://example.com/$1 [R=301,L]
This rule will redirect any visitors who type in www.example.com to example.com.
Conversely, to force WWW site addresses:
Options +FollowSymLinks
RewriteEngine on
RewriteCond %{HTTP_HOST} ^example.com [NC]
RewriteRule ^(.*)$ http://www.example.com/$1 [L,R=301]
URL Redirects: Mod_Rewrite is also used for implementing redirects. Here’s an example of a 301 (permanent) redirect:
Redirect 301 /old-page.html http://www.example.com/new-page.html
For more complex redirects, you can use RewriteRule:
RewriteEngine on
RewriteRule ^old-directory/(.*)$ /new-directory/$1 [R=301,L]
This rule redirects all pages in ‘old-directory’ to the same page in ‘new-directory’.
Forcing HTTPS: You can use Mod_Rewrite to ensure all traffic uses HTTPS:
RewriteEngine On
RewriteCond %{HTTPS} !=on
RewriteRule ^/?(.*) https://example.com/$1 [R=301,L]
Advanced uses of Mod_Rewrite include:
- Redirecting based on browser type or language
- Implementing custom error pages
- Creating vanity URLs
- Blocking access from specific IP addresses or referrers
Remember, Mod_Rewrite rules can be complex and powerful. Always test thoroughly after implementation to ensure they’re working as intended and not causing unintended side effects.
MIME Types
MIME (Multipurpose Internet Mail Extensions) types tell browsers how to handle different file types. While Apache has default MIME type settings, you can use .htaccess to add or modify MIME types for your site.
Here’s an example of adding a MIME type for WebP images:
AddType image/webp .webpThis ensures browsers correctly identify and display WebP images.
You can also use .htaccess to set the default character set for your HTML and text files:
AddDefaultCharset UTF-8For security purposes, you might want to prevent certain file types from being executed as scripts:
AddHandler cgi-script .pl .py .jsp .asp .htm .shtml .sh .cgiCommon uses for custom MIME types include:
- Supporting new file formats
- Forcing downloads for certain file types
- Enabling compression for specific file types
- Improving security by controlling how files are handled
For example, to force PDF files to download instead of opening in the browser:
AddType application/octet-stream .pdfOr to enable gzip compression for text-based files:
AddOutputFilterByType DEFLATE text/html text/plain text/xml text/css text/javascript application/javascriptWhile not directly related to MIME types, it’s worth noting that .htaccess can also be used to control caching, which can significantly impact your site’s performance:
<FilesMatch "\.(jpg|jpeg|png|gif|js|css)$">
Header set Cache-Control "max-age=31536000, public"
</FilesMatch>
This rule sets a long cache time for static assets, which can help improve load times for returning visitors.
Remember, changes to MIME types and file handling can have significant impacts on your site’s functionality and security. Always test thoroughly after making changes to ensure your site works as expected.
Server-Side Includes (SSI)
Server-Side Includes (SSI) is a simple server-side scripting language that allows you to add dynamic content to your HTML pages without the need for more complex server-side programming. SSI directives are processed on the server before the page is sent to the client’s browser.
To enable SSI in your .htaccess file, you can use the following directives:
Options +Includes
AddType text/html .shtml
AddHandler server-parsed .shtml
This configuration enables SSI for files with the .shtml extension. If you want to use SSI with regular .html files, you can modify the AddType line:
AddType text/html .html
AddHandler server-parsed .html
Once SSI is enabled, you can use SSI directives in your HTML files. Here are some common uses:
1. Including other files:
<!--#include virtual="/includes/header.html" -->This is useful for creating reusable components like headers, footers, or navigation menus.
2. Displaying server variables:
Current time: <!--#echo var="DATE_LOCAL" -->3. Executing commands:
<!--#exec cmd="ls -l" -->Note: Be cautious with this feature as it can pose security risks if not properly controlled.
4. Setting variables:
<!--#set var="name" value="John Doe" -->
Hello, <!--#echo var="name" -->
5. Conditional statements:
<!--#if expr="$HTTP_USER_AGENT = /MSIE/" -->
  <p>You are using Internet Explorer</p>
<!--#else -->
  <p>You are not using Internet Explorer</p>
<!--#endif -->
SSI can be particularly useful for:
- Implementing basic templating systems
- Displaying dynamic content without full server-side scripting
- Showing server information or the results of simple CGI programs
- Customizing content based on user variables
While SSI is powerful, it’s important to note that it can impact server performance if overused, especially on high-traffic sites. For more complex dynamic content needs, server-side programming languages like PHP or Python might be more appropriate.
Secure & Protect Your WordPress Website
Every WordPress website needs a solid backup and security strategy. With BackupBuddy, our WordPress backup plugin, and iThemes Security Pro, our WordPress security plugin, you get backups and security … plus peace of mind that your content is safe.
Join us for the next Solid Academy Webinar!
Free weekly webinars that will help you master WordPress and increase your business's bottom line.
What is a WordPress Phishing Attack?
Learn how to identify and prevent phishing attacks on WordPress websites.
Kiki SheldonWebsite Protection: 5 Ways to Keep Your Website Safe
Robust website protection is the shield that stands between your business and relentless cyber attacks. Prioritizing website protection enables businesses to fortify defenses to safeguard their online presence and preserve the trust of their customers in the face of ever-evolving cybersecurity threats.
Kiki Sheldon23 Ideas To Grow Your WordPress Business in 2023
WordPress is the most popular website-building platform worldwide, trusted by numerous brands. WordPress enables you to build a user-friendly and highly reliable site, together with tools and plugins to enhance your marketing and work like a lead magnet. All these features make WordPress the platform chosen by more than 43% of businesses globally.
SolidWP Editorial TeamSign up now — Get SolidWP updates and valuable content straight to your inbox
Sign up
Get started with confidence — risk free, guaranteed


