Step-by-Step: WordPress to Dropbox Backups
With the ever-present threats of data loss, cyberattacks, and server crashes, having a reliable backup process is a necessity. Dropbox is a well-known and popular choice for many website owners — it offers a secure and accessible platform for storage, and backing up your WordPress site to Dropbox is easy with the right knowledge and tools to hand.

With the ever-present threats of data loss, cyberattacks, and server crashes, having a reliable backup process is a necessity. Dropbox is a well-known and popular choice for many website owners — it offers a secure and accessible platform for storage, and backing up your WordPress site to Dropbox is easy with the right knowledge and tools to hand.
Here we’ll show you how to manually back up your data to the Dropbox platform, as well as detail an easier, alternative approach using our Solid Backups — NextGen software, ensuring your website remains both secure and recoverable, whatever the circumstances.
How to back up your WordPress site to Dropbox
When it comes to backing up your WordPress site to Dropbox, there are two primary methods: manual backups and automated solutions. Each technique has its pros, cons, and use cases, as we’ll see below.
1. Manual backup method
Opting for a manual backup method allows for greater control and customization over the backup process. This can be appealing to users who want to ensure that every aspect of their site is preserved according to their specifications. If a manual backup fits your needs, you can achieve this by taking the following steps:
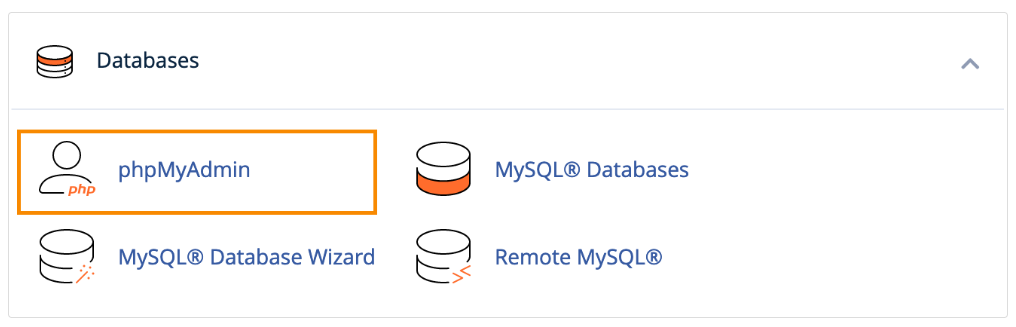
- Database export: Start by exporting your WordPress database using phpMyAdmin or a similar tool. Log in to phpMyAdmin, select your WordPress database, and click on the Export tab. All tables need to be exported (in a .sql file) to ensure a complete backup of your site’s data.
- File download: Next, use an SFTP client like FileZilla to download all the files and folders from your WordPress root directory.
- Organizing the backup: Create a new folder on your local machine named with the current date for easy reference. Store all downloaded files and the database export within this folder. It’s also good practice to compress this folder into a single ZIP or TAR.GZ archive.
- Uploading to Dropbox: Finally, upload the compressed backup folder to your Dropbox account.
Pros and cons of manual backups
As we’ve seen, manual backups offer advantages such as complete control over the backup process and independence from third-party plugins. However, they can be time-consuming and are prone to human error if steps are missed or mishandled.
2. Using software for Dropbox backups
Utilizing software to back up WordPress to Dropbox offers a more efficient alternative to manual methods, removing the need for technical knowledge. With many tools, the backup process can be automated, ensuring your website data is consistently protected without needing day-to-day management.
Among the most popular backup and restoration solutions are Duplicator, BlogVault, and UpdraftPlus. However, Solid Backups — NextGen stands out with its advanced capabilities, making it a premium choice for anyone looking to preserve their site.
Solid Backups – NextGen actually removes the need for third-party remote storage providers like Dropbox. All backups are stored on SolidWP’s servers for the ultimate convenience and security. And users still have the option to download their backups in a zip file, then upload it to Dropbox if they desire.
Transferring backups created by plugins to offsite storage requires connecting to external cloud providers, which can lead to possible disorganization.That’s not the case with our ultra-modern, cloud-first approach.
Here’s how you can use our cloud-first software to backup files and folders to SolidWP’s offsite servers, or to Dropbox, if you prefer:
1. Install Solid Backups — NextGen on your WordPress site

- Go to the Solid Backups — NextGen product page on the SolidWP website.
- Select the Buy (X) Site Now button to purchase a subscription, based on the number of sites you own.
- Configuring Solid Backups — NextGen requires setting up your centralized management dashboard. This dashboard houses Solid Backups — NextGen, and you can follow our setup guide to do so.
- Be aware that Solid Backups — NextGen connects using SSH or SFTP credentials, and the process will differ depending on your hosting provider. Consult our NextGen 101 guide for tips, or our support team if you run into any issues.
- Once that’s sorted, go back to your site, and you’ll see the following screen:

2. Backing up to SolidWP’s cloud servers
After establishing a connection, your initial backup will automatically begin. This will be a complete backup of your website, and you can monitor its progress through the Timeline tab. Following this initial backup, subsequent backups will be incremental, meaning only new or modified files will be saved, which conserves both time and storage space. You can also set timescales for how long your backups are kept.

As we’ve seen, SolidWP’s cloud servers eliminate the need for multiple accounts with different storage providers. Additionally, your site’s performance remains unaffected during the backup process, keeping your users happy!
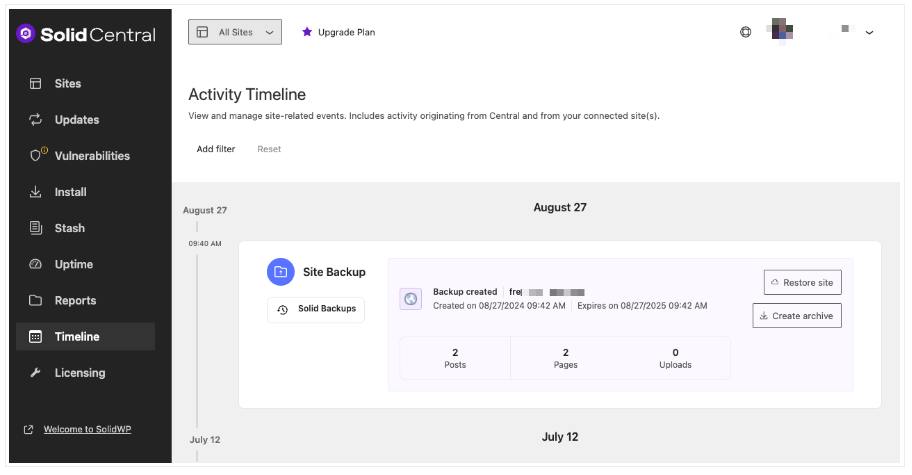
From the Solid Backups — NextGen Activity Timeline, you can track the status of backups, restore them, and download them if necessary. This centralized interface simplifies accessing and restoring your backups as needed.
3. Backing up to Dropbox
If you still have a need to backup your site to Dropbox, you can achieve this with ease.
- Go to Timeline.
- Select the backup you want to send to Dropbox.
- Click Download backup file.
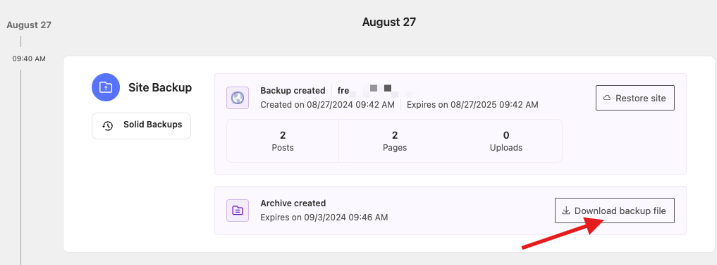
Your backup will be downloaded in a zip format, which you can then upload to Dropbox — or indeed, many other popular remote storage destinations.
Restoring from a backup: One-click recovery
It’s worth noting that Solid Backups — NextGen also makes the restoration process effortless. A one-click restore feature enhances user-friendliness, making it accessible for everyone.
To restore a site from a backup, use the Site Backup card on the Timeline screen and choose the Restore site option. You’ll be asked if you want to proceed, and clicking Yes, restore to this point will kickstart the process.
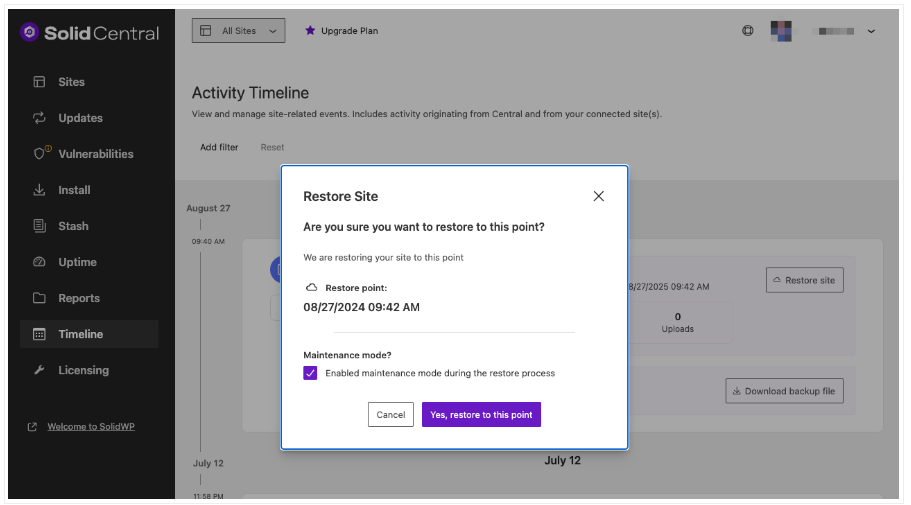
As mentioned, you can then track the progress of your Site Restore on the main Timeline screen.
Take the next step with Solid Backups — NextGen
“Having a reliable backup solution for your WordPress site is essential — just consider the alternative and potential fallout that comes from losing your data! Solid Backups — NextGen simplifies the process of backing up your site, offering automated scheduling to guarantee regular data protection. With one-click restoration, the software is easy to use, and ultra-flexible.”
Ben Meredith, Director of Technical Support, Solid WP
Solid Backups — NextGen also emphasizes security, employing encryption across all storage and restoration processes. This added layer of protection safeguards your data from unauthorized access and unexpected events.
For the most comprehensive backup solution, there’s simply no alternative. Try Solid Backups — NextGen today and enjoy the peace of mind that comes from knowing your website’s data is in the safest possible space.
Join us for the next Solid Academy Webinar!
Free weekly webinars that will help you master WordPress and increase your business's bottom line.
What is a WordPress Phishing Attack?
Learn how to identify and prevent phishing attacks on WordPress websites.
Kiki SheldonWebsite Protection: 5 Ways to Keep Your Website Safe
Robust website protection is the shield that stands between your business and relentless cyber attacks. Prioritizing website protection enables businesses to fortify defenses to safeguard their online presence and preserve the trust of their customers in the face of ever-evolving cybersecurity threats.
Kiki Sheldon23 Ideas To Grow Your WordPress Business in 2023
WordPress is the most popular website-building platform worldwide, trusted by numerous brands. WordPress enables you to build a user-friendly and highly reliable site, together with tools and plugins to enhance your marketing and work like a lead magnet. All these features make WordPress the platform chosen by more than 43% of businesses globally.
SolidWP Editorial TeamSign up now — Get SolidWP updates and valuable content straight to your inbox
Sign up
Get started with confidence — risk free, guaranteed


