Introduction to Solid Backups — NextGen
Solid Backups — NextGen is a cloud-based system for backing up WordPress sites, managing and storing backups, and — when you need it — restoring to a previous state of your choosing. Because Solid Backups — NextGen relies upon SolidWP server infrastructure instead of taxing the resources of your hosting environment, it provides fast, reliable, secure backups without slowing your website down.
This document will guide you through getting started with Solid Backups — NextGen, how to navigate the essentials, and will answer some of the most important questions you may have about using the system. Following this guide will get you up and running quickly, and you’ll have the opportunity to follow links to other docs (coming soon!) that go into greater detail about specific items along the way.
By the end of this document you will understand the following:
- How to connect a WordPress Site to Solid Backups — NextGen
- How to ensure that a site is being backed up.
- How to download a site backup.
- How to restore from a backup.
Need further help? The SolidWP Support team is staffed with WordPress and web experts, and they are ready to answer your questions. Reach out via the support channels.
Here’s a visual guide to getting connected to Solid Backups — NextGen:
Before You Begin: System Requirements #
Before you begin, please ensure your WordPress installation and hosting environment meet the following requirements, as these prerequisites are crucial for Solid Backups — NextGen to connect to your site and run backups successfully.
WordPress Install Requirements: #
- Connection to Solid Central: Your website must be connected to the Solid Central dashboard. This is the first step in the setup process.
- WordPress Application Passwords: Your website must have Application Passwords enabled, as Solid Central uses this secure method to connect to your site without needing your actual password. This is a standard feature in modern WordPress versions
- Note: security plugins can disable this feature. See here to learn more: Solid Central — WordPress Settings.
Server & Hosting Environment Requirements #
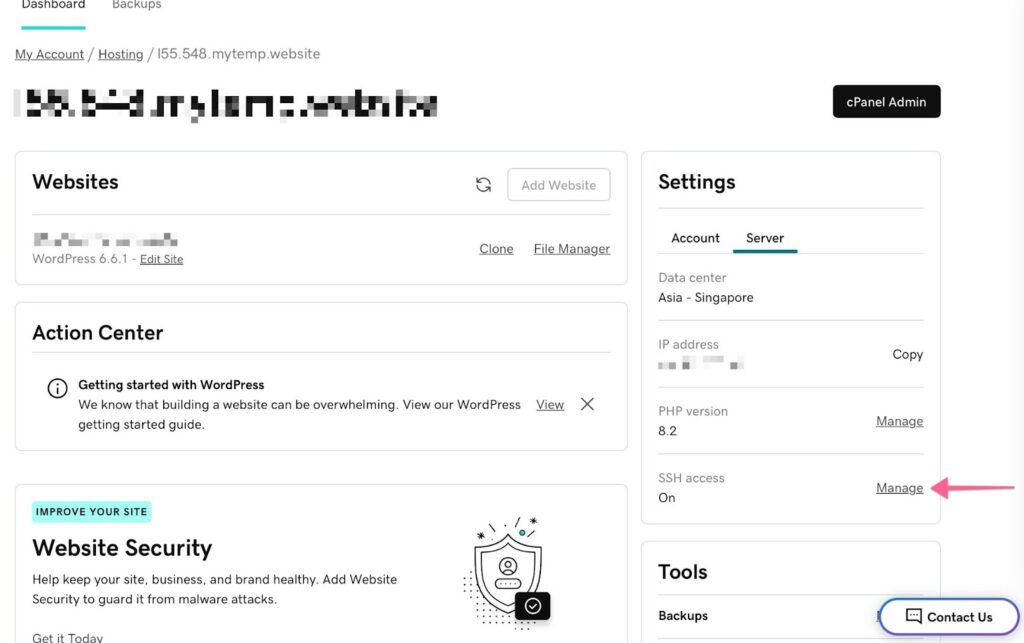
- SSH Access: Your server user must have SSH (Secure Shell) access to your hosting server, as this is the secure protocol that Solid Backups — NextGen uses to connect to your server, run commands, and transfer files. You will need your SSH credentials (server address, username, port number) during setup.
- To learn how to get the SSH credentials for known hosts, see: Using Solid Backups — NextGen with Your Hosting Provider.
- WP-CLI Installed: Your server must have WP-CLI installed and properly configured. WP-CLI is the standard command-line interface for WordPress, and Solid Backups — NextGen relies on it to perform tasks like verifying your license and initiating backups.
- Correct
wp-config.phpRequires: If yourwp-config.phpfile includes a line like:require 'wp-salt.php';causing WP-CLI commands to fail when run outside the WordPress root directory (as Solid Backups — NextGen does). It should instead use:require __DIR__ . '/wp-salt.php';- Some hosting providers (such as Cloudways) provision WordPress with the shorter
require 'wp-salt.php';, so you may need to request that your host update this in their setup.
- Some hosting providers (such as Cloudways) provision WordPress with the shorter
- Correct PHP Configuration: The version of PHP used by WP-CLI must have the Phar PHP extension enabled.
- IP Address Whitelisting: To ensure a stable connection, you may need to whitelist Solid Central’s IP addresses in your server’s firewall.
- You can find the list of IPs here: What IP address(es) might need to be added to an allow list?
Running into more issues? These links may help you:
Get connected to Solid Backups — NextGen #
Solid Backups — NextGen connects to your site in a two-step process, first to get you connected to the dashboard on the SolidWP side (called Solid Central) and then to grant the Central application access to your web host to actually be able to perform the tasks related to backing up and restoring your website.
New customers are guided through this in a customer flow immediately following checkout, where you create an account on the Solid Central platform, and are then walked through the steps to connect a site, and then enroll and connect it to the backups service specifically.
To get to that flow after the fact, visit https://central.solidwp.com/onboard/backups and sign into your account to get connected to a new site.
NOTE: Experienced WordPress users might be asking “Can I just install the plugin and connect from the WordPress side?”
Short answer: YES! But be aware of this key distinction: Previous iterations of Solid Backups (and iThemes BackupBuddy before it) *was* a plugin. Solid Backups — NextGen *has* a plugin, but more fundamentally *is* a service that functions alongside WordPress sites, backing up and restoring files and database without taxing the resources of your web host at all.
That matters in answering the question of “doing it the WordPress way” because you may run into incompatibility issues with the plugin that are completely avoidable by connecting to sites from the SolidWP direction. Especially for installing Solid Backups — NextGen on sites running older versions of WordPress itself, the recommended path is to follow this guide.
Step 1: Visit the Onboarding Link #
At the risk of oversimplifying things, the fast way to connect to a site is to visit the onboarding link and walk through the steps there. First, type in the full URL of the site you want to back up, and then SolidWP will prompt you for an Application Password (which can always be revoked later if needed) that allows for secure access to the site in order to proceed to step two.
You’re ready for Step 2 once you reach a screen that looks like this:
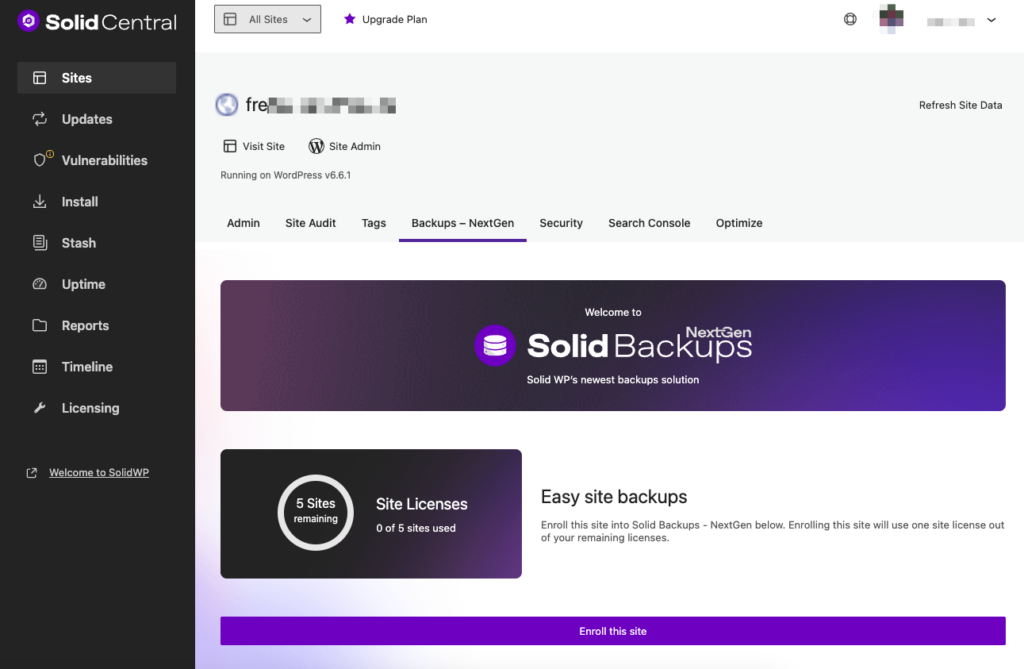
Step 2: Enroll your site in Solid Backups — NextGen #
SolidWP connects to your WordPress website as a WordPress plugin. That’s what you’ve done in Step 1, but you’re still not fully connected to Solid Backups — NextGen.
In order to effectively back up your site, Solid Backups — NextGen connects on a “deeper” level using SSH or SFTP credentials, which is a process that is slightly different depending on your web host, but this document covers many popular hosts and how to connect. It’s a one-time thing to get connected, and the SolidWP support team is here to help if you run into any issues.
Before you enter the connection details from the host, the onboarding process has one required setting and some other optional advanced settings that require a bit of background understanding in order to make the most informed choice. No matter what, you can’t make a truly wrong choice here.
Cannot enroll your site? See I enrolled my site to Solid Backups — NextGen, but nothing happened. What should I do?
How Long Should Backups Be Stored? (Required) #
When setting up your backups in Solid Backups — NextGen, you have the flexibility to choose how long you would like your backups to be stored. The amount of time backups are stored is up to you. You can select that they are retained for up to a year.
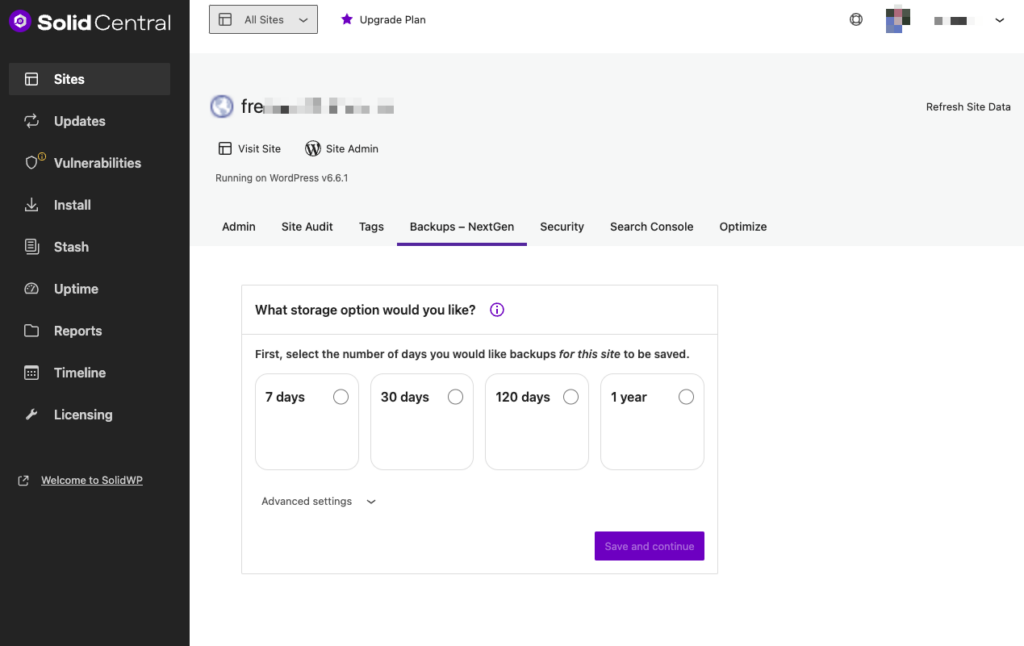
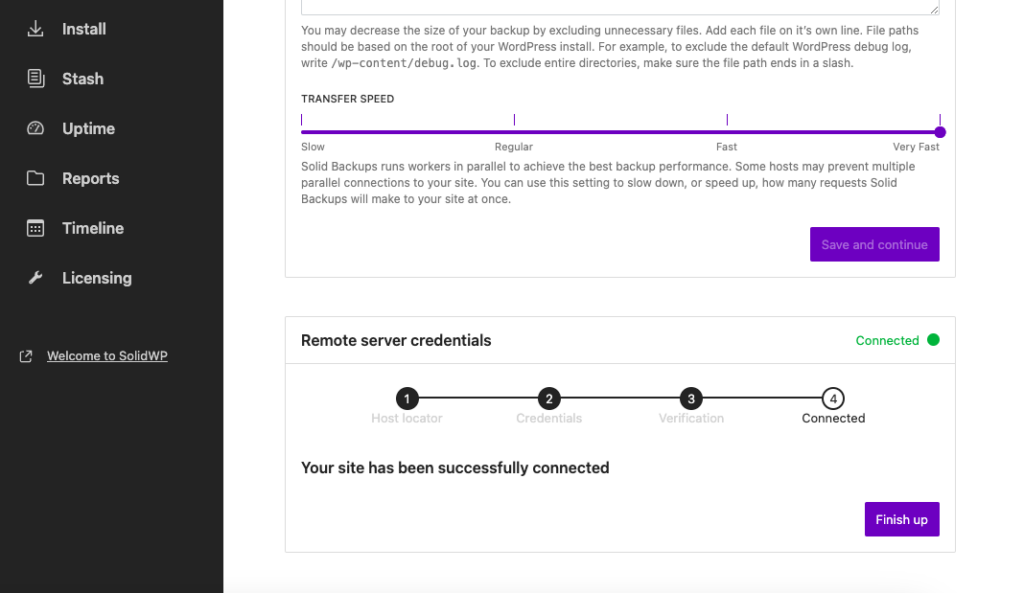
The length of time that backups are stored on Solid Backups — NextGen does have an effect on total storage used, but not as exponential as you might think. If you set a site to retain backups for 7 days or a month, the difference in size has more to do with what changed on the website in the month than anything else, since Solid Backups — NextGen is optimized to reduce the amount of storage related to items that have not changed on the site. The best way to save total storage space is the “exclude files” option found in the advanced settings.
Advanced Settings (Optional) #
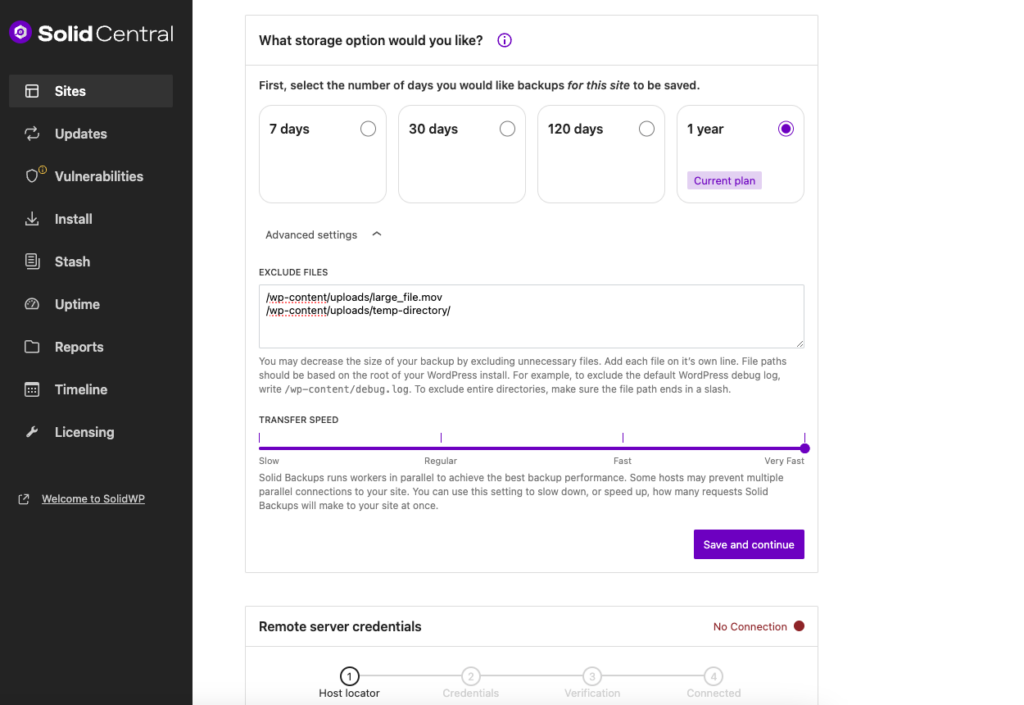
Exclude Files
A file that is never included in a backup reduces the total storage size, so before you connect for the first time (which triggers an automatic backup) be sure to indicate which files you do not want to back up. Examples of files to not back up are ones that are redundantly stored elsewhere or files that you don’t need.
Enter each file path on a new line.
File paths should be based on the root of your WordPress installation. For example, to exclude the default WordPress debug log, enter /wp-content/debug.log. If you want to exclude entire directories, make sure the file path ends with a slash (/).
Transfer Speed
One thing you’ll note once you get going with Solid Backups — NextGen is that, especially on more robust hosts, it is very fast. That’s because (in part) Solid Backups — NextGen uses parallel workers to maximize performance. When the server can handle it, Solid Backups — NextGen backs your site up so fast you’re certain it couldn’t have finished already.
Some hosts limit the number of concurrent connections, which can cause Solid Backups — NextGen to fail. If you’re having trouble connecting, or backups fail, it’s worth coming back here and adjusting this setting.
Once you’ve configured things, it’s time to actually connect!
Step 3: Connecting to Your WordPress Host #
This section of the doc covers generically what each setting means and how to connect. No matter which host you select from the list. If you mistakenly selected the wrong host from the list, the Change host link at the bottom allows you to go and select differently.
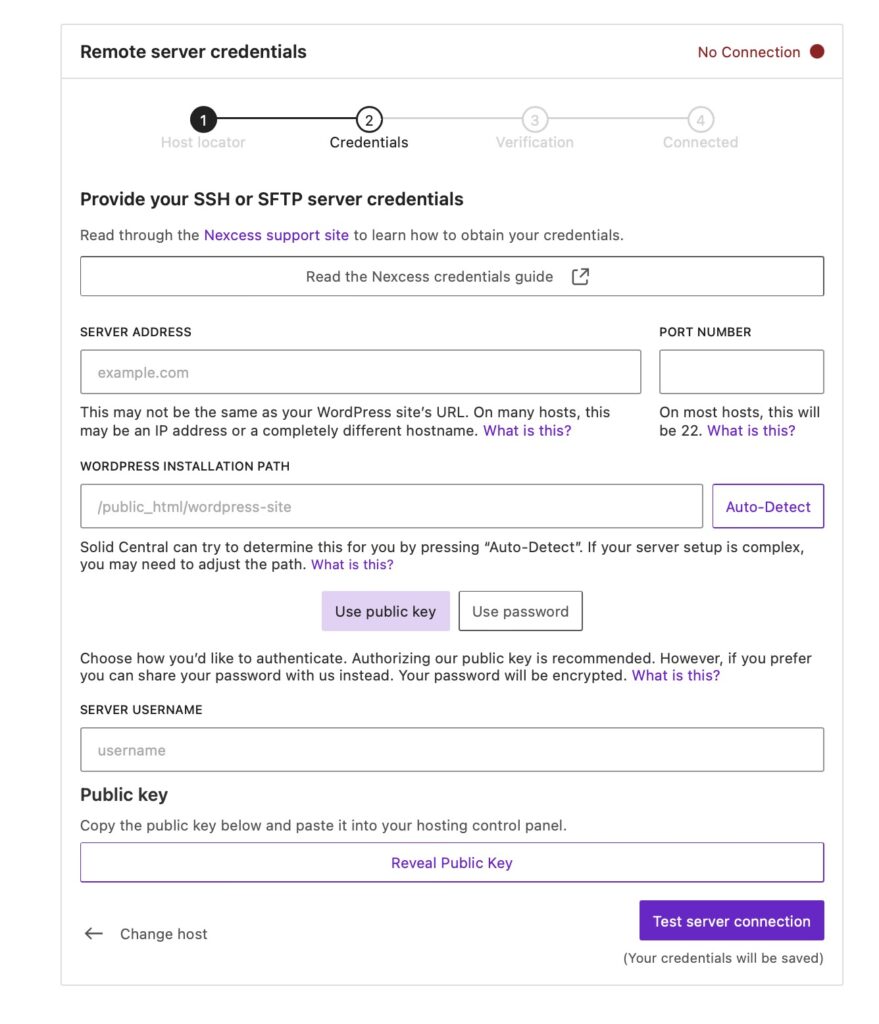
Server Address #
The Server Address is usually found in the host’s control panel. Note that this might differ from your WordPress site’s URL and could be an IP address or a unique hostname.
Most of the time it will look like either example.com or 123.45.67
The section below covers how to find this information for some specific hosts.
Port Number #
The Port Number is used to ensure that hosts can restrict traffic to certain ports, and controlled by them. Usually for SSH traffic, port 22 is used, but it could be different depending on your host.
WordPress Installation Path #
The WordPress Installation path is necessary to point Solid Backups — NextGen to the exact spot where it can find the configuration files to be able to back up the site effectively.
There’s a handy feature of WordPress to determine your installation path, found at Tools > Site Health > Info > Directories and Sizes.
That is essentially WordPress self- identifying where it thinks it’s installed, which is usually correct.
Auto-Detect Feature: You can select “Auto-Detect” to have Solid Central try to find the path for you. If the automatic detection doesn’t work, you need to enter the path manually. It’s critical that SolidWP be able to locate the installation path.
Choose Your Authentication Method #
Public Key authentication is the recommended method for security reasons. You’ll need to copy the public key (after selecting to reveal it) from the SolidWP side and paste it into your hosting control panel.
Using a Public key is a way for SolidWP to be authenticated in a way that can’t be compromised even if a malicious actor guesses a password. It is a bit of extra work up front, and requires knowing how to add those keys to your web host’s panel, but is worth the extra effort.
Alternatively, you can choose to use a password. Your password will be securely encrypted during the connection.
Server Username #
Enter the username associated with your server account. Note that this is NOT the WordPress username, but the user that your host used to install WordPress on the server itself. In most cases, it’s displayed prominently in the hosting control panel.
Testing the Connection #
Once all the required fields are filled out, select “Test Server Connection” to verify the connection between Solid Backups — NextGen and your host.
Note: no matter what, testing the connection will save your credentials, so you don’t have to worry about retrieving them again.
If all goes as planned, you’ll be connected and all set to learn how to access your backed-up files and restore them.
For specific instructions based on your host, see this section.
What Happens After You Connect Your Site? #

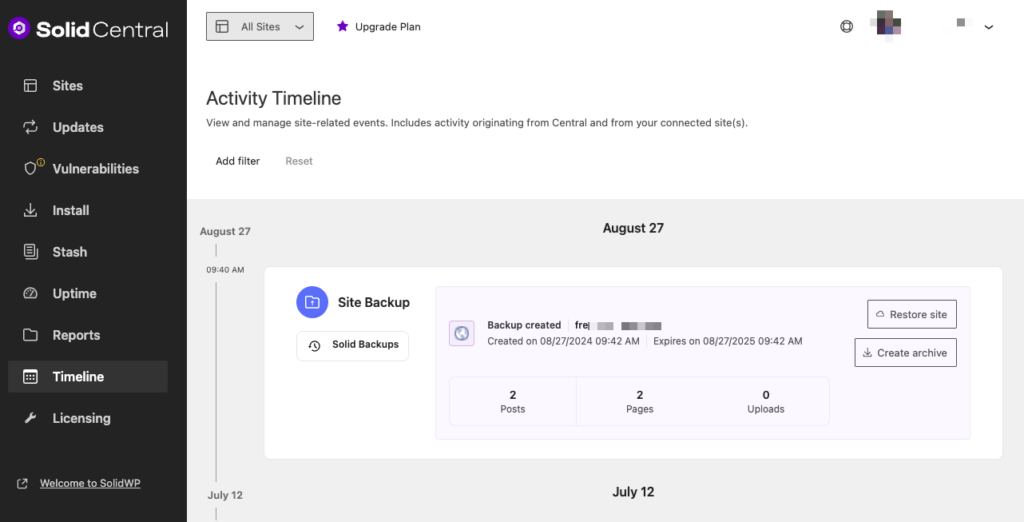
Once you’ve successfully connected your site and filled out the required connection information, Solid Backups — NextGen immediately starts a backup. You can view that backup in progress (if you get there fast enough!) on the Timeline screen or by selecting to “View your first backup” on the screen.
Monitoring Your Backup #
For larger sites, you can confirm that they are being backed up by checking the Timeline screen. You do not have to remain on that screen, as the backup will continue without checking on it!
Downloading Your Backup files #
Once the backup is complete, the timeline screen is what you will need to access the backup.
The only reason you’d need to download an archive is for redundantly storing it, so if you’re looking to restore the site from a backup, skip to the Restoring a Backup section
Before it can be downloaded, the ZIP file itself needs to be built. This is because Solid Backups — NextGen is designed to reduce redunundancy, and there’s not a stockpile of ZIPs just waiting to be downloaded.
On the timeline screen, each Site Backup card has a button to create an archive. Select that, and once it’s done (the process you’re kicking off there will take a varying amount of time depending on the site size) you’ll be able to download the archive file.

Restoring a Backup #
To restore a site from backup (sometimes you’ll hear it called “rolling back to a backup”) you can use the same Site Backup card on the Timeline screen and select the “Restore site” option.
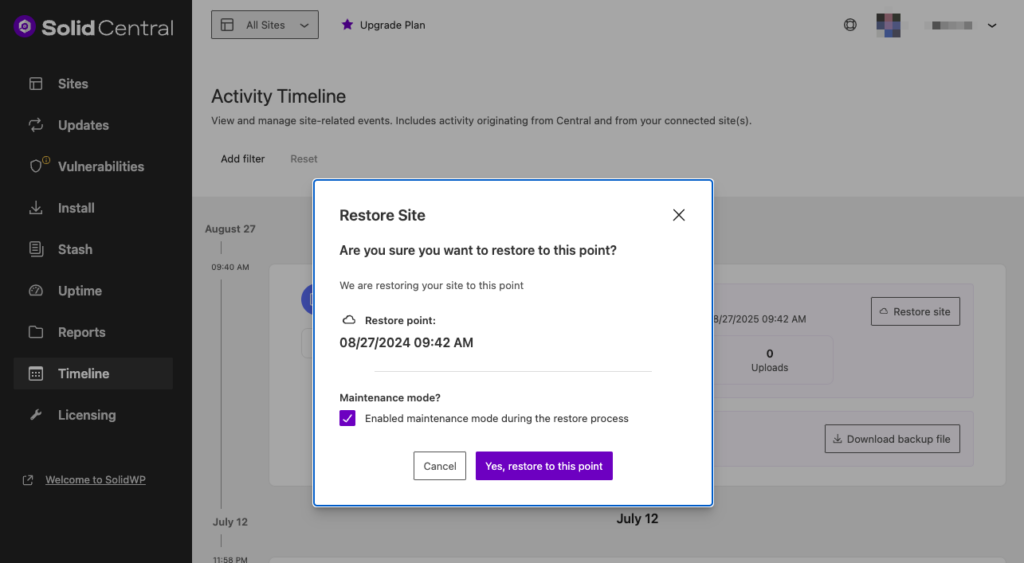
After confirming that you want to roll the site back to the state it was in at the time indicated, the process happens automatically in the background.

You can monitor the process of the Site Restore back on the main timeline screen.
Using Solid Backups — NextGen with Your Hosting Provider #
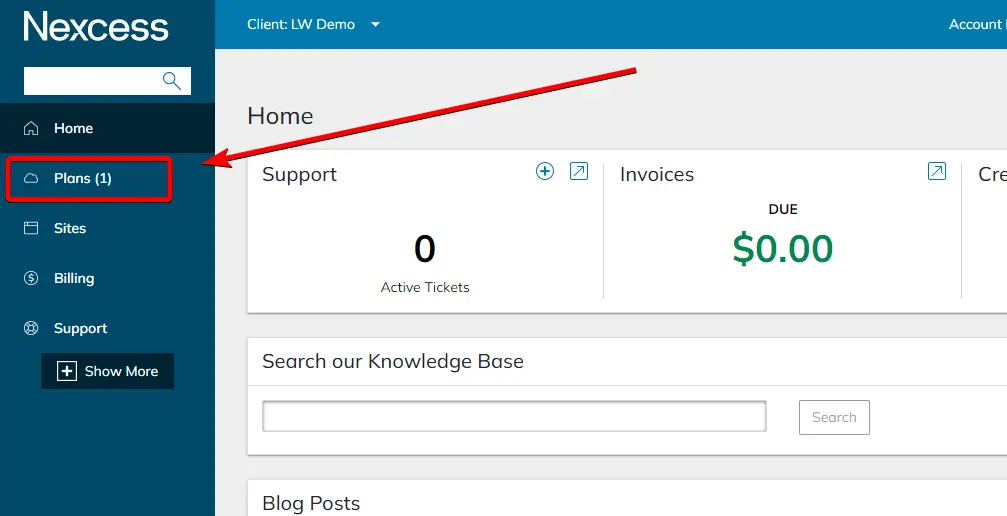
Nexcess #
- Log in to your Nexcess Client Portal
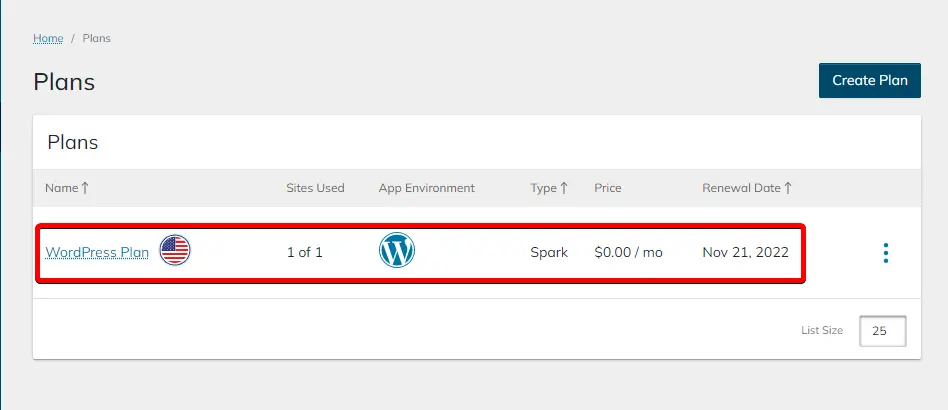
- Go to the Plans area in the user interface
- There you can see all your active plans and select the plan that has your site in it.
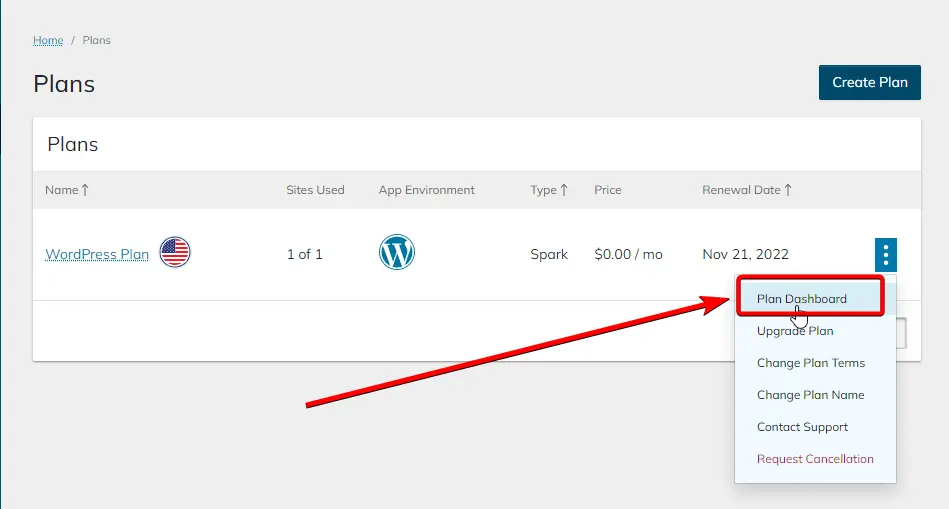
- Select on the vertical ellipsis that can be found on our right-hand side to see your WordPress plan options and navigate to the Plan Dashboard
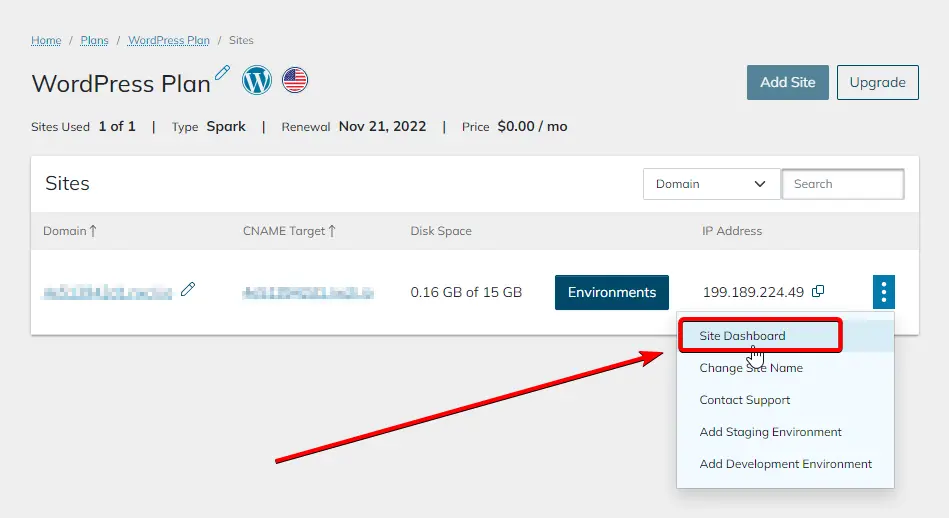
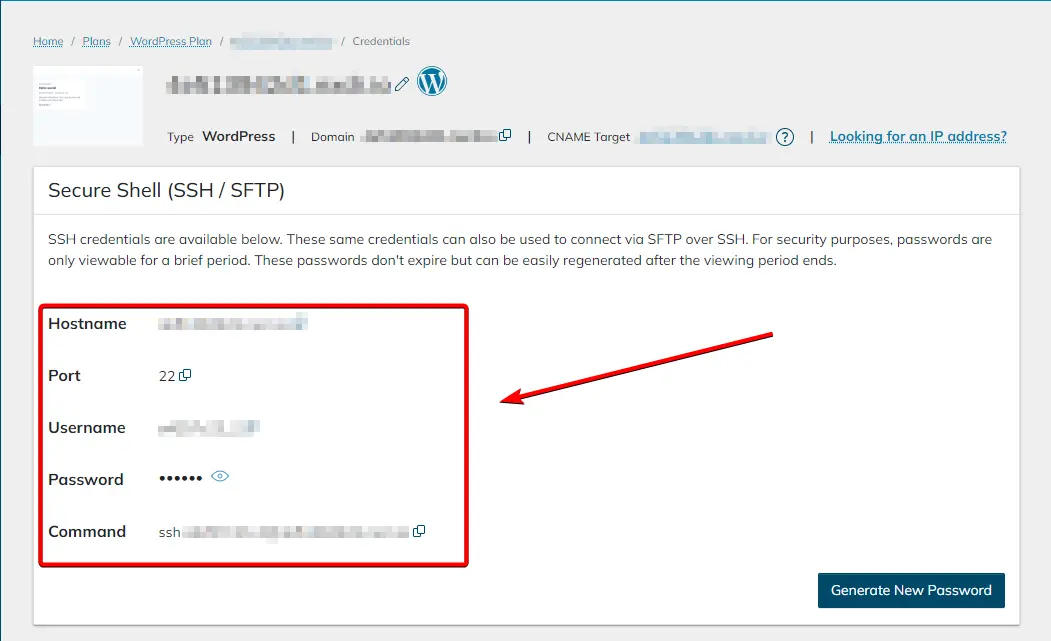
- Similarly, find the website you want to create SSH (Secure Shell) credentials for. Open site options by clicking the vertical ellipsis and navigating to Site Dashboard.
- In the Site Dashboard, you’ll find Secure Shell (SSH/SFTP) credentials near the top of the page. You can also change the password by clicking the Generate New Password button location in the bottom right portion of the Secure Shell (SSH/SFTP) box.
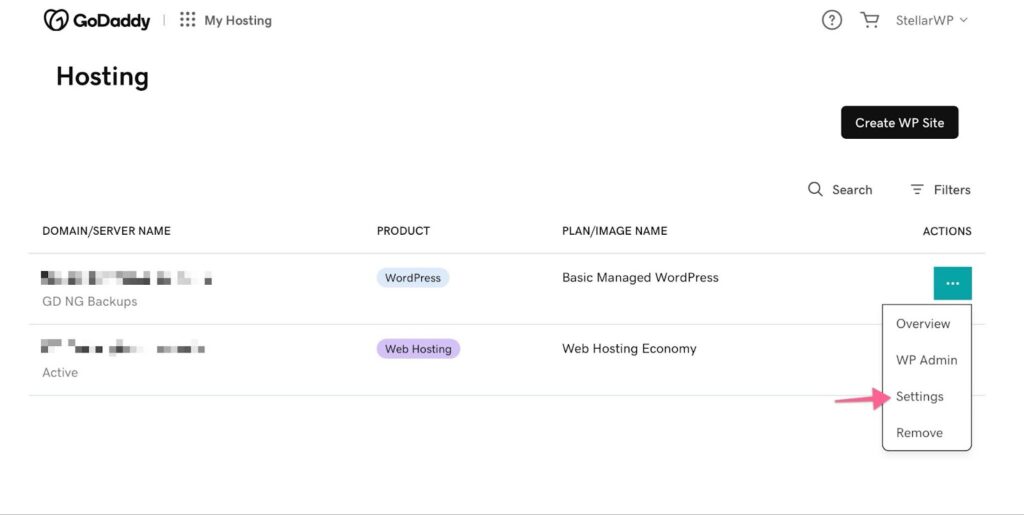
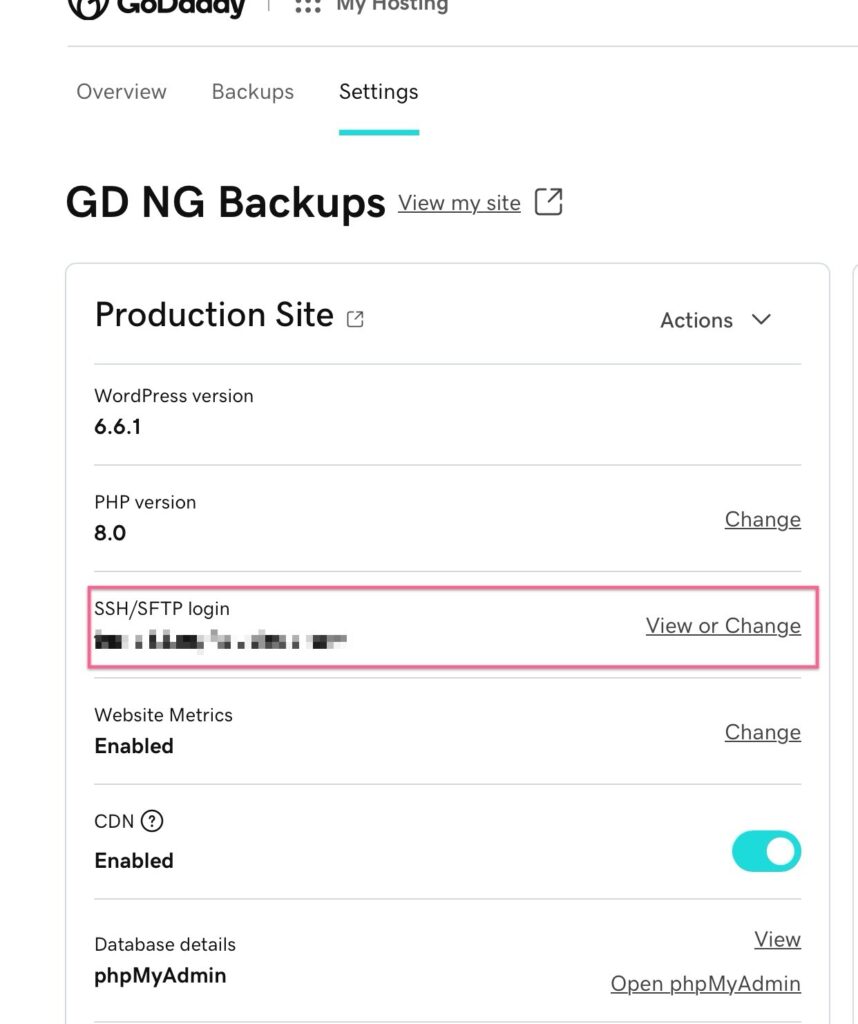
GoDaddy Managed #
- Go to Hosting > Actions > Settings
- Open SSH/SFTP login section to create SSH/SFTP credentials
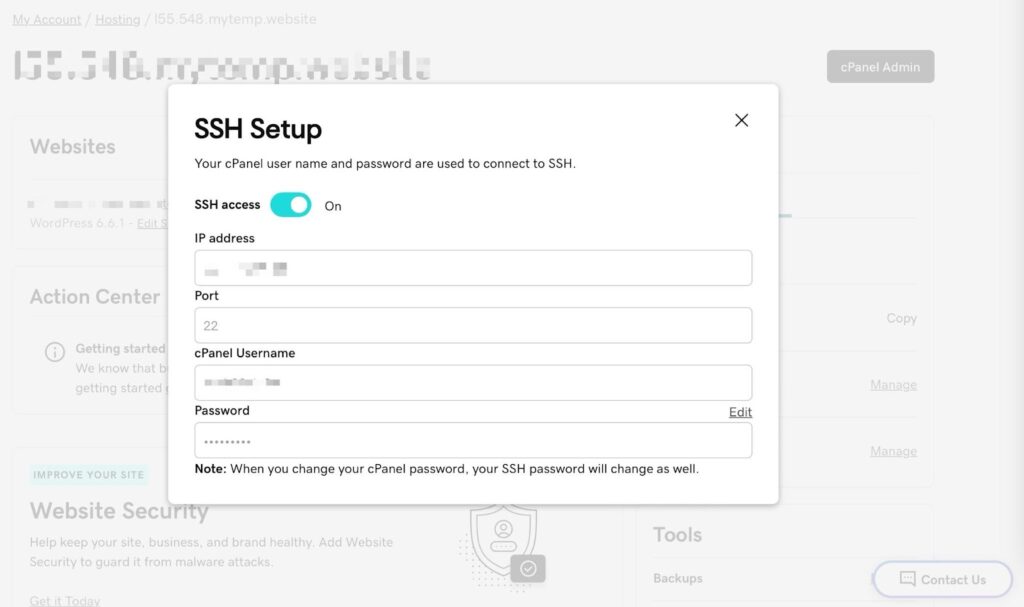
GoDaddy Shared #
- Go to Hosting > Actions > Settings
- Open Settings > Server > SSH access to enable SSH and get credentials

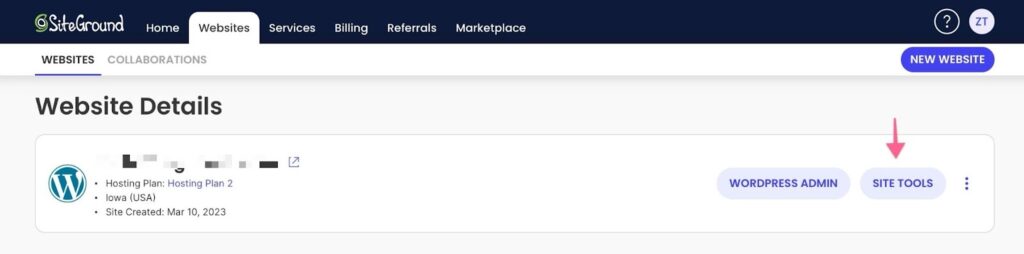
Siteground #
- Go to Home > Website > Manage
- Click “Site Tools”
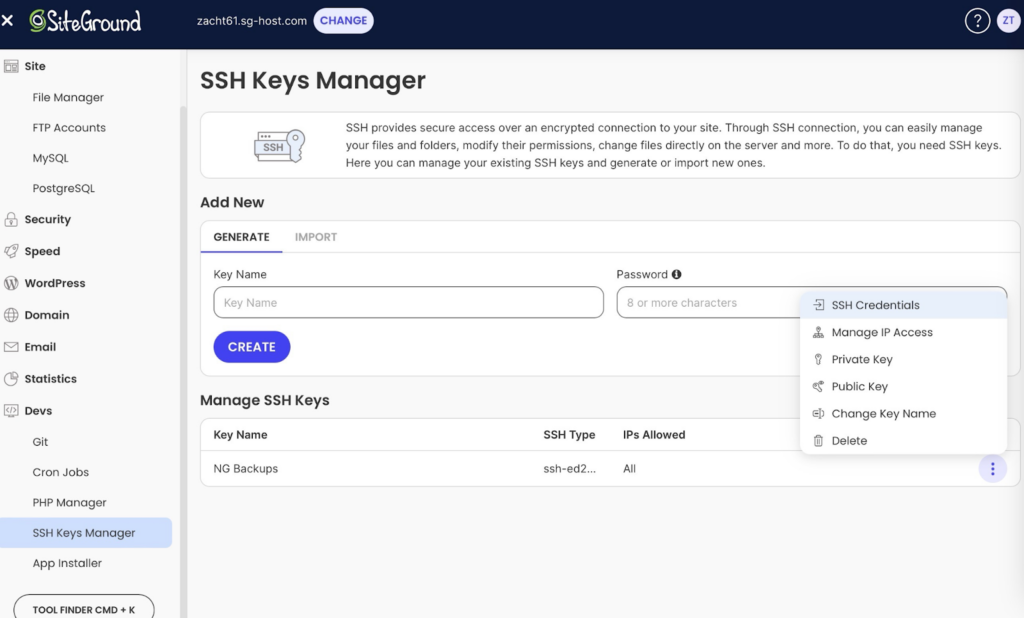
- Go to Dev > SSH Keys Manager and Import Solid Backups — NextGen’s Public key
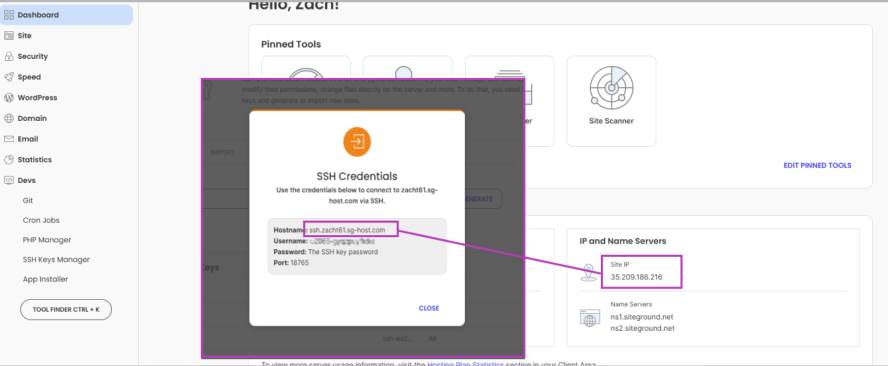
- Once saved, click the saved key’s more info and choose “SSH Credentials”
- Paste the credentials into your Solid Backups — NextGen credentials form
Note: If you come across the following error while connecting your Siteground website to Solid Backups — NextGen, use your website’s server IP address for the Server Address field in the NextGen server credentials form instead of the “Hostname” from your SSH Credentials. Your IP can be found in Site Tools > Dashboard > IP and Name Servers.

BlueHost #
- Log into your Bluehost Account Manager.
- Click the Hosting tab in the left-side navigation menu.
- Under Quick Links, select the CPANEL button to access the cPanel page.
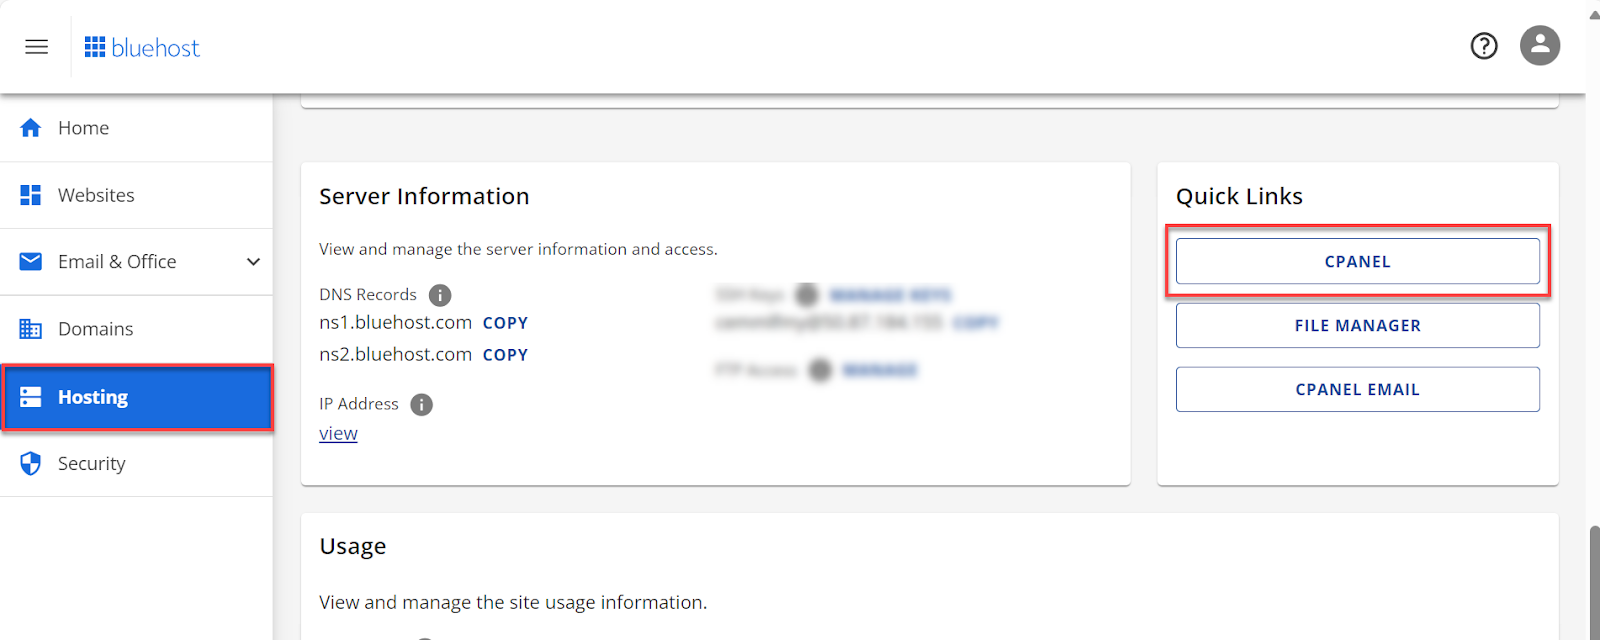
- Locate the Current User and Shared IP Address and use those in the NextGen Server Username and Server Address fields respectively. Use port 22 for SSH connections on Bluehost.
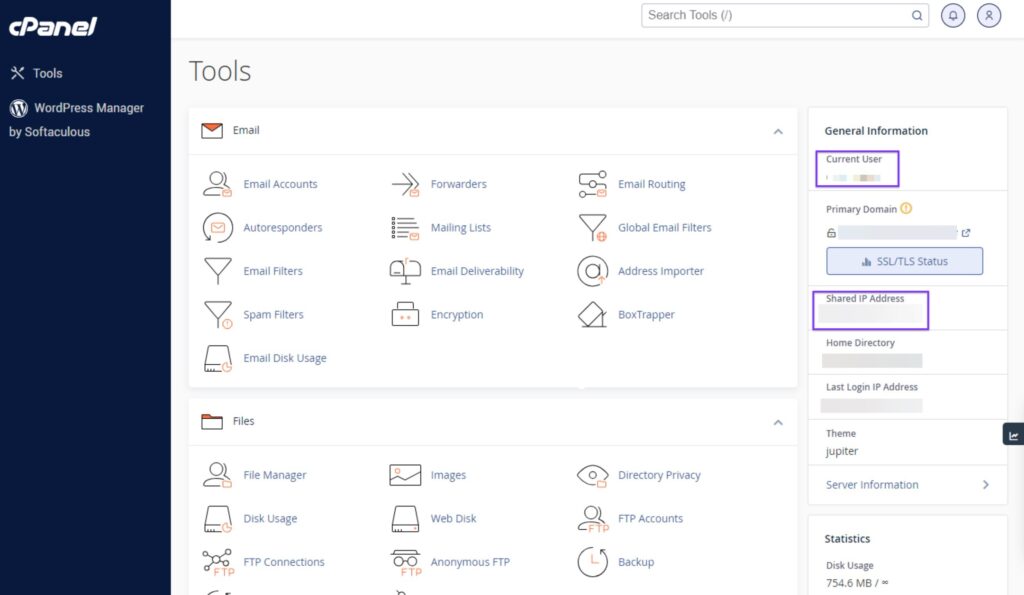
- Scroll down and locate the Security section, then click SSH Access.

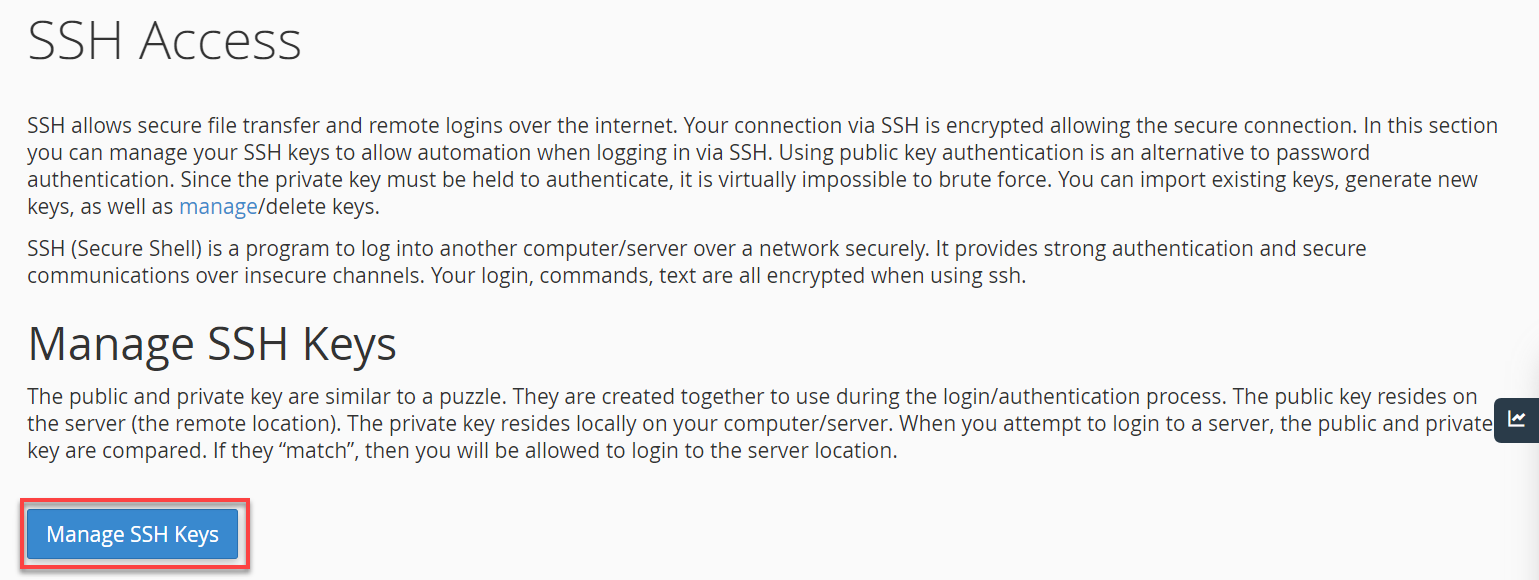
- Click Manage SSH Keys.
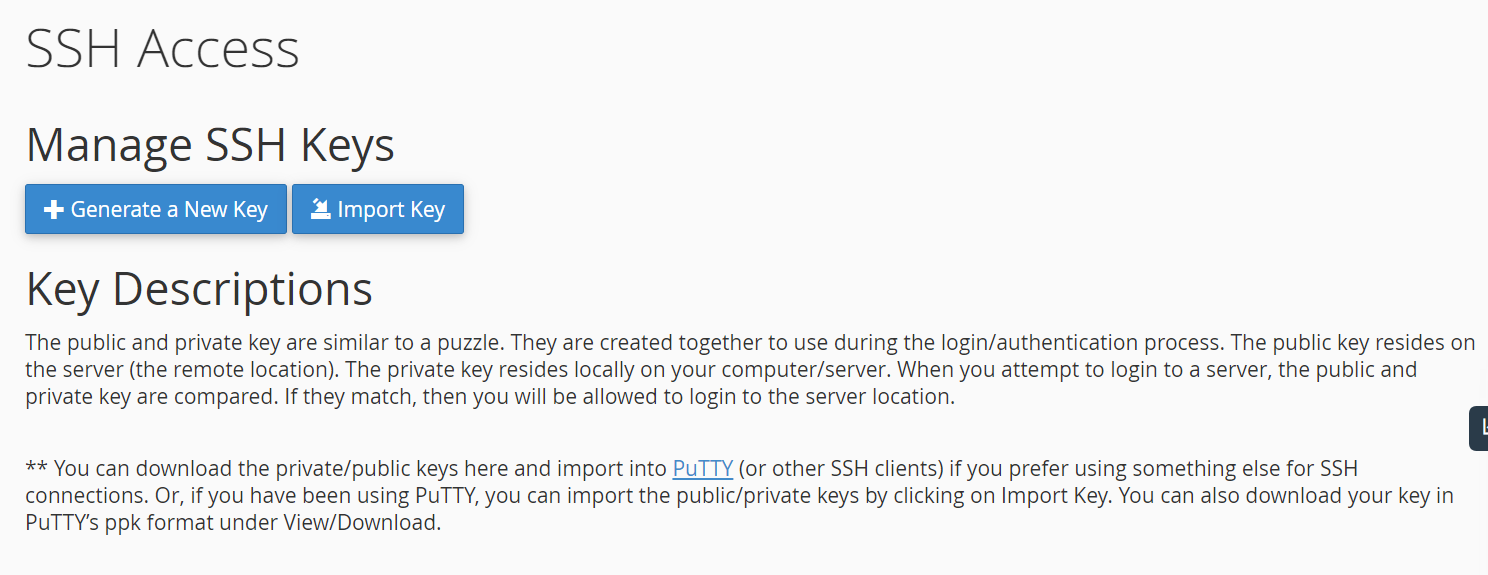
- Import Key – Import the NextGen SSH Key as a public key here and make sure to authorize it after.
Additional tips on configuring cPanel can be found here.
IONOS #
How to find the WP installation path #
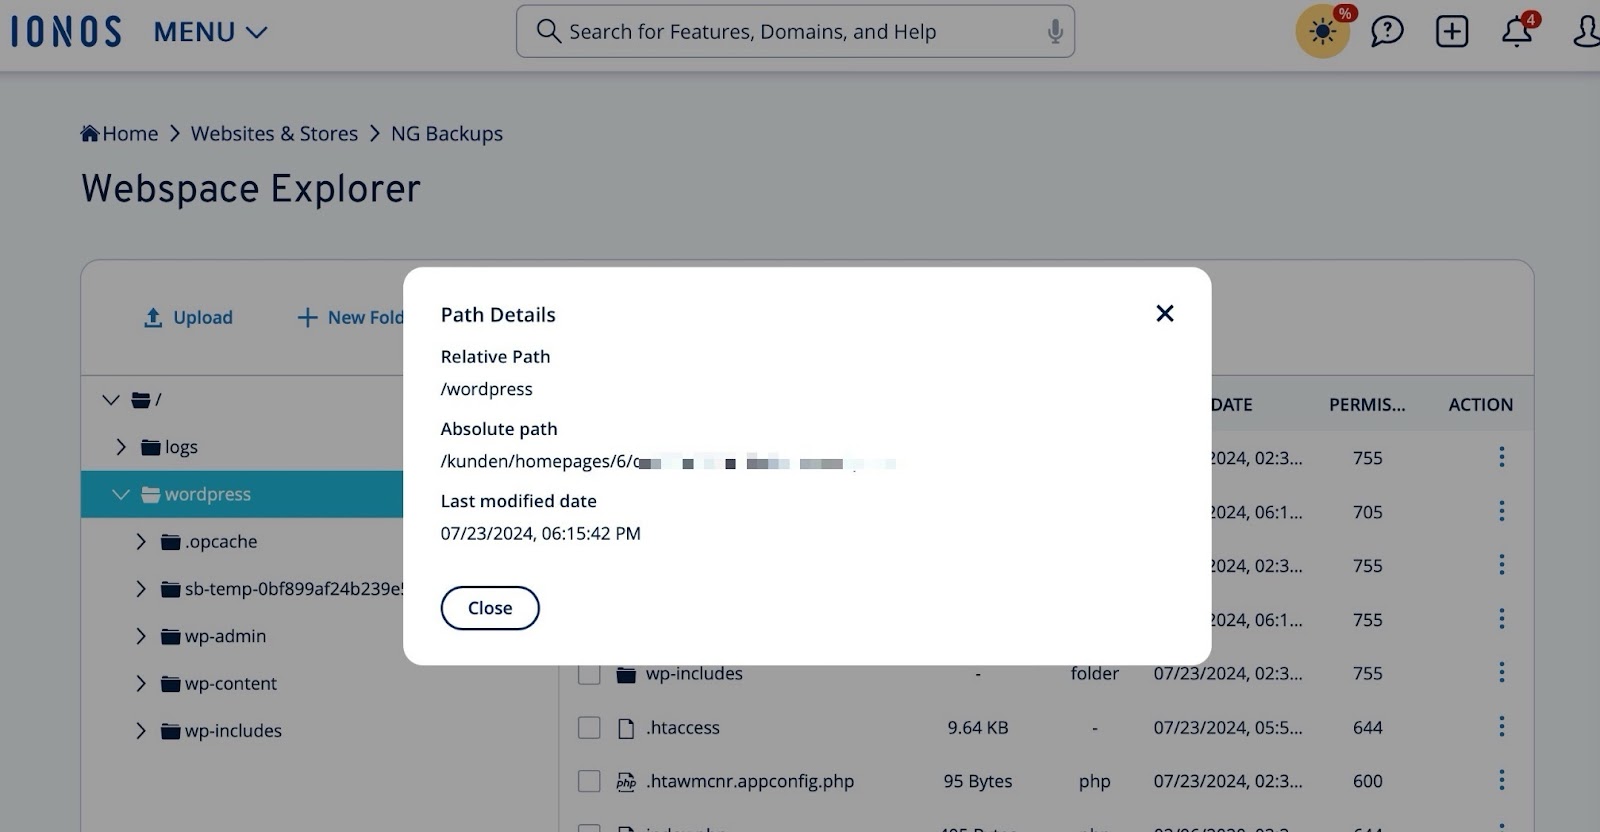
- Go to Websites & Stores > Settings > Advanced settings > Webspace Explorer
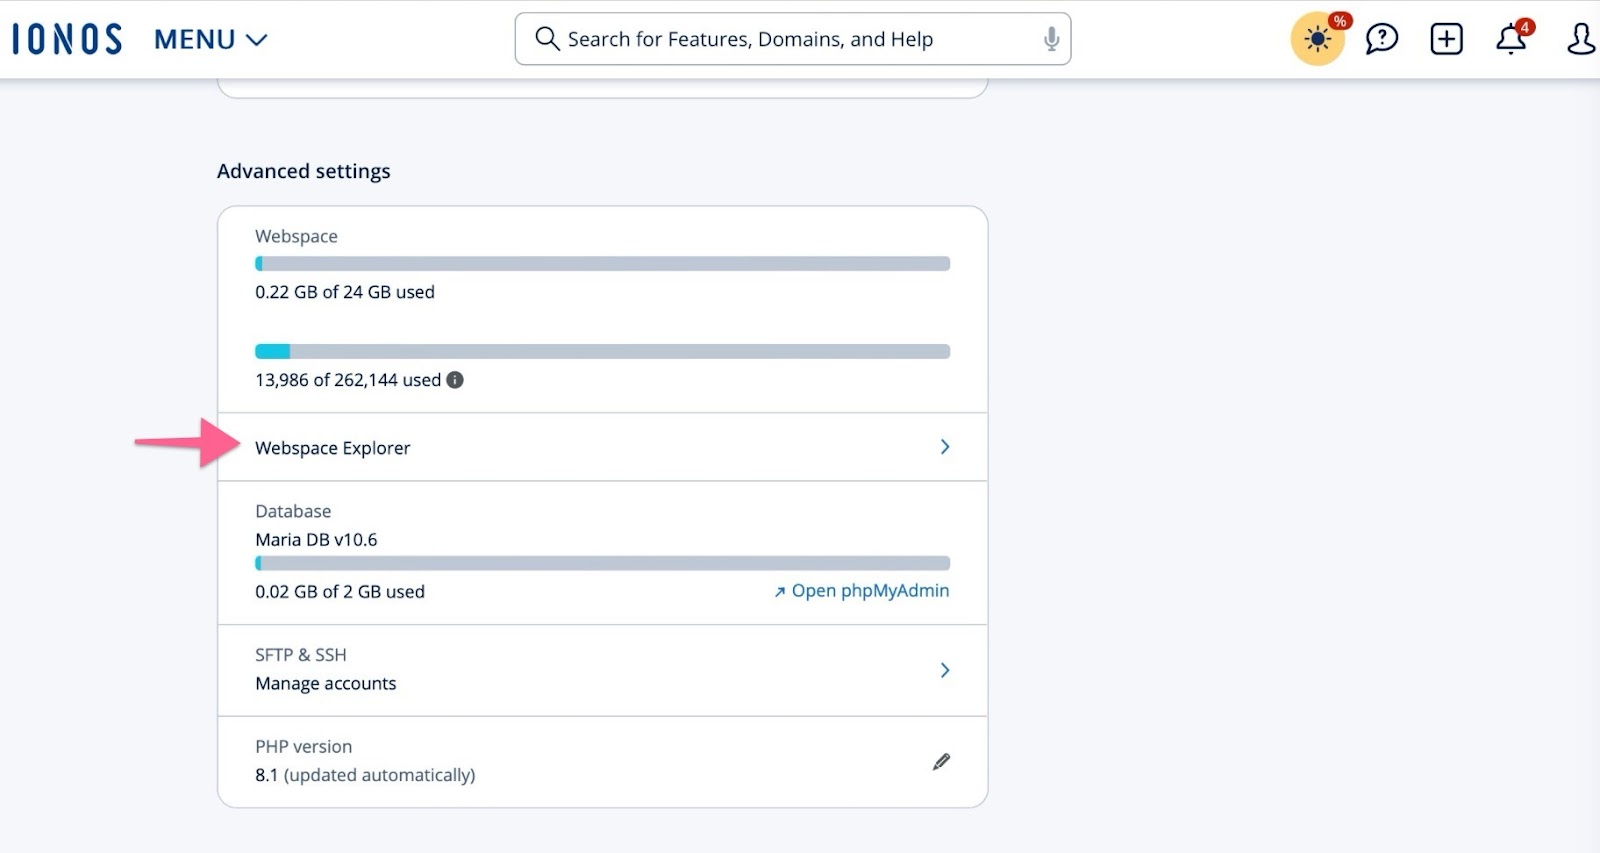
- Select the “wordpress” folder and the “Path” link at the top of the screen.
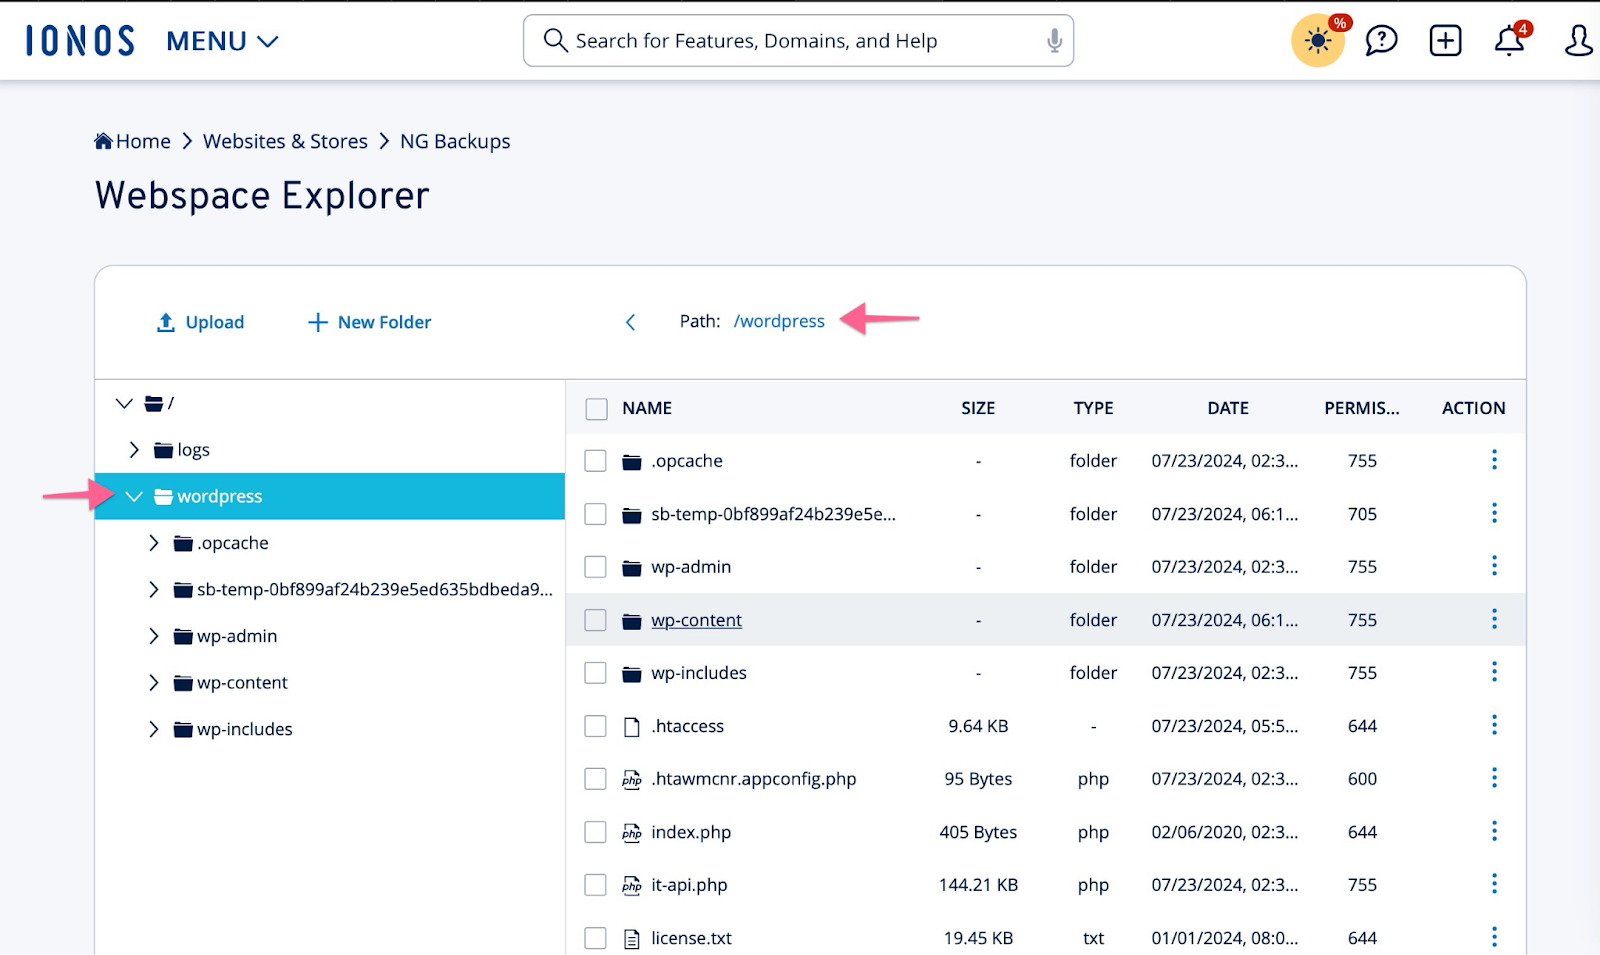
- Copy the absolute path starting from (and including) /homepages/..
How To Find IONOS Credentials #
- Go to Websites & Stores > Settings > Advanced settings > SFTP & SSH

- In the FTP account row, select More > Show connection data
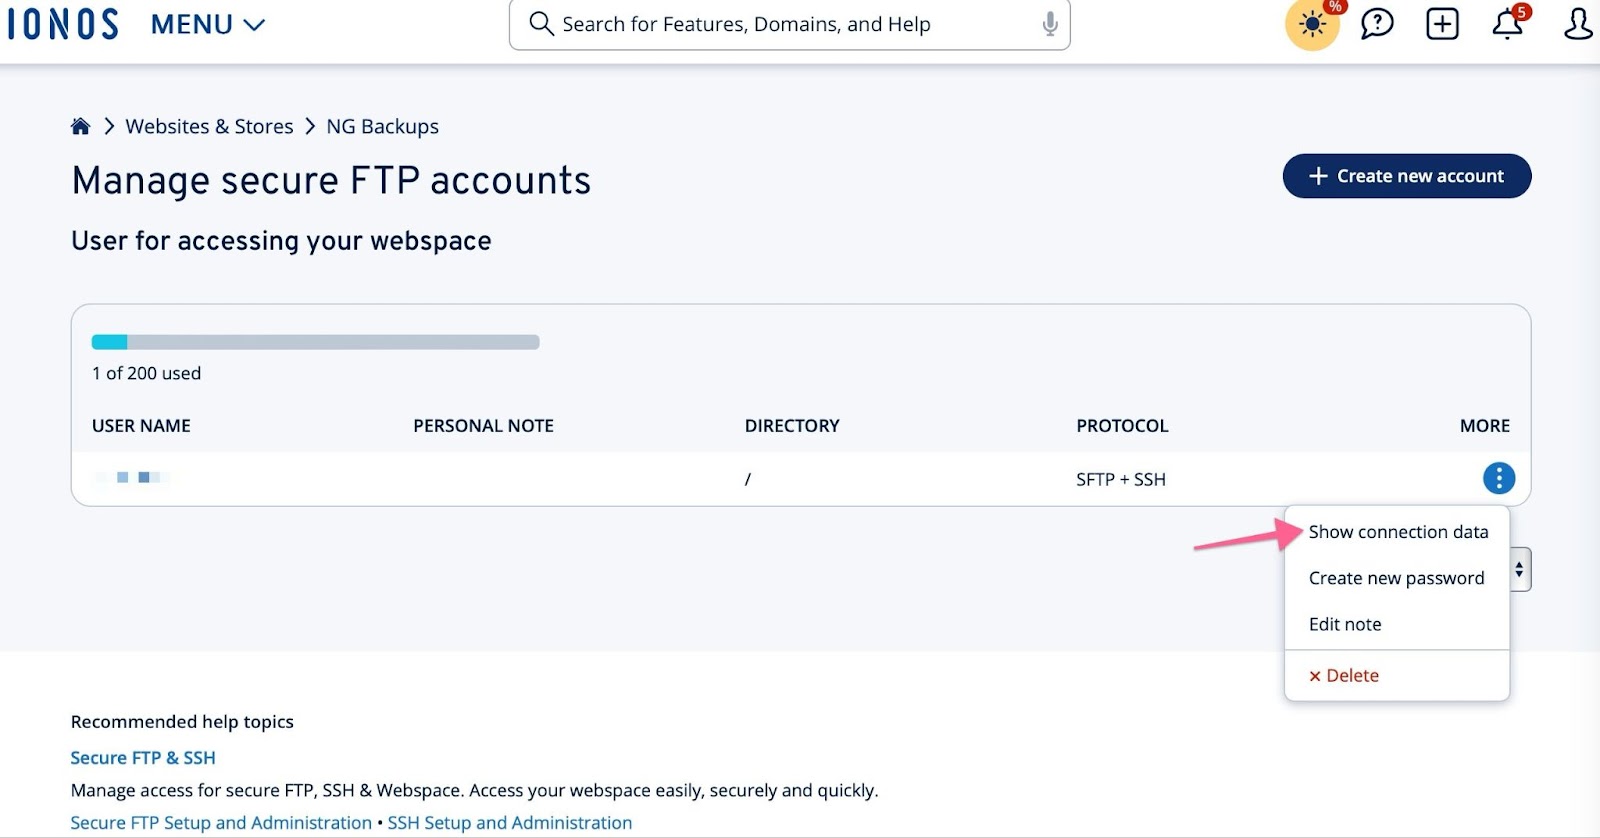
- Copy those details into the username/password (as well as the port) and put them into the SolidWP settings.
GreenGeeks #
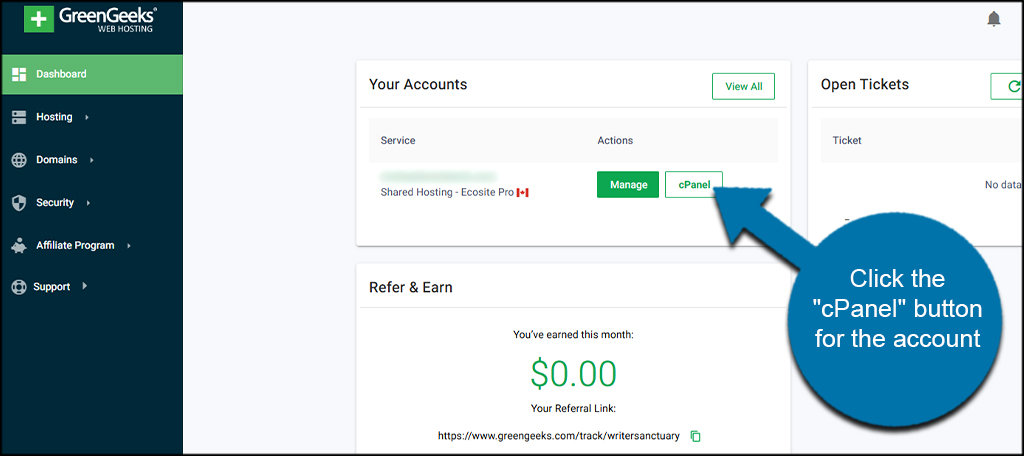
- Log in to GreenGeeks. From your dashboard, click the “cPanel” button next for the account you want to edit.
The cPanel URL contains your server information. Everything after https:// and before :2083 is the host name.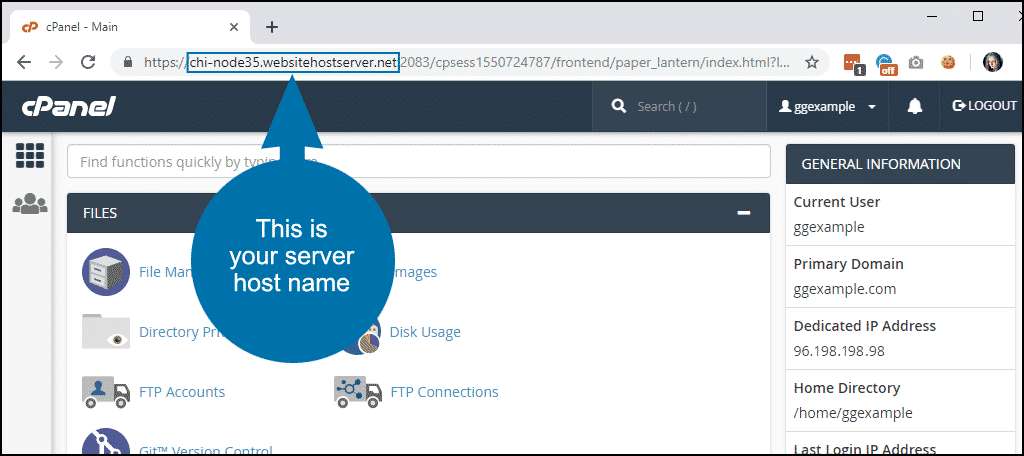
- Scroll down this page and follow the guidance in the “Hosts that Use cPanel” section below.
- Note: if you do not already have SSH/SFTP enabled on your server, you may have to open a support ticket to have it enabled.
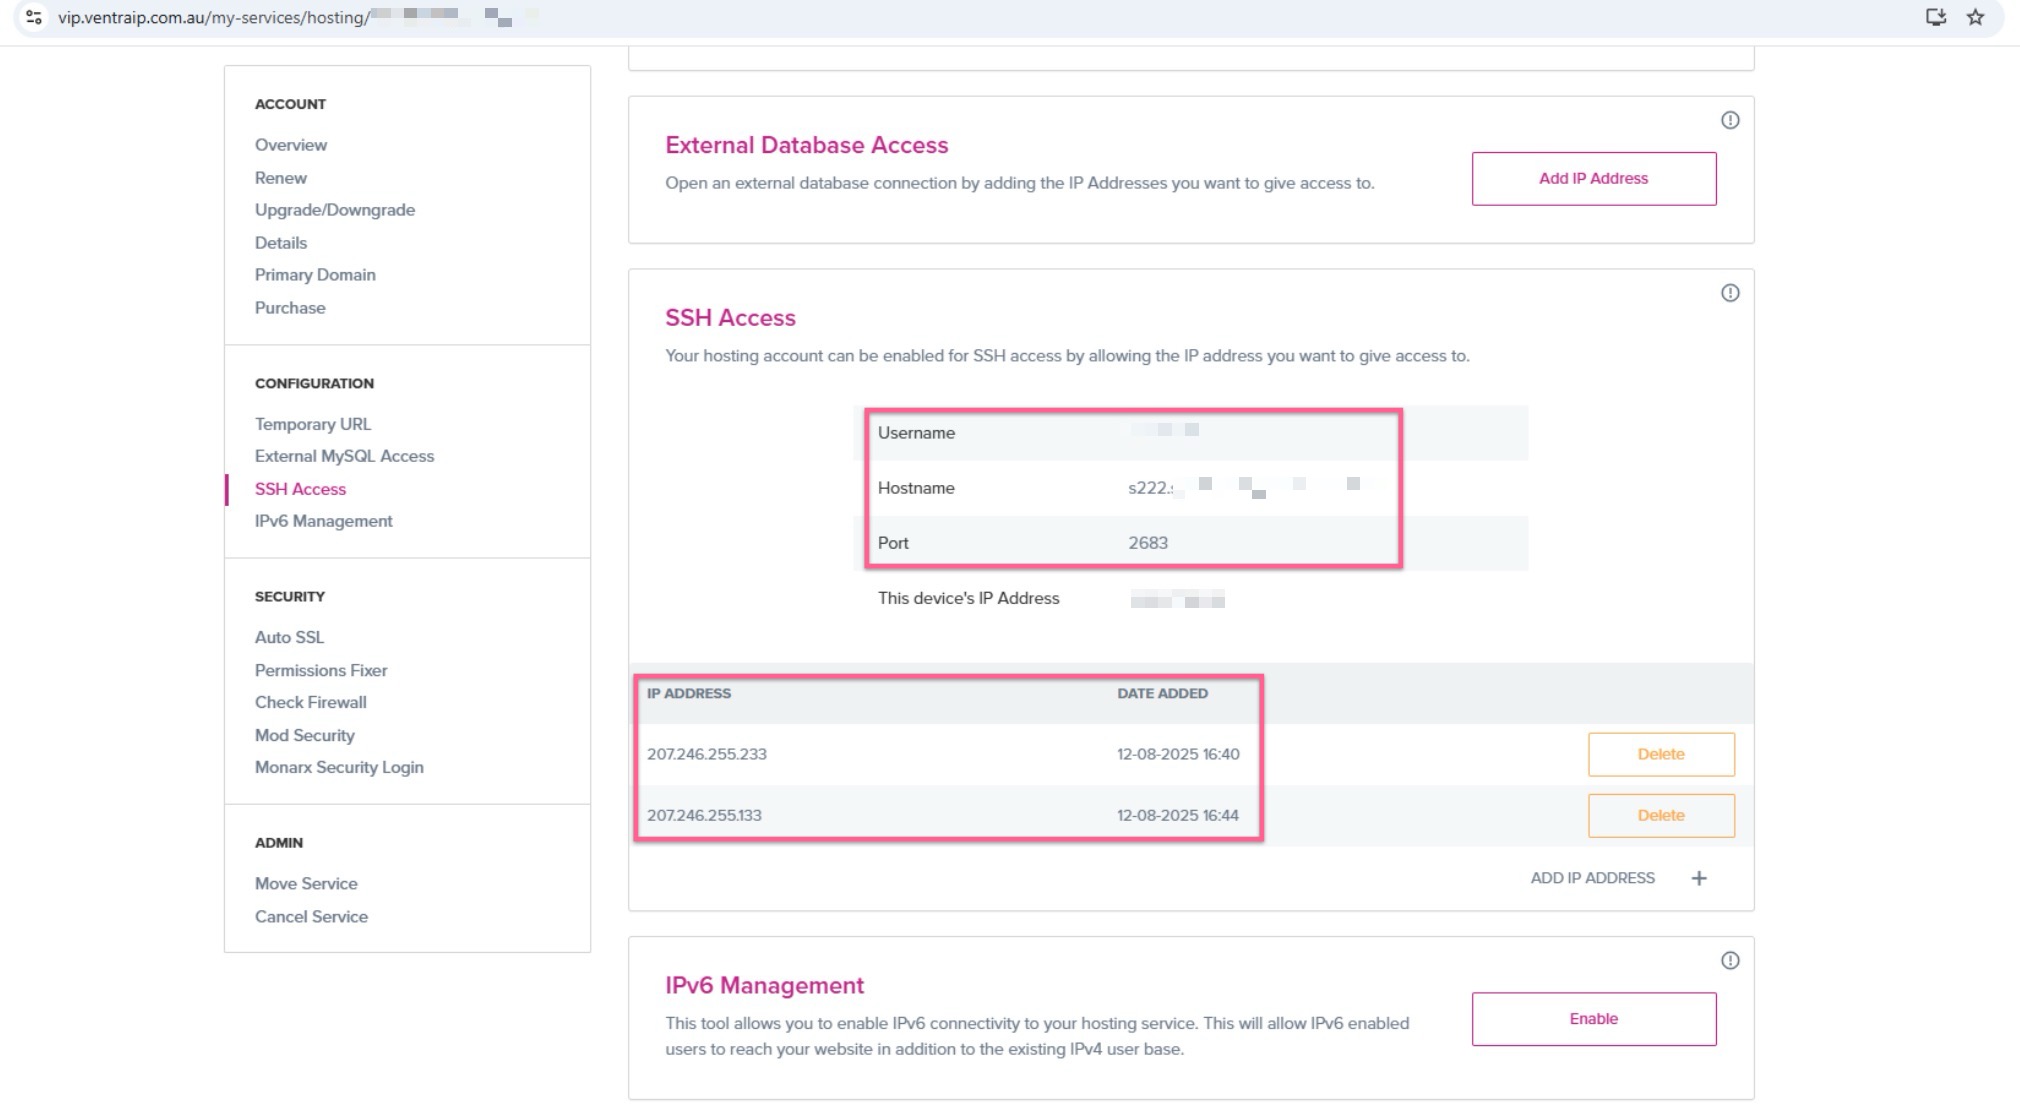
VentraIP #
- Ensure SSH/SFTP Access is enabled by following VentraIP’s guide: Enabling SSH and SFTP access on a hosting service.
- Set the connection port to 2683 (instead of the default 22).
- Use the provided Hostname by VentraIP.
- In your hosting control panel, look for your server hostname (e.g.,
s222…) and use this in the NextGen connection settings.
- In your hosting control panel, look for your server hostname (e.g.,
- Whitelist Solid Backups — NextGen IPs
- Add NextGen’s IP addresses listed here to your hosting firewall/allowlist.
- Check ModSecurity Rules (Advanced)
- If ModSecurity is blocking connections, rules can be whitelisted through the VentraIP control panel or via
.htaccess. See Troubleshooting with ModSecurity for details. - Some customers have reported ModSecurity rule 225170 blocking Solid Central requests.
- If ModSecurity is blocking connections, rules can be whitelisted through the VentraIP control panel or via
- Test the Connection
- After applying these changes and adding your server credentials in the NextGen connection settings, test the backup connection to confirm it’s working
Amazon / AWS #
Coming soon
HostGator #
Coming Soon
Hosts that Use cPanel #
To connect Solid Backups — NextGen to hosts that use cPanel (including a self-managed VPS running WHM and cPanel), there are a few configuration requirements:
- SSH access must be enabled
- WP-CLI must be installed & available in the cPanel account(s) hosting the site(s) you plan to back up.
- If ConfigServer Security & Firewall (or other server-based firewall or abuse detection system) is running in WHM, the Solid Backups — NextGen IP addresses must be added to the allowlist
Enable SSH Access #
By default, SSH access is disabled in cPanel.
If you have access to WHM
- Navigate to Account Functions -> Manage Shell Access
- Set “Normal Shell” for each cPanel account that hosts a site you plan to back up
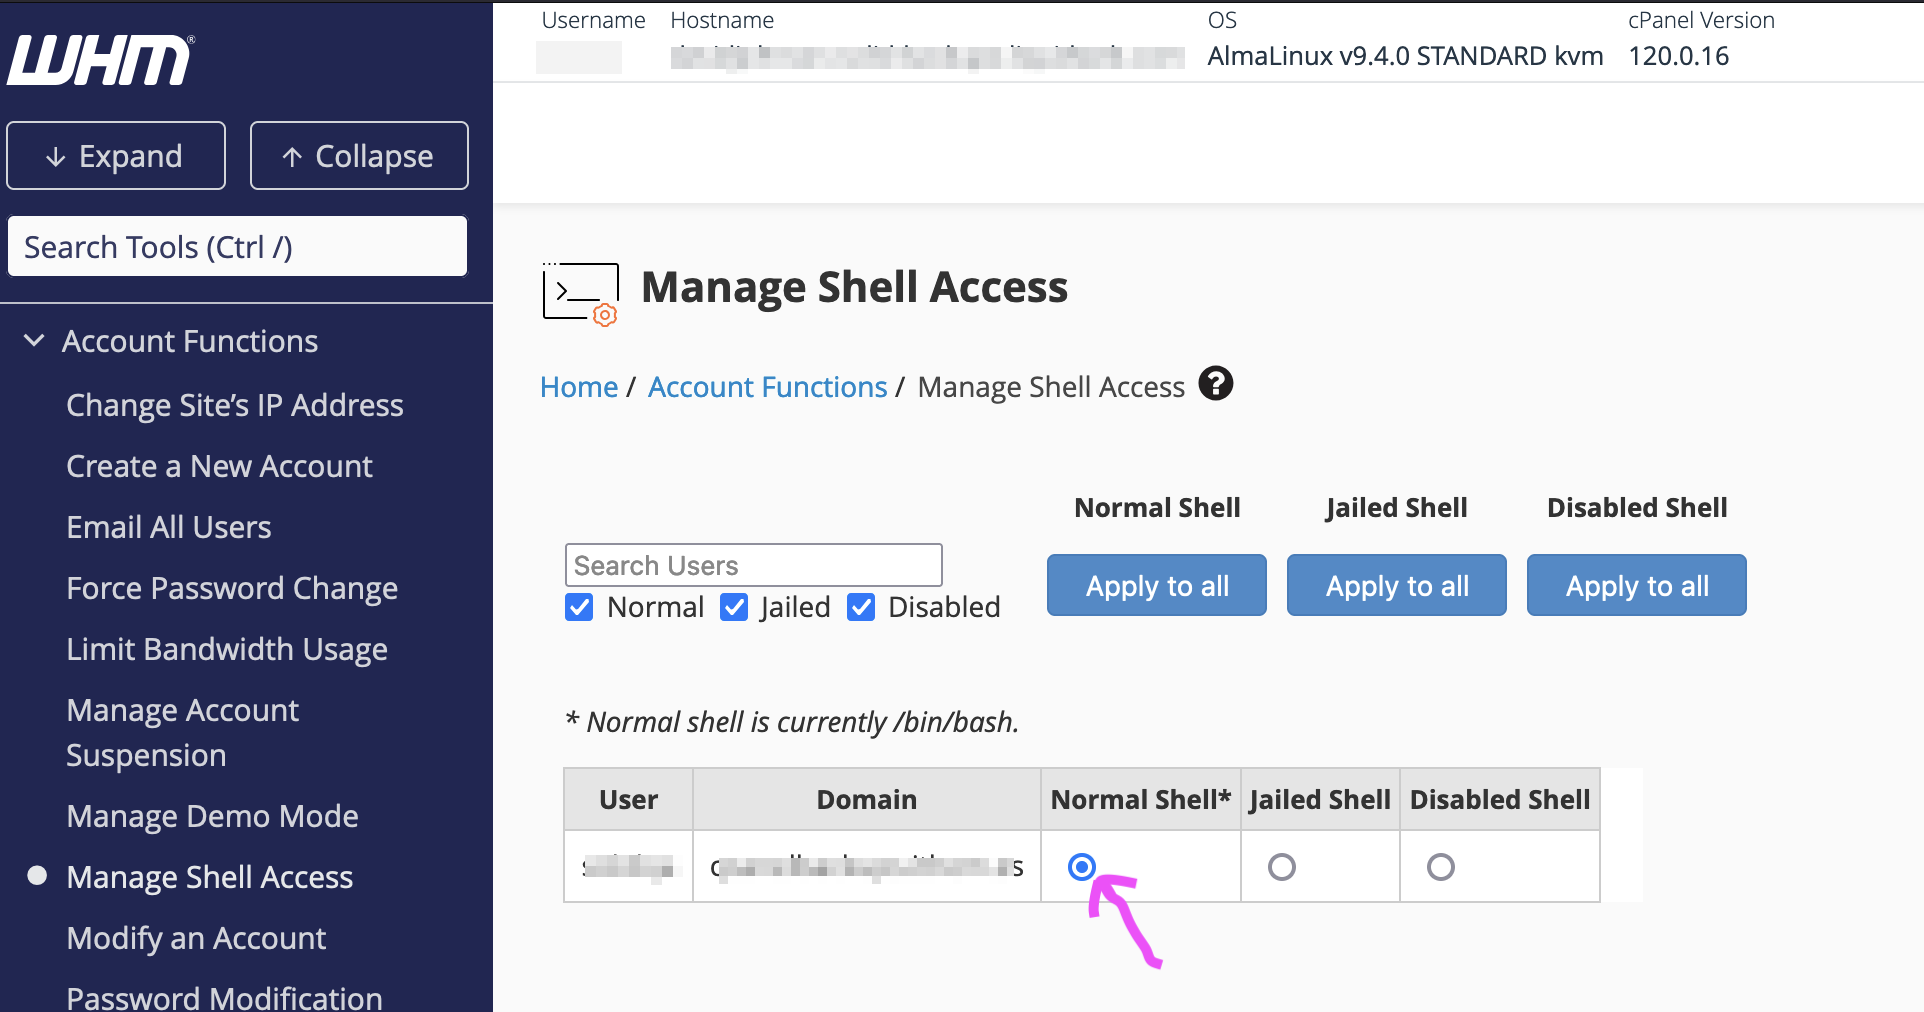 For more details see https://docs.cpanel.net/whm/account-functions/manage-shell-access/
 - Recommended: Disable Password Authentication at Security Center ? SSH Password Authorization Tweak.
Warning: this will block all password-based SSH access for WHM and all cPanel accounts. SSH keys must be configured for WHM and each cPanel account you wish to access via SSH. For more information, see https://docs.cpanel.net/whm/security-center/ssh-password-authorization-tweak/) - Add SSH keys for root access to WHM and as needed for each cPanel account you wish to access via SSH (see below).
If you do not have access to WHM #
Some notes related to specific hosts are below. You may need to check with your hosting provider to determine how to enable SSH for your cPanel account.
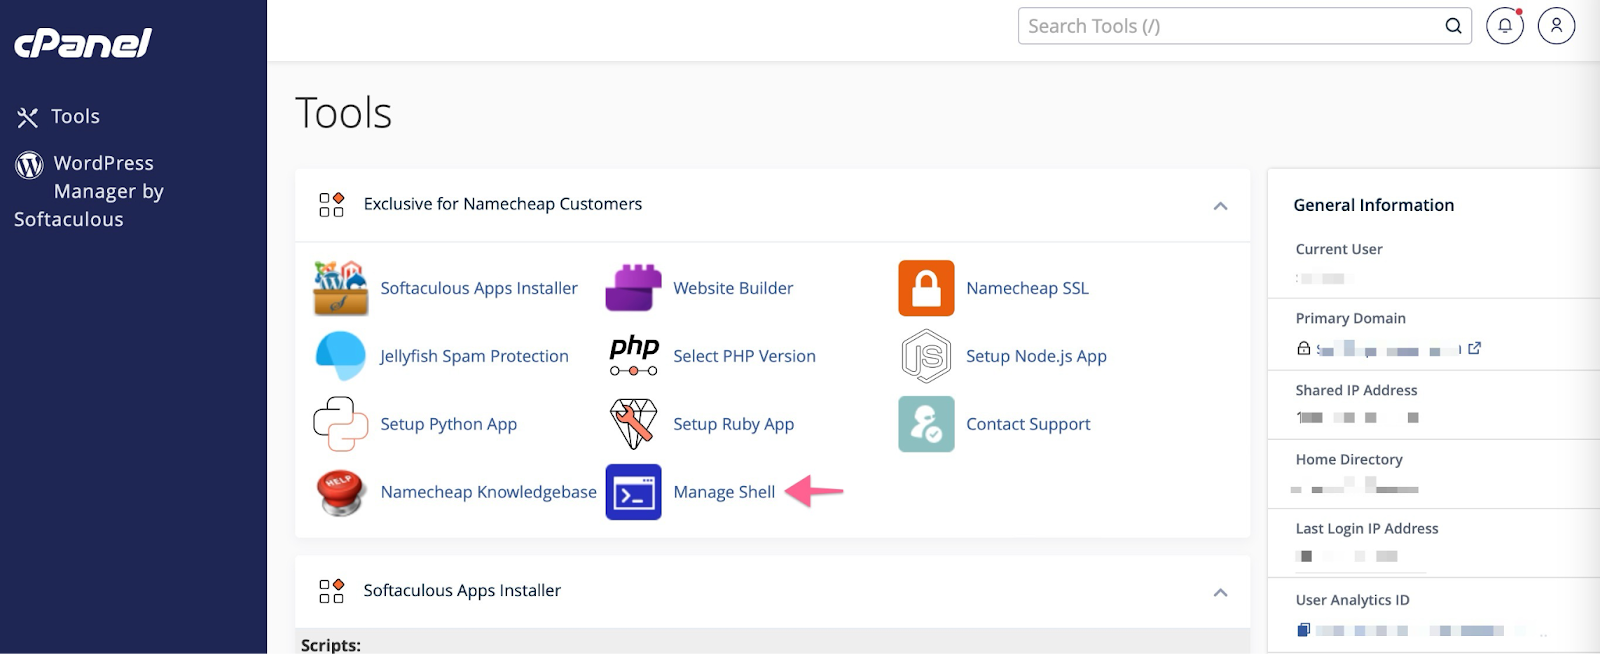
- Namecheap: Go to Manage Shell and then click Enable SSH access
- For Mochahost hosting: the Mochahost technical support team can enable SSH support for you.
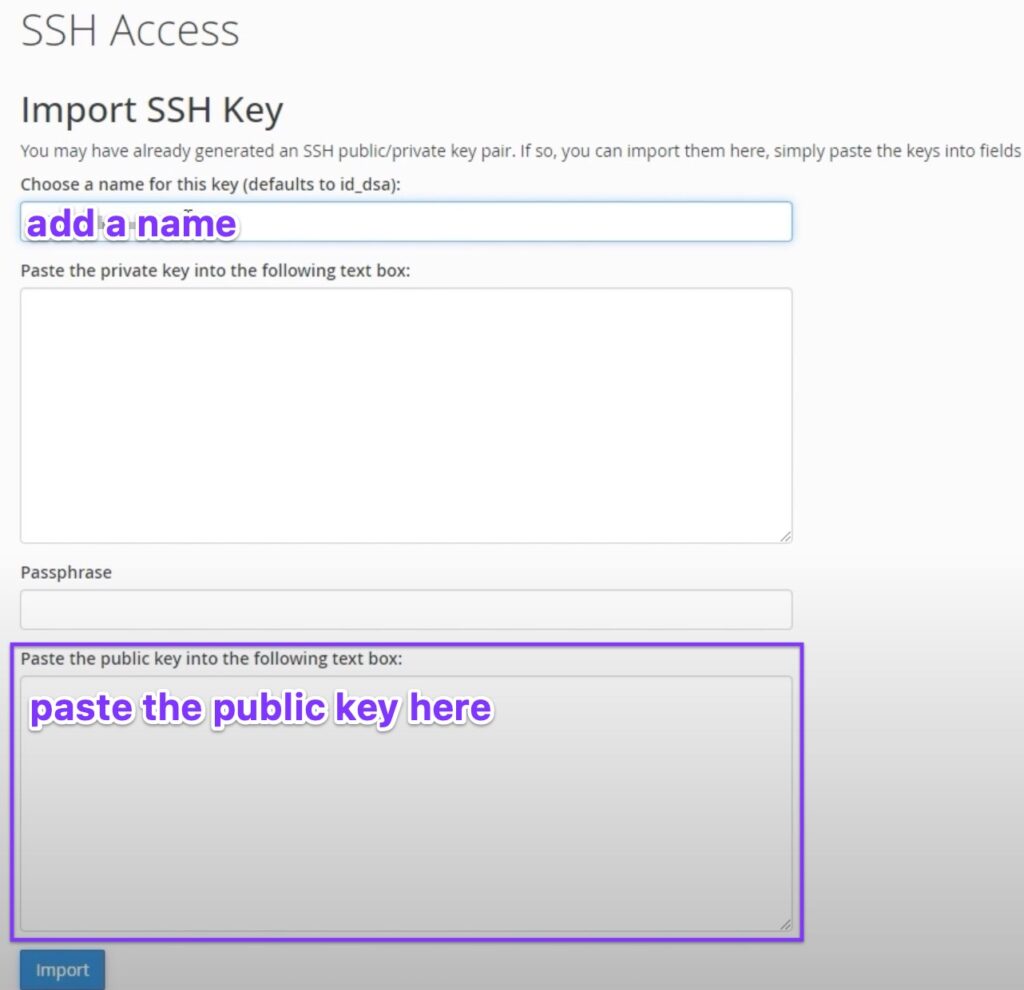
How to Add and Authorize SSH Keys in cPanel #
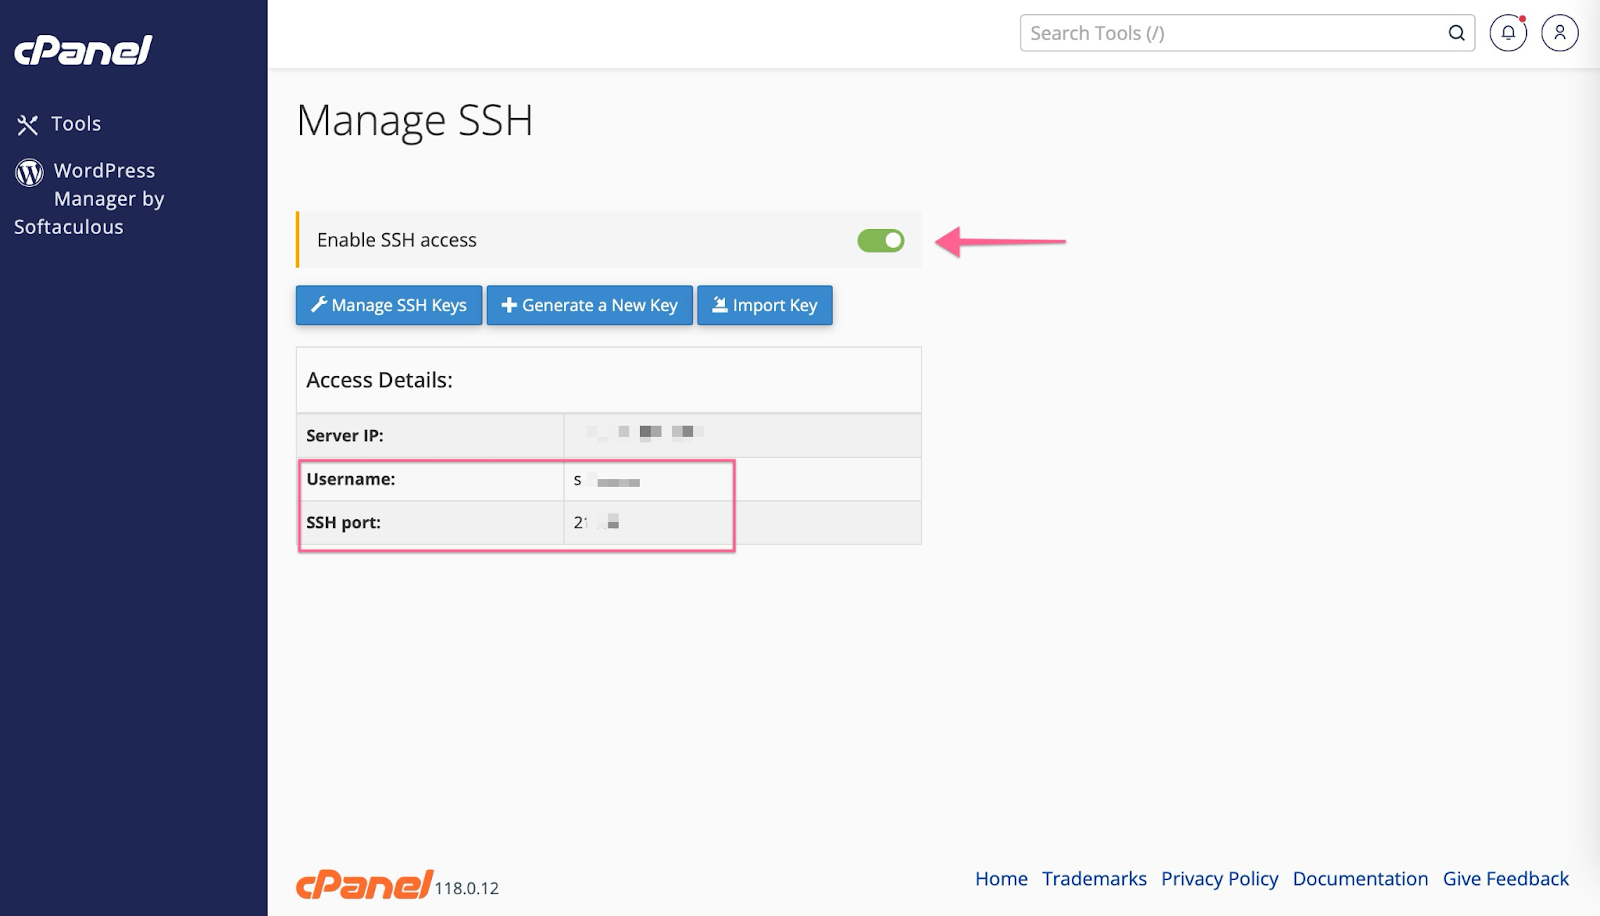
- Search for SSH from the cPanel home page. You should see a screen similar to this:
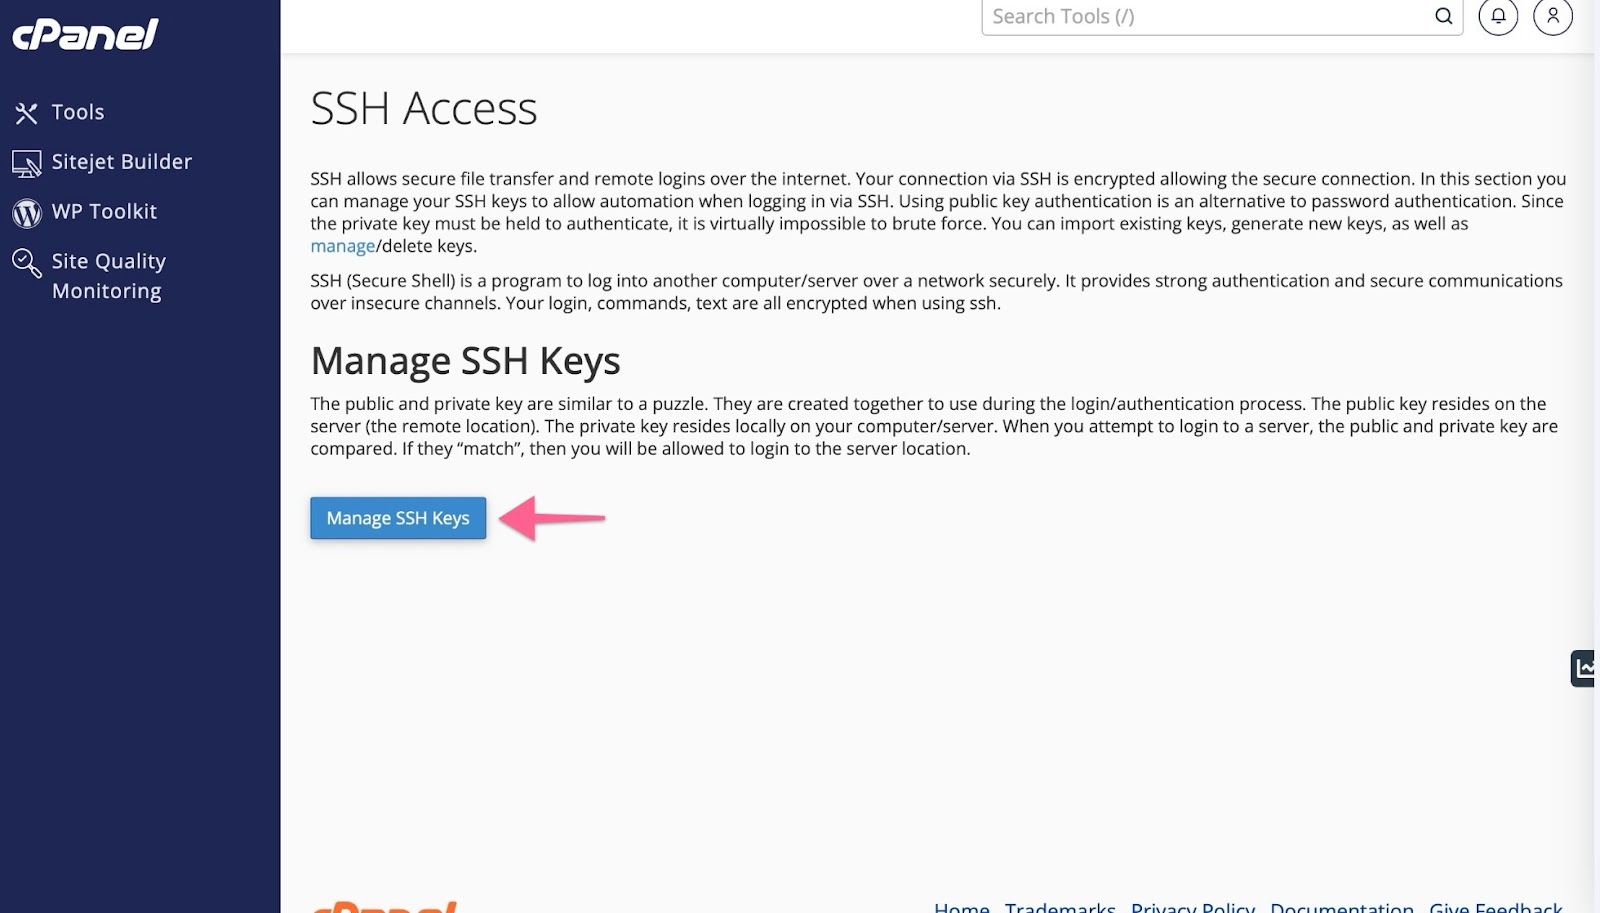
- Click the Import Key button to add the public key that Solid Backups — NextGen provides to you. (Note that Solid Backups — NextGen will provide a unique public key for each site that you enroll.)
- Enter a descriptive name for the key
- Leave the “Private Key” box empty
- Paste the public key provided by Solid Backups — NextGen into the “Public Key” box.
- Save the key
- From the “Manage SSH Keys” screen, locate the new key in the list and click “Manage” as shown here:
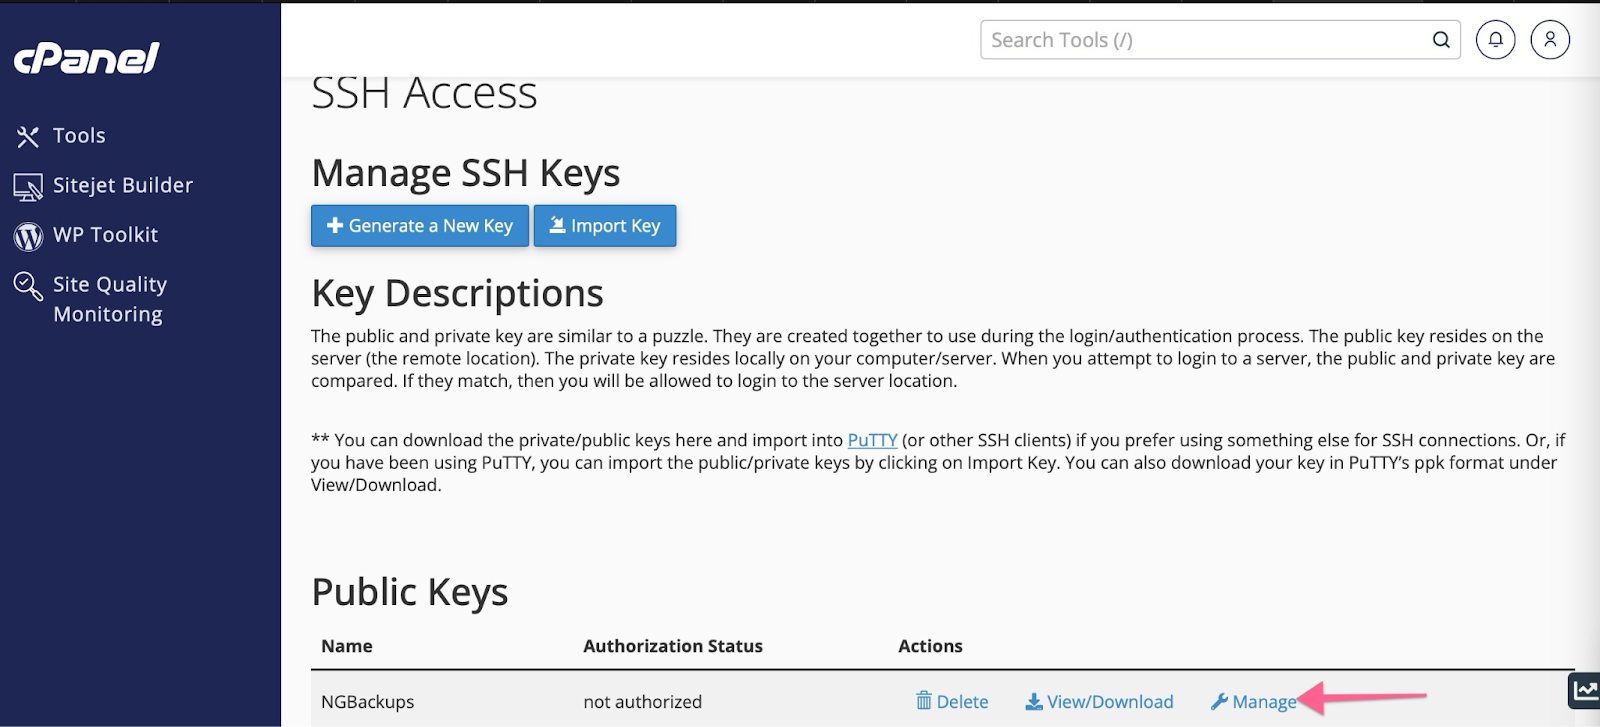
- Click “Authorize Key”
Install WP-CLI #
WP-CLI must be installed on your hosting server for Solid Backups — NextGen to function. Follow the instructions in this article to install it in WHM (at the root level) for all cPanel accounts OR to install it in an individual cPanel account.
Add the Solid Backups — NextGen IP addresses to the server’s allowlist #
If ConfigServer Security & Firewall is running in WHM:
- Navigate to Plugins ? ConfigServer Security & Firewall
- Scroll to the “csf – Quick Actions” section.

- Enter this IP into the “Allow IP address” box next to “Quick Allow”:
207.246.255.233 - (optionally) add a comment for future reference
- Click the “Quick Allow” button to add the rule.
- Repeat Steps 3-5 using this IP:
207.246.255.133
If firewall rules are managed in a different way on the server:
Add these IPs to your server’s allowlist:
207.246.255.233207.246.255.133
Other Hosts #
Review our current list of Solid Backups — NextGen Verified Hosts.
