Releasing a lockout in Solid Security can be done in several ways, depending on your level of access to the site and hosting environment.
This guide covers the different methods available — from using the WordPress dashboard, to making file changes, to running server commands — so you can choose the best option for your situation.
Each method is designed to help you quickly regain access while keeping your site’s security protections in mind.
Understanding Site Lockouts #
Solid Security locks out users who attempt to log in and fail after a certain number of attempts, by issuing a Site Lockout. It uses the IP address where the failed attempts occurred and the username to prevent the user from attempting again.
When suspicious login attempts or banned actions are detected, Solid Security will temporarily block the IP address, username, or user agent.
- Default lockout time: 15 minutes for most lockouts.
- Multiple offenses: Repeated lockouts for the same IP can result in a Ban, which stays until you manually remove it.
Site Lockouts are designed to protect your site from unauthorized access, but sometimes even legitimate users can get locked out by mistake. Don’t worry: lockouts are temporary and fully reversible, and there are simple ways to get back in fast.
Note: If you are getting a high volume of email notifications about users being correctly locked out, you can disable the notification and rest easy that Solid Security is working. It is a very common thing for WordPress sites of any size to be targeted by scripts trying to use compromised passwords. That can create an overwhelming number of notifications. As long as you are using 2-Factor Authentication and strong passwords, you can treat the notification as reassurance that your system is working. Nothing to worry about.
Releasing Site Lockouts #
There are multiple ways of releasing lockouts, depending on whether your admin user or another user has been locked out and which one you should choose. If you still have access to your WordPress admin dashboard, you can release lockouts using the Security Dashboard Active Lockouts Card. Otherwise, you’ll need to manually release the lockout, which can take time and technical know-how.
Wait it out #
Most lockouts automatically expire after 15 minutes. Simply wait and try again.
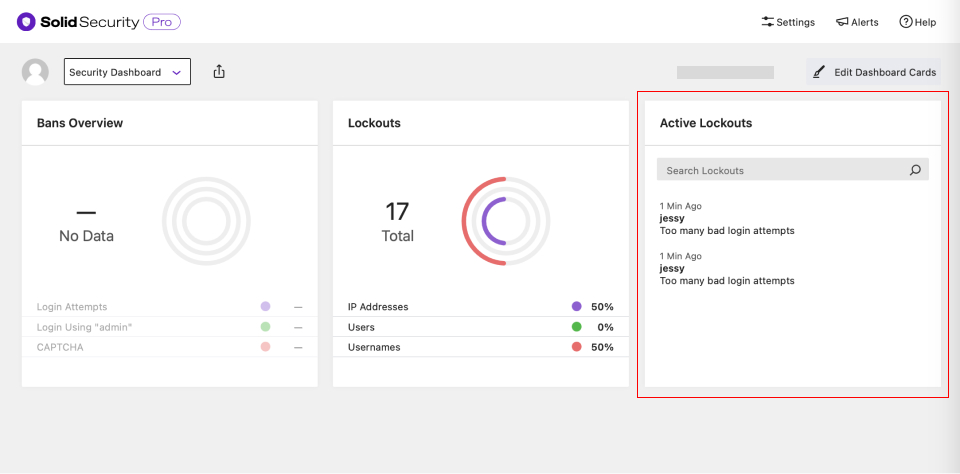
Releasing Lockouts From the Security Dashboard. #
Navigate to Solid Security -> Dashboard. Go to your Active Lockouts card, choose the user you wish to unlock, and click the “Release Lockout” button.

Releasing lockouts using phpMyAdmin #
If you can’t log into your site, you can still release lockouts by understanding how they are saved in your database and using phpMyAdmin or some other database management tool to release the lockout. This procedure is not for novices; you always need a site backup before attempting to modify your site’s database.
Those disclaimers out of the way, to release a lockout using phpMyAdmin, follow these steps:
Log in to your hosting cPanel and open phpMyAdmin to open your site’s database.

Locate the correct database for the site where the lockout occurred. Find the table xxxxxx_itsec_lockouts (where xxxxxx is your table prefix).

In this table, look for your IP address. If your IP is included in the table, delete the record with your IP address. Not sure about your IP address?


After deleting the record, check if you can reaccess your site.
Bonus Method: Releasing Lockouts from Solid Central #
Using Solid Central, you can release lockouts by logging into your Solid Central account and clicking on Domain Name -> Security -> Lockouts.

Releasing Lockouts via WP-CLI #
If you have command-line access to your server, another efficient way to release a lockout is to use WP-CLI, the WordPress command-line tool.
To release all lockouts associated with a specific IP address, you can run the following command:
wp itsec lockout release $(wp itsec lockout list --search=123.123.123.123 --field=id)Replace 123.123.123.123 with the IP address you want to release.
How This Command Works #
wp itsec lockout list --search=123.123.123.123 --field=id:
Finds all lockouts related to the specified IP address and returns their IDs.wp itsec lockout release $(...):
Uses the returned IDs to release the associated lockouts.
This method is handy when:
- You are locked out yourself, but still have SSH or terminal access.
- You are assisting a client or another user who has been locked out.
Important Notes #
- WP-CLI must be installed on your server to use this method.
- This command only releases lockouts for the IP address you specify. It does not affect other users or system settings.
If you are new to WP-CLI, consider reviewing your hosting provider’s documentation or the WP-CLI official website for installation and usage guidance.
Regaining Access by Disabling Solid Security Modules #
In rare cases where standard lockout release methods are unavailable or unsuccessful, it’s possible to regain access to your site by temporarily disabling all Solid Security modules through the wp-config.php file.
Adding the following line to your wp-config.php file will disable all Solid Security modules immediately:
define('ITSEC_DISABLE_MODULES', true);This disables Solid Security’s protections at a code level, allowing you to log back into your WordPress admin without interference from active security settings or lockouts.
When to Use This Method #
- If you are completely locked out of your site and cannot use the Solid Central dashboard or other standard release methods.
- If the site is experiencing a configuration issue caused by a Solid Security setting that prevents standard login.
This should be considered a temporary recovery step. Once you regain access, removing this line from your
file will reenable Solid Security modules and maintain your site’s protection.
Important Considerations #
- Disabling modules reduces your site’s security protections until you restore them.
- Make sure to re-enable Solid Security by removing the line as soon as you complete troubleshooting or unlock your account.
- If you are unfamiliar with editing the
wp-config.phpfile, be cautious: incorrect edits can make your site inaccessible.
For detailed instructions on how to safely edit the wp-config.php file, refer to the guide here: Editing and Handling wp-config.php
Avoiding Future Lockouts #
1. Enable Magic Links #
Navigate to Security -> Settings -> Features -> Firewall -> Magic Links and enable Magic Links. If you’re locked out, enter your email address, and you’ll receive an email with a login link that automatically releases/bypasses the lockout.
2. Add Your IP to The Authorized Hosts List #
The latest version of Solid Security allows you to authorize your IP temporarily.
From the Solid Security Dashboard, visit the Global Settings page from the Configure menu item. Click the Add my current IP to the authorized hosts list button to prevent locking out your IP address for the next 24 hours. It will still notify you of the situation, but it will not lock you out of your site, allowing you a chance to fix the issue.
Please note that if your IP address changes at any time during the period (such as when you switch locations), you could still inadvertently lock yourself out.

3. Configure Lockout Settings #
Navigate to Security -> Settings -> Global Settings and set sensible lockout time limits.
4. Enable Firewall features #
Use Two-Factor Authentication, CAPTCHA, and Strong Passwords to reduce brute force login attempts.
5. Check Logs #
Monitor the logs in Security -> Logs to see what triggered the lockout.
What is the difference between a Site Lockout and a Banned IP Address? #
A Site Lockout is a temporary block enforced by Solid Security when a user or IP address triggers one of your security rules (such as multiple invalid login attempts).
- A lockout typically lasts 15 minutes by default, after which the user can try again.
- During that time, the IP or username will appear in the Active Lockouts section of your Security > Firewall page and the Active Lockouts card of your Security Dashboard.
A Banned IP on the other hand is a permanent block.
- An IP can be banned automatically after reaching the maximum lockout threshold (3 lockouts in a row by default) or if you manually add it to the Banned IPs card in your Security Dashboard .
- Once banned, that IP will remain blocked until you manually remove it.
