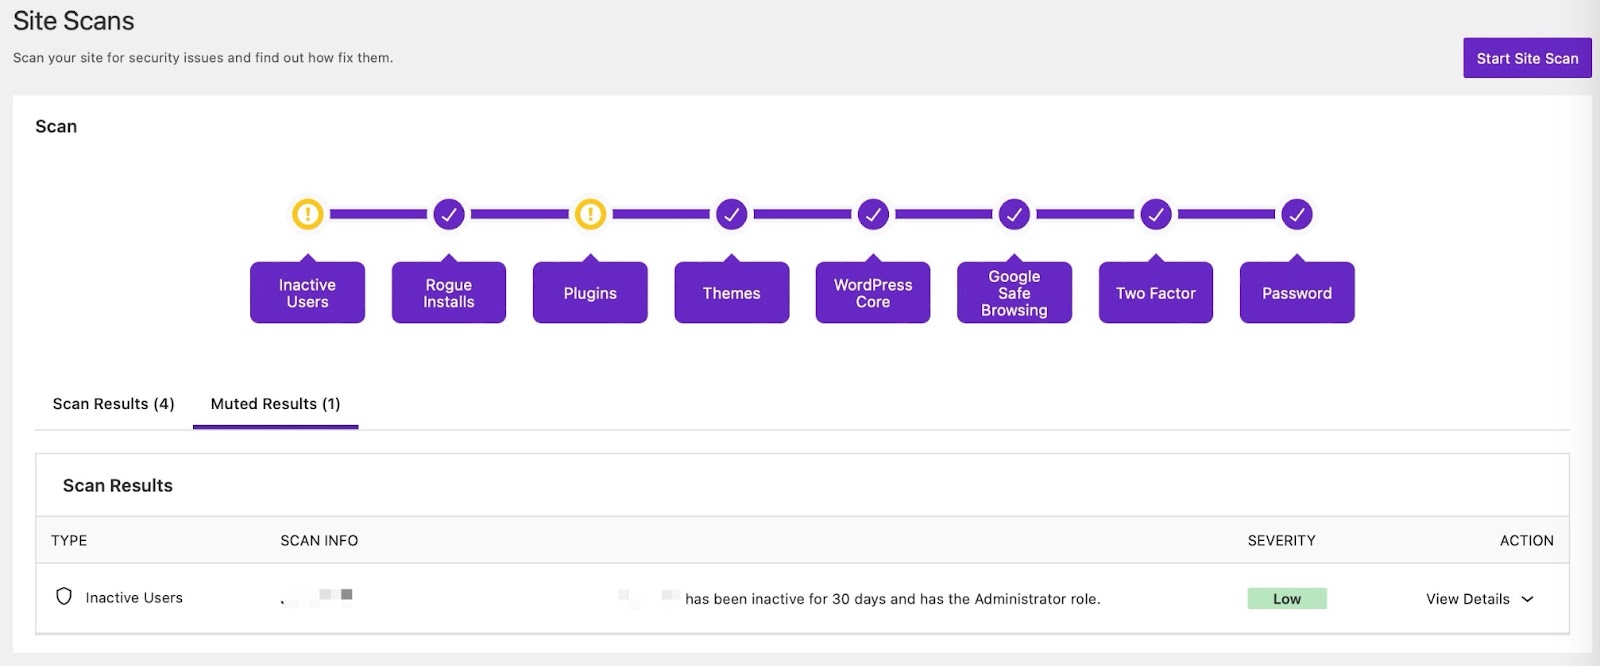
The Site Scans page is where you can run a manual Site Scans and review the results.

Solid Security’s Site Scanner scans your site for security issues found in these areas:
- Vulnerable Plugins
- Vulnerable Themes
- WordPress Core Vulnerabilities
- Two-Factor
- Password
- Inactive Users
- Rogue Installs
- Checks if Google Safe Browsing has flagged your site as containing malware (Site Blacklist Status)
To run a manual Site Scan, go to the Security Site Scans page and select the “Start Site Scan“ button:

To view the results of previous Site Scans, visit the Security Logs page.
What to do when the Site Scan finds an issue #
Some issues surfaced by a site scan are false positives, or known risks that you may be intentionally taking. So the first action point when the Site Scan feature of Solid Security finds an issue is to take a deep breath: not all issues are worth immediate action.
Select the “View Details” dropdown to gather additional details and the recommended actions you can take. You’ll also have the option to mute a security issue.
Here’s a brief rundown of the various checks and steps taken during a Site Scan, and what you can do to resolve issues that arise during that step.
Inactive Users #
The Inactive users check lists all site users that have been inactive for more than 30 days.
What to do: Review the identified inactive users and demote or remove them from the site.
Rogue Installs #
The Rogue Installs check identifies “Rogue Installs” or old WordPress files/installations that are no longer in use and are on the same server. It’s uncommon for multiple copies of WordPress to be installed in the same root directory or nested into another directory within your WordPress site’s files, and this check detects those rogue installations.
What to do: Check the identified old sites, and if the site is still being used, update the installed WordPress version, plugins, and themes. You may also opt to delete or remove the rogue install, via your web host’s file manager.
Plugins/Themes #
The Plugins/Themes check lists all outdated and vulnerable plugins, themes, or WordPress core, along with the severity. In the case of vulnerable plugins/themes, the severity column will display a Patchstack Priority vulnerability score that represents the real-world risk the vulnerability poses to your site, helping to inform your decision making.
What to do: The most important thing is to look for an update. Most known vulnerabilities have updates available, and simply updating to the latest version will resolve the issue.
If no update is available, you have some tradeoffs to weigh: first, check whether the plugin/theme is actively supported. For plugins or themes hosted on the official WordPress Plugin or Theme Directory, you can see the last time it was updated. For other plugins, you may need to contact the developer. For non-major vulnerabilities, you may opt to leave the plugin/theme active, and for more major ones you might consider an alternative option.
If you’re using Solid Security Pro, you’ll have access to Patchstack Virtual Patching, which is a feature that can be enabled in Settings > Features.
In many cases, virtual patches will be available to mitigate the vulnerabilities that have been identified. In the event a virtual patch is available for a particular vulnerability, Solid Security Pro will automatically apply the virtual patch if the feature is enabled, protecting your site until the plugin/theme vendor releases an update to resolve the issue.
The SolidWP support team is more than willing to weigh in on specific vulnerabilities if you need additional insight beyond what the Patchstack Priority score offers, so you can definitely reach out for clarification!
Also, if you are aware of the issue or in some other way want to no longer be notified of it, you can mute the issue.
WordPress Core #
The WordPress Core check looks for known WordPress Core vulnerabilities.
What to do: Ensure that your installed WordPress Core is up-to-date.
Google Safe Browsing #
The Google Safe Browsing step checks whether your site has landed on Google’s Safe Browsing Blocklist.
What to do: Follow these five key steps if your site is flagged as “deceptive” by Google’s Safe Browsing service:
- Scan your site for vulnerabilities and malware.
- Update or remove vulnerable themes and plugins.
- Find and remove any malware from your site.
- Submit a request to Google to have the warning flag removed. (To do this, navigate to the Google Search Console, go to Security & Manual Actions >> Security issues, and select the button that says “Request Review.”)
- Confirm you are no longer on Google’s Blocklist.
Two-Factor #
The Two-factor audit lists all site users that have administrator-like capabilities but do not have Two-Factor enabled.
What to do: Send the user a Two-Factor Authentication Reminder email notification.
Password #
The Password check lists all site users that have administrator-like capabilities but are using insecure passwords. Note that your passwords are not stored anywhere, so this check only finds insecure passwords that were made after that Solid Security feature was enabled, so there may be false positives or inconclusive results if you’ve only recently installed Solid Security and have not forced a password change.
What to do: Enable the Strong Password in the User Groups settings to require users to set up a strong password.
How to activate automatic Site Scans? #
To activate automatic scanning, navigate to Security -> Settings -> Features -> Site Check, and the toggle ON the Site Scan Scheduling module.
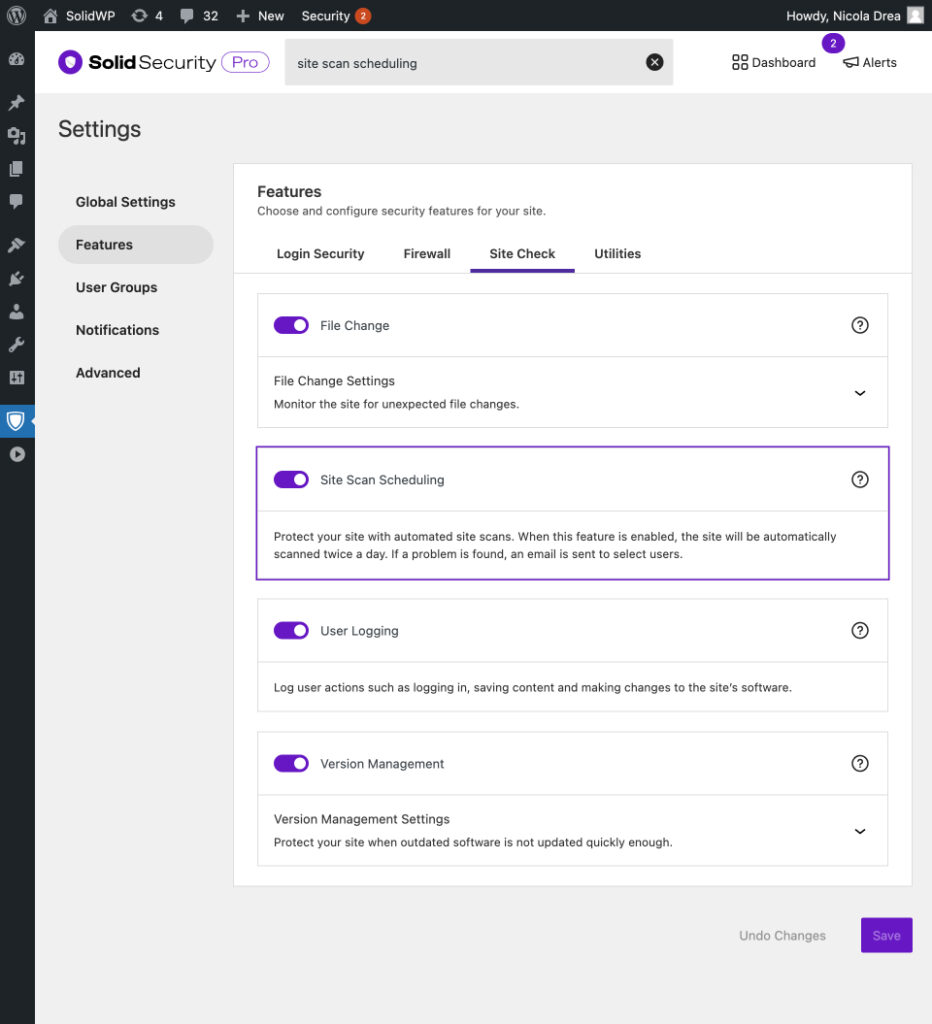
The automatic site scans run four times per day in Solid Security, and every hour for Solid Security Pro, and will send you the “Site Scan Results” email notification if it picks up a new vulnerability that meets the defined priority threshold, and was not identified in the previous scan. This notification can be managed via the Notifications settings.
Muting a Site Scan issue #
Whether you’re still waiting for a vulnerable software update or have confirmed that the Site Scan result is not an issue, Solid Security gives you the ability to mute it so that you stop receiving notifications about a specific vulnerability/issue.
To mute a Site Scan result, open the “View Details” dropdown below the Action column and select the Mute Issue button.
All the muted issues will not show on the proceeding Site Scan “Scan Results” tab but instead under the “Muted Results” tab. From there, you’ll have the option to unmute the issue.
Does the Site Scan have an IP address I can whitelist? #
Yes! In some cases, your host could block the Solid Security Scanner IP. If this happens, you will need to have it whitelisted: 207.246.255.60
Common Site Scan errors #
Whenever Solid Security runs a Site Scan, a log for that activity is recorded on the Security Logs page. Viewing the log’s “Raw Details” provides in-depth information about the scan.
In some cases, the scans may run into an error, which you’ll be notified of. Looking at the raw details is one of the best ways to troubleshoot these issues.
Here are some common errors that may occur during a scan:
cURL error 28 #
When you see the `cURL error 28: Operation timed out after x milliseconds`
on your logs, this indicates that the scan hit a timeout due to an issue with the server or other conditions.
This error is server-related and might be temporary, but if it keeps showing up, it’s best to look at the server logs for clues on why the timeout occurred. Some of the areas you can check with your host are:
- Issues with WP Cron
- Check if loopback is disabled
- Server firewall or ModSecurity rule blocking the outgoing cURL requests
Exceeded rate limit #
Getting a rate limit error implies that the scan ran too many times in a row. The logs would include this message: “Exceeded rate limit. Please wait x seconds.” and waiting for the cooldown time should resolve it.
However if you keep getting rate limited, it’s most likely due to a combination of this set up:
- Running the Basic version of Solid Security
- Shared hosting
Solid Security Basic has a 10-minute rate limit that is tied to the server’s IP address and when you install the plugin on your sites that’s on a shared hosting set up, these sites will appear as a “single” site to Solid Security, which makes it think all those scans were coming from the same site thus it triggers the rate limit.
To resolve, it’s recommended to either increase server resources, modify the site scans cron jobs and stagger them (with the help of your host), or consider upgrading to the Pro version.
Invalid response or Invalid JSON #
This means a NON-JSON response was encountered during the scan. Some tips to resolve this:
- Ensure that your server allows the required REST HTTP methods: GET, POST, PUT, PATCH, DELETE, and OPTIONS.
- Ensure that you’re not blocking the scanner’s IP address: 207.246.255.60 from your server firewall, security plugin, or CDN firewall.
Getting the site_verification_failed.invalid_json error code can also be related to an issue with the licensing, so double-check your plugin’s license and try to reinforce it.
Cloudflare 524 Timeout Error #
In some cases, the “Invalid JSON” or “Temporary Server Error” messages in Site Scan logs may appear with additional details showing a Cloudflare 524 timeout response, such as:
invalid_json => Invalid JSON.
itsec-temporary-server-error => Site Scanning is temporarily unavailable, please try again later.
error_data => <!DOCTYPE html> ... <title>itsec-site-scanner.ithemes.com | 524: A timeout occurred</title>
This indicates that the Solid Security Site Scanner successfully connected to the site but the server took too long to respond, causing Cloudflare to terminate the connection.
How to resolve:
- Check the server logs for possible performance issues or processes causing the delays.
- Review Cloudflare’s guide on Error 524: A Timeout Occurred
403 Connection error #
There are different cases where this error code pops up on the logs and usually, it tells you what areas to check to resolve it. site_verification_failed.connection_error
For instance, the below indicates that the scanner’s IP is being blocked preventing the scan to run successfully:
Unable to determine if the scan target is allowed: Target site returned invalid response. The site scanner was forbidden from accessing your site. Please check if the IP address 207.246.255.60 has been blocked.
The below indicates that something is disabling the REST API on your site:
Unable to determine if the scan target is allowed: Target site returned invalid response. Do you have a plugin that disables access to the REST API? For instance, Coming Soon Page, W3 Total Cache, Password Protected, Members, Profile Builder, Disable Login, Clearfy, Disable REST API, REST API Toolbox, Defender Security, Shield Security, or Force Login? Try turning off that feature and using “Restricted REST API Access” in Solid Security instead.
Could not verify keypair: Token not found. #
This means that when Solid Security tried to verify the keypair, the server timed out.
Keypair verification should only occur when the plugin isn’t licensed, so if you’re using the Pro version and it’s licensed but you’re getting this error, most times it’s due to an old WP instance still up somewhere that’s running an unlicensed version of Solid Security.
Double check with your host (including previous hosts if you’ve migrated the site to a different server) and make sure the site is disabled/deleted properly and/or Solid Security is disabled.
Pro tip: Clear the transients on your live site as part of troubleshooting to make sure old data of the keypair data aren’t being picked up by the scans.
Not Found #
When you see these kind of information on your scheduled site scans:
Error Message: Not FoundError Code: not_foundError Message: Internal Server ErrorError Code: internal_server_error
It can mean that the Solid Security server may be having a temporary downtime. In this case, contact the SolidWP support team to notify or check the status.
Missing scan URL #
If you see the “Missing scan URL” or site_verification_failed.missing_url error, it means the Site Scanner could not verify your website’s URL most likely due to a malformed Authorization header, which prevents Solid Security from making a proper request.
Common causes of the site’s Authorization header being malformed are: a plugin (security, caching, or optimization) that can modify/block the header or the server’s outgoing HTTP proxy interfering with the scan. In some cases, an incorrect or missing scan URL in Solid Security’s settings can also lead to this error.
First, ensure that the “Licensed URL” is correct in your WP Admin -> Settings -> SolidWP Licensing page. If the issue persists, try disabling any security, caching, and optimization plugins one at a time and then manually running a scan to see if the error resolves.
If the problem is not related to a plugin, check with your hosting provider for possible restrictions on the Authorization header or blocking/filtering outgoing HTTP requests.
If your site uses a proxy service such like Cloudflare, review its settings to ensure they are not interfering with the scan request. You can also check your server logs (such as /wp-content/debug.log) for additional clues on what might be causing the error.
If none of these helped, reach out to the SolidWP support team with details on your site setup and the steps you’ve taken.
Invalid Signature #
This is usually due to having incorrect or corrupted licensing details. To resolve this, double-check the plugin’s license credentials and “Licensed URL” field.
You can also try to remove the existing license and add it back: How to Make sure your site is licensed correctly
Your site’s SSL certificate is invalid #
This error means that the scanner cannot validate the SSL certificate on your site, even if it appears fine in modern browsers. In Raw Details you might see:
Error Code: site_verification_failed.connection_error Error Message: “Unable to determine if the scan target is allowed: Target site returned invalid response. Your site’s SSL certificate is invalid.”
Some tips to resolve this:
- Double-check that your SSL certificate is valid, not expired, and installed correctly.
- Ensure that TLS 1.2 alongside TLS 1.3 is enabled on your server and any mapped subdomains.
- If using Cloudflare, follow this guide to enable TLS 1.2 support: Minimum TLS Version (see Zone-level).
- Verify there are no SSL chain or hostname mismatch issues (you can use tools like SSL Labs or SSL Shopper to confirm).
